Best ways of how to recover deleted and lost data from Samsung Galaxy S7/S8/S9/S10/S20/S21, no matter with or without backup.
Do you feel helpless or even mad about the data that is deleted by mistake or lost for unknown reasons on your Samsung Galaxy S series phone. Don't worry, this article will teach you how to recover the lost and deleted data in different helpful methods. Please pay attention and read the following details.
Samsung Galaxy S7 is equipped with a high-speed memory card, which has a memory capacity of 820 megabytes, and is equipped with a high-speed memory card, which has a memory of 880 megabytes. Samsung Galaxy S8 adopts the classic double-sided glass and metal middle frame design. The connection between the front and back curved glass and the metal middle frame is in place. The handle is very good. The screen proportion changes, which can reduce the black edge of the mobile phone to watch movies. The visual effect is better, and the operation experience of multitasking on the same screen is also better. Samsung Galaxy S9 rear dual 12 megapixel camera, supporting optical anti shake, phase focusing, double optical focusing, front 8 megapixel camera, 3600mAh capacity battery, supporting quick charge 2.0 fast charging and wireless charging, IP68 dust-proof and waterproof. Samsung Galaxy S10 is equipped with a new generation of 7Nm process high-performance processor, running memory up to 12GB, up to 1TB of storage space, and IP68 level dustproof and waterproof function, supporting wireless accelerated charging 2.0, wireless shared charging technology, which uses ultrasonic pulse to accurately monitor the 3D texture of fingerprint, greatly improving the convenience and security.Samsung Galaxy S20 main lens 12 million pixels, f/1.8, support OIS optical anti shake, long focus lens 64 million pixels, f/2.0, support OIS optical anti shake, ultra wide angle lens 12 million pixels, f/2.2120 degrees, front lens 10 million pixels, f/2.2, support automatic focusing. Samsung Galaxy S21 has a smart battery, powerful processor and large storage space, with superior performance.
From the perspective of mobile phone configuration, the Samsung Galaxy S series is undoubtedly Samsung's masterpiece. Each generation of flagship mobile phones represents the highest level of smartphones in the same period, so it has attracted many consumers to use them. However, due to improper operation or various force majeure factors, data may be lost. Fortunately, if data loss occurs, you should try to use the following methods to recover the lost and deleted data from any Samsung Galaxy S series phone.
Part 1 Methods of Data Recovery
- Method 1. Directly Recover Data on Samsung Galaxy S7/S8/S9/S10/S20/S21 without Backup
- Method 2. Restore Data from Backup to Samsung Galaxy S7/S8/S9/S10/S20/S21
- Method 3. Restore Backup to Samsung Galaxy S7/S8/S9/S10/S20/S21 via Samsung Kies
- Method 4. Restore Backup to Samsung Galaxy S7/S8/S9/S10/S20/S21 using Samsung Cloud
- Method 5. Restore Backup to Samsung Galaxy S7/S8/S9/S10/S20/S21 using Google Cloud
- Method 6. Restore Backup to Samsung Galaxy S7/S8/S9/S10/S20/S21 using Mobile Transfer
Part 2 Methods of Data Backup
- Way 1. Backup Data from Samsung Galaxy S7/S8/S9/S10/S20/S21 to Computer
- Way 2. Backup Data from Samsung Galaxy S7/S8/S9/S10/S20/S21 to Samsung Cloud
Method 1. Directly Recover Data on Samsung Galaxy S7/S8/S9/S10/S20/S21 without Backup
For most Samsung Galaxy S series phone users, no matter what causes the data loss, no matter what kind of data is lost, most of them have not backed up their phone data. But don't worry, now you just need the Samsung Data Recovery
Samsung Data Recovery is a professional software specially developed for data recovery. With help of this software, you can directly recover deleted and lost data including contacts, WhatsApp messages, text messages, call logs, document, videos, audio, photos and more from any Samsung Galaxy S series phone, even if without backup.


- Supported Samsung Galaxy S Series Device: Samsung Galaxy S4/S5, Samsung Galaxy S6/S6 Edge/S6 Edge Plus, Samsung Galaxy S7/S7 Edge, Samsung Galaxy S8/S8+, Samsung Galaxy S9/S9+, Samsung Galaxy S10/S10e/S10+, Samsung Galaxy S20/S20+/S20 Ultra, Samsung Galaxy S21/S21+/S21 Ultra, etc.
- Supported Situation: Improper Handling, Accidental Deletion, OS/Rooting Error, Device Failure/Stuck, Virus Attack, System Crash, Forgotten Password, SD Card Issue, Factory Settings Restore, etc.
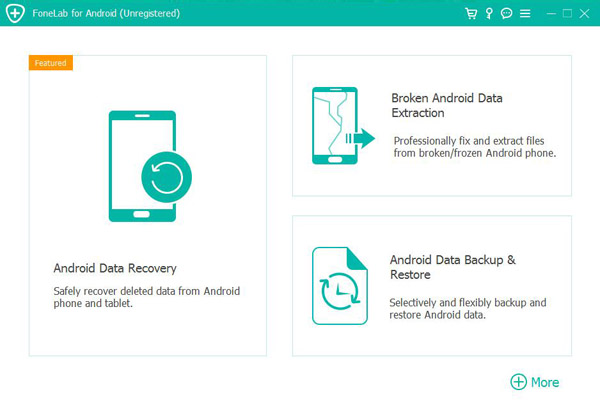
Step 1: If you don't have Samsung Data Recovery on your computer, please download, install and run it on your computer, then run the software and select the option of "Android Data Recovery".
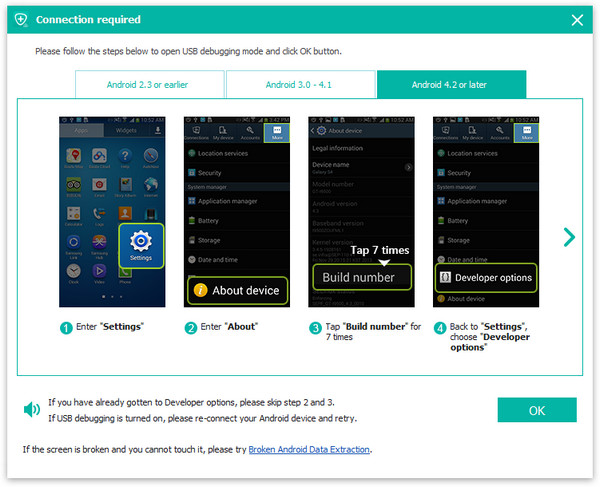
Step 2: Connect your Samsung Galaxy S7/S8/S9/S10/S20/S21 to your computer with a USB cable, open the USB debugging mode according to the steps on the phone screen, and then click the "OK" button.
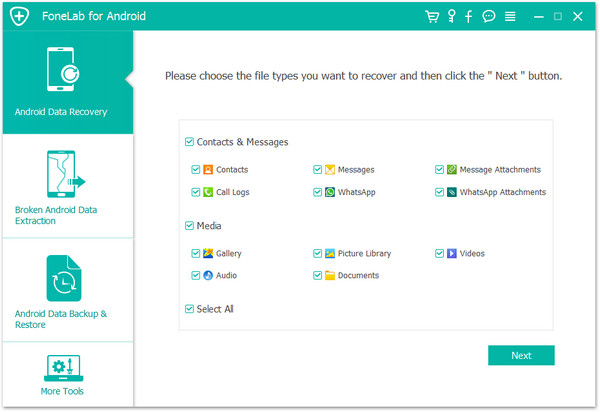
Step 3: Wait for your mobile phone to be detected, and then carefully browse the files displayed on the computer and select the data you want to recover. After selecting, click "Next" and wait for a few minutes.
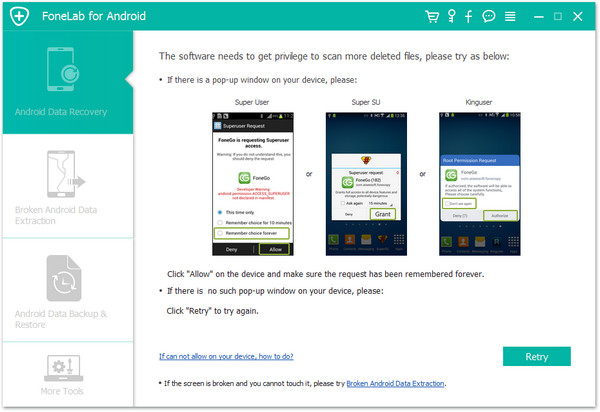
Note: When it reaches the deep scan stage, the program may need to obtain more permissions to find more hidden data, but this will not harm the security of your data and privacy. Please allow these requests and wait patiently until the scan is complete.
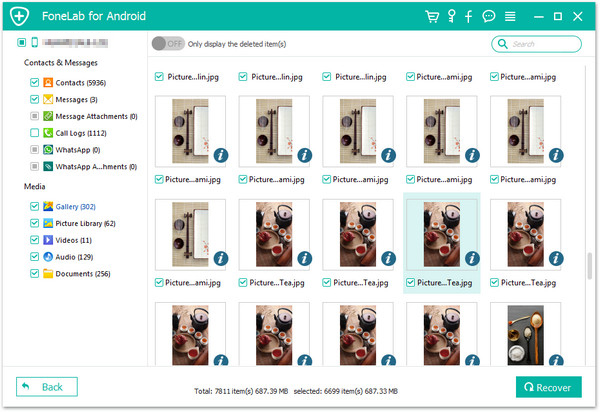
Step 4: After the scanning is completed, a menu of content type will be displayed on the computer. You will find the content you want, select them, and then click the recover button in the lower right corner. All the required data will be recovered.
Note: In the process of data scanning and recovery, once the connection is interrupted or the phone is powered off, it may cause your data to be lost again. Therefore, please ensure that there are no obstacles in this process.
Method 2. Restore Data from Backup to Samsung Galaxy S7/S8/S9/S10/S20/S21
As the matter of fact, this data recovery software can be broken down into four functional branches, and data backup and data restore are two of them. So, if you've ever backed up your Samsung Galaxy S7/S8/S9/S10/S20/S21 with this software or any other software/Apps of which backup file can be detected by this software, then you can easily restore data from these backup files to your device.
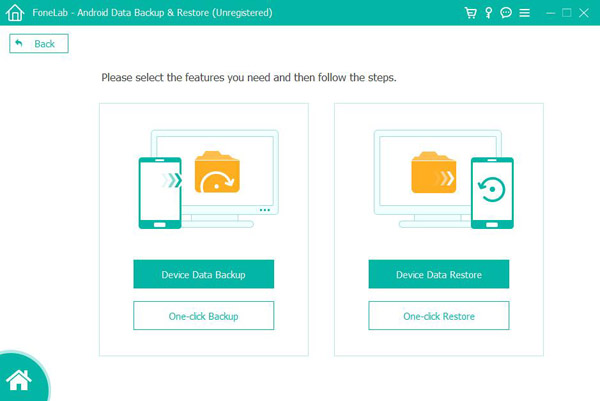
Step 1: Launch Samsung Data Recovery software and select "Android Data Backup & Restore" option on the primary page.
Step 2: Connect your Samsung Galaxy S7/S8/S9/S10/S20/S21 to your computer with USB cable.
Step 3: Click "Device Data Restore" or "One-click Restore" option in subsequent pages.
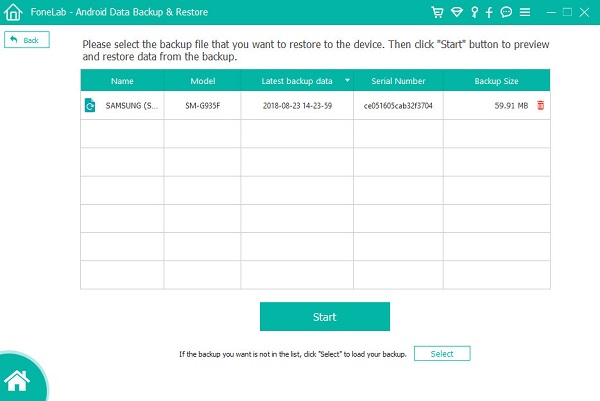
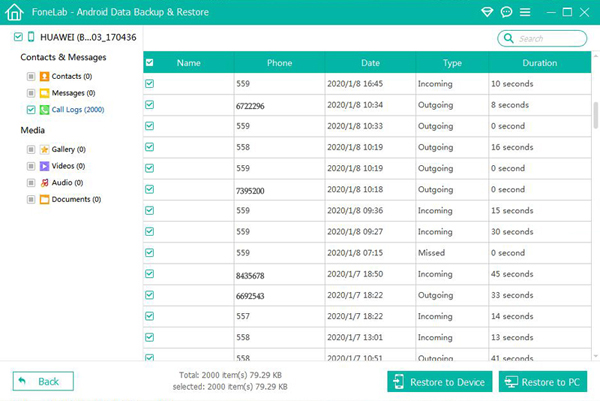
Step 4: At this time, there will be a list of backup files on the computer. Please select the backup files to be restored, click on "Start" button to extract the data that can be restored in the required backup file.
Wait until it's finish, select the data you want. Click "Restore to Device" or "Restore to PC" to save them to the corresponding devices. Pay attention to the good connection of the whole process.
Method 3. Restore Backup to Samsung Galaxy S7/S8/S9/S10/S20/S21 via Samsung Kies
The role of Samsung Kies for Samsung users does not need us to talk too much again. If you've ever backed up your Samsung Galaxy S7/S8/S9/S10/S20/S21 via Samsung Kies, then you can restore the lost data from backup with Samsung Kies.
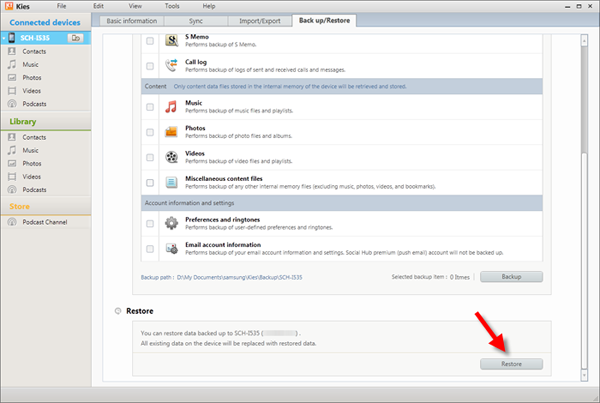
Step 1: Run Samsung Kies on your computer, Then find the "Back up/Restore" option in the upper menu, scroll all the way to the bottom and tap on "Restore".
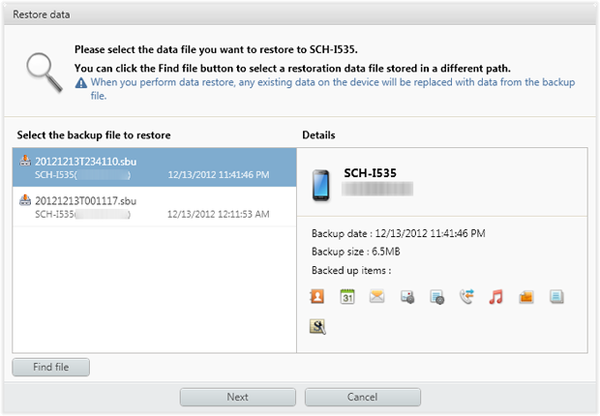
Step 2: Connect your Samsung Galaxy S7/S8/S9/S10/S20/S21 to computer using a USB cable, and choose a backup file you wish to restore, then click on "Next".
Step 3: Check the box(es) in front of the item(s) that you wanting to restore, and fully understand whether the remaining storage space in your phone is enough, and 100% sure that you need to perform this recovery. If confirmed, click "Next".

Step 4: Now, the program will automatically restore the selected data from the selected backup file, please keep patient and wait for you are told that the process is complete.
Method 4. Restore Backup to Samsung Galaxy S7/S8/S9/S10/S20/S21 using Samsung Cloud
If your data have synced with Samsung cloud, the they can be recovered on any Samsung phone, including your Samsung Galaxy S7/S8/S9/S10/S20/S21.
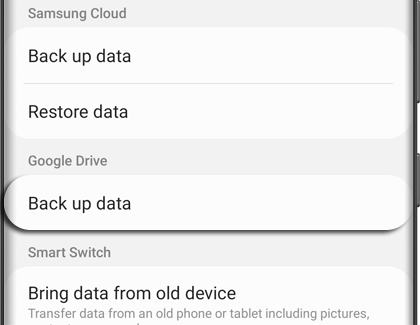
Step 1: Unlock your Samsung Galaxy S7/S8/S9/S10/S20/S21 and connect it to a stable network, then go to "Settings", and tap on "Accounts and backup".
Step 2: Tap on "Backup and restore", if you have not login your Samsung cloud, please sign in it first.
Step 3: Tap on "Restore data" to select your desired device of which created a backup file from.
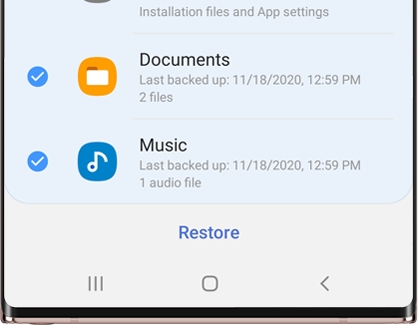
Step 4: Select the content you wish to restore and click on "Restore" to restore them to your Samsung Galaxy S7/S8/S9/S10/S20/S21.
Method 5. Restore Backup to Samsung Galaxy S7/S8/S9/S10/S20/S21 using Google Cloud
Step 1: Unlock your Samsung Galaxy S7/S8/S9/S10/S20/S21 and connect it to a stable network, then go to Settings, and click "Accounts and backup".
Step 2: Click data backup under Google drive. When prompted, please log in with Google account
Step 3: After successful login, you can click back up now. To restore your data, please click the "Switch" next to automatic recovery under Google account.
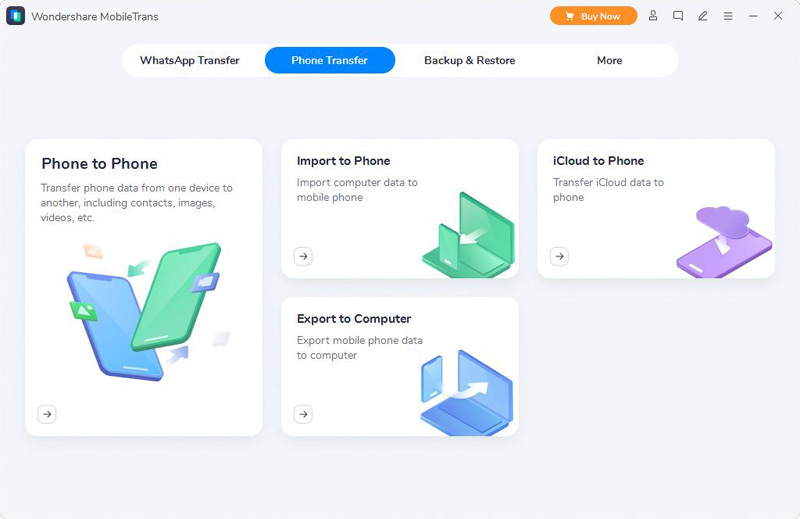
Method 6. Restore Backup to Samsung Galaxy S7/S8/S9/S10/S20/S21 using Mobile Transfer
Mobile Transfer is a set of data transmission and recovery software, suitable for all types of mobile phones, but also suitable for the recovery of various types of data files. If you have backed up your data to Mobile Transfer, you can try the following steps to recover the data.
Step 1: Please download, install and run Mobile Transfer first. Then select the "Restore from Backups" option on the homepage, and then click the "MobileTrans" option.
Step 2: Connect the Samsung Galaxy S7/S8/S9/S10/S20/S21 to your computer with USB cable, and then operate according to the relevant instructions of the computer. As long as the good connection between the mobile phone and the computer is maintained, it can be finished smoothly.
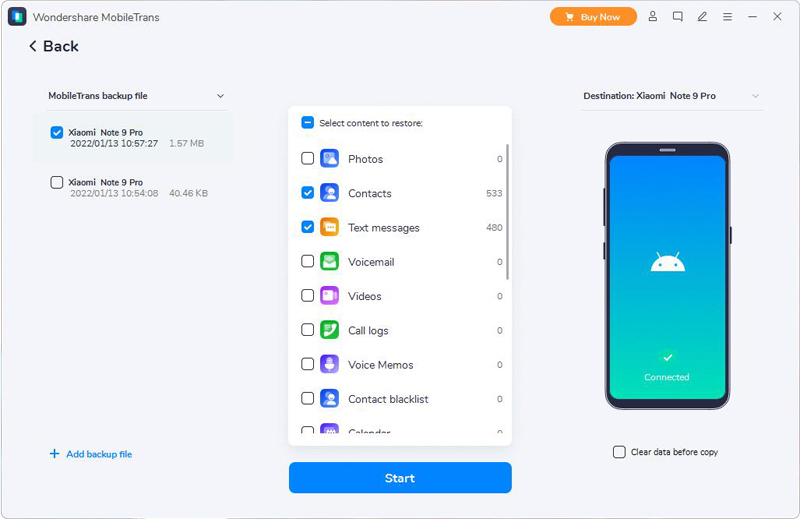
Step 3: First select the backup file you want, and then select a specific type of file in the backup file. You can click "Start transfer" to transfer the data to the Samsung Galaxy S7/S8/S9/S10/S20/S21.

Tips: You can tick the box of "Clear data before copy" to clear all data on your Samsung Galaxy S7/S8/S9/S10/S20/S21 before transfer.
Way 1. Backup Data from Samsung Galaxy S7/S8/S9/S10/S20/S21 to Computer
Step 1: Select the "Android Data Backup & Restore" option on the main page of the Samsung recovery software.
Step 2: Connect your Samsung Galaxy S7/S8/S9/S10/S20/S21 to your computer via USB cable.
Step 3: Click on "Device Data Backup" or "One-click Backup" to go on.
Step 4: Select the contents you wish to back up if needed, then click on "Start" to back up your files.
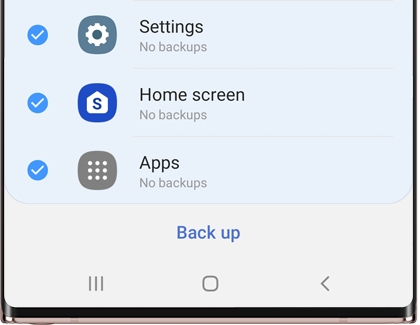
Way 2. Backup Data from Samsung Galaxy S7/S8/S9/S10/S20/S21 to Samsung Cloud
Step 1: Unlock your Samsung Galaxy S7/S8/S9/S10/S20/S21 and connect it to a stable network, then go to "Settings", tap your "name", then tap "Backup data".
Note: Make sure that you've signed into your Samsung Cloud. If you are backing up files for the first time, you should click "No backups".
Step 2: Click "Back up data" again.
Step 3: Select the contents to be backed up and click on "Back up".
Step 4: Wait for the backup is complete, press "Done".