6 effective ways to restore deleted and lost files from Samsung Galaxy J1/J2/J3/J4/J5/J6/J7/J8, whether you have backup or not.
When you accidentally delete files on your phone, please don't panic, because there are many recover solutions. This is an article about multiple methods to recover deleted and lost data from your Samsung Galaxy J1/J2/J3/J4/J5/J6/J7/J8, as well as backing up data on Samsung Galaxy J1/J2/J3/J4/J5/J6/J7/J8.
Samsung Galaxy J series were released from 2015 to 2018. The battery capacity of this series also ranges from 1850 mAh for Samsung Galaxy J1 to 3500 mAh for Samsung Galaxy J8. The screen size has been upgraded from Galaxy J1's 4.3 inches to Galaxy J8's 6 inches, and the screen resolution is from 800x480 pixels to 1440x720 pixels. The rear camera of the Galaxy J1 is 5 million pixels, 2 million pixels for the front camera, the Samsung Galaxy J8 is 16+5 million pixels dual rear camera combination, and 15 million pixels for the front camera. The CPU is upgraded from quad-core to eight-core.

Although the Samsung Galaxy J series focuses on cost performance, it caters to users with mid-range mobile phone needs. However, Samsung Galaxy J series is constantly improving its configuration, and its holdings in the market are very large. Therefore, it is very necessary for us to master some reliable and efficient methods to recover important data lost during daily use of our Samsung Galaxy J1/J2/J3/J4/J5/J6/J7/J8. Next, we will introduce you in detail in different ways.
Part 1 Methods for Data Recovery
- Method 1. Directly Recover Data on Samsung Galaxy J1/J2/J3/J4/J5/J6/J7/J8 without Backup
- Method 2. Restore Data from Backup to Samsung Galaxy J1/J2/J3/J4/J5/J6/J7/J8
- Method 3. Restore Backup to Samsung Galaxy J1/J2/J3/J4/J5/J6/J7/J8 using Mobile Transfer
- Method 4. Restore Backup to Samsung Galaxy J1/J2/J3/J4/J5/J6/J7/J8 using Samsung Kies
- Method 5. Restore Backup to Samsung Galaxy J1/J2/J3/J4/J5/J6/J7/J8 using Samsung Cloud
- Method 6. Restore Backup to Samsung Galaxy J1/J2/J3/J4/J5/J6/J7/J8 using Google Cloud
Part 2 Method for Data Backup
- Way 1. Backup Data from Samsung Galaxy J1/J2/J3/J4/J5/J6/J7/J8 to Computer
- Way 2. Backup Data from Samsung Galaxy J1/J2/J3/J4/J5/J6/J7/J8 to Samsung Cloud
- Way 3. Backup Data from Samsung Galaxy J1/J2/J3/J4/J5/J6/J7/J8 to Samsung Kies
Method 1. Directly Recover Data on Samsung Galaxy J1/J2/J3/J4/J5/J6/J7/J8 without Backup
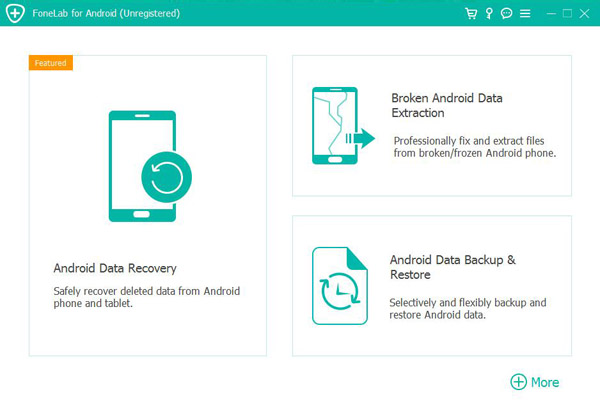
Android Data Recovery can help you recover deleted and lost data faster, more efficiently, and more safely, such as contacts, text messages, call logs, voice memos, audio, videos, photos, pictures, WhatsApp messages, etc. As long as the data is still stored on the phone, it can being detected and restored. The reasons for recommending it are as follows: First, its operation steps are very simple and do not require professional knowledge. Whether you delete data accidentally or the phone automatically loses data, whether the phone can be used normally, it can quickly recover lost and deleted data. In addition, it has high compatibility and is compatible with almost all Android phones on the market, such as Samsung, Huawei, Honor, Google, Xiaomi, Redmi, OPPO, vivo, OnePlus, HTC, LG, Sony, Motorola, Meizu and other brands. And it is very safe. In the process of restoring data, it will neither leak your information nor damage your data.


- Supported Samsung Galaxy J Series Device: Samsung Galaxy J1, Samsung Galaxy J1 Ace, Samsung Galaxy J2(Pro), Samsung Galaxy J3(Pro), Samsung Galaxy J4(+), Samsung Galaxy J5(Pro), Samsung Galaxy J6(+), Samsung Galaxy J7(Pro), Samsung Galaxy J8(+), etc.
- Supported Situation: Improper Handling, Accidental Deletion, OS/Rooting Error, Device Failure/Stuck, Virus Attack, System Crash, Forgotten Password, SD Card Issue, Factory Settings Restore, etc.
Step 1: First download, install and run Android Data Recovery on your computer. After entering the program, check "Android Data Recovery". Then connect Samsung Galaxy J1/J2/J3/J4/J5/J6/J7/J8 to your computer with USB cable. Immediately afterwards, the connection progress bar appeared on the main interface.
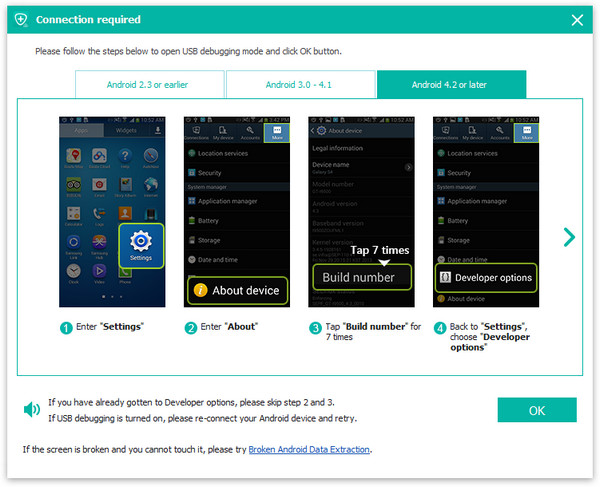
Step 2: After fully entering the program, it will automatically detect your phone's Android version. You need to turn on USB debugging according to the steps provided by the program, and then click "OK".
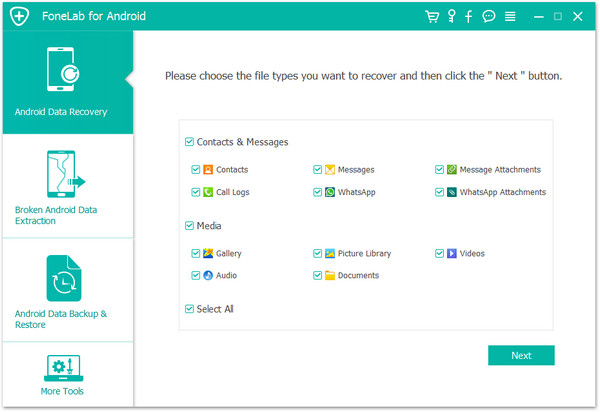
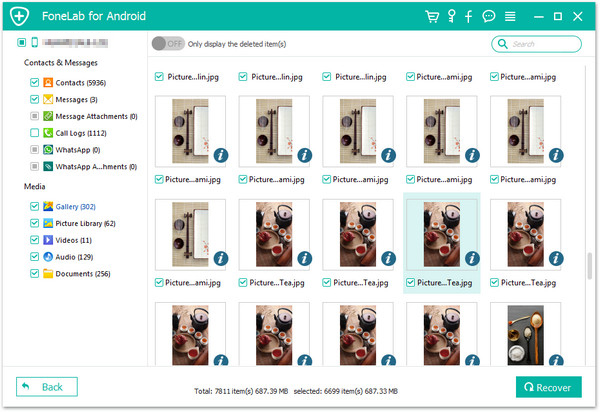
Step 3: Now, you will see the directory of recoverable data on the main interface, please check the type(s) of data you need to recover, and click "Next" after confirmation. Then the program will scan your phone.
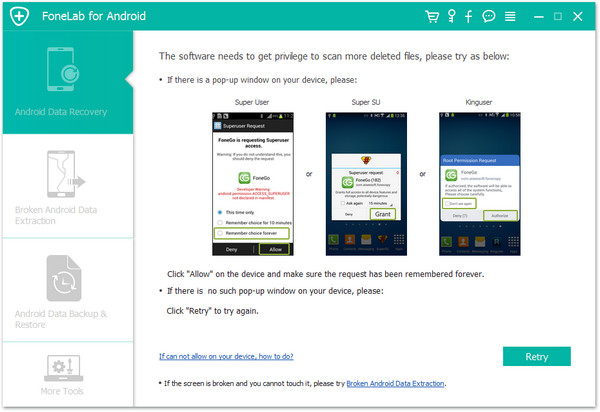
Note: Here, the program needs permission to scan for deleted and lost data. If your device pops up a window, remember to click the device's "Allow" to make sure the request is remembered. If your device does not pop up such a window, please click "Retry" to try again.
Step 4: After the scan is successful, the main interface displays the type of data that can be recovered. Wait for you to preview and confirm the data type, and then click "Recover". All data that needs to be recovered will be saved on your computer. Please be patient, the length of time required for recovery is directly proportional to the amount of recovered data.
Method 2. Restore Data from Backup to Samsung Galaxy J1/J2/J3/J4/J5/J6/J7/J8
If you use Android Data Recovery to back up your data, then your method of restoring its data is easier. The specific operations are as follows:
Step 1: Run the program on your computer, and then click "Android Data Backup & Restore".
Step 2: Use a USB cable to connect your Samsung Galaxy J1/J2/J3/J4/J5/J6/J7/J8 to the computer.
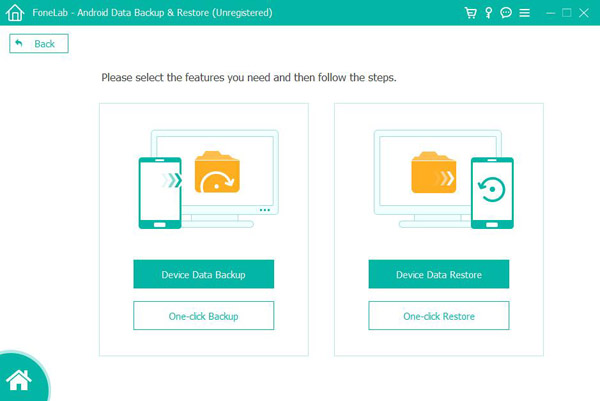
Step 3: At this time, the "Device Data Restore" and "One-click Restore" options will appear on the main interface, you can choose any one.
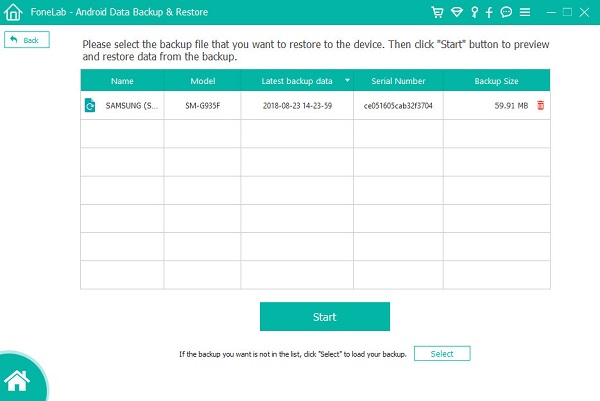
Step 4: Now, please select the backup you need from the backup list, and then click "Start" to preview and restore data from the selected backup to your Samsung Galaxy J1/J2/J3/J4/J5/J6/J7/J8.
Method 3. Restore Backup to Samsung Galaxy J1/J2/J3/J4/J5/J6/J7/J8 using Mobile Transfer
Mobile Transfer is currently one of the most popular data transfer and management software. Compared with other software, its highlights are as follows: First, its operation is very simple and fast. Secondly, it is very compatible, not only compatible with Samsung, Huawei, Honor, Xiaomi, Redmi, OPPO, OnePlus, Google, HTC, LG, Moto, vivo and other Android phones, but also compatible with all versions of iPhone. In addition, it can transfer multiple types of data, including contacts, call logs, text messages, voice memos, photos, videos, audios, music, applications, etc. The most important thing is that it has a high safety factor, it will not cause any harm to your phone during the data transmission process, and will not leak your data.
Step 1: Download, install and run the software, then click "Restore from Backups" mode, and then click "MobileTrans" or "Kies" among all items.
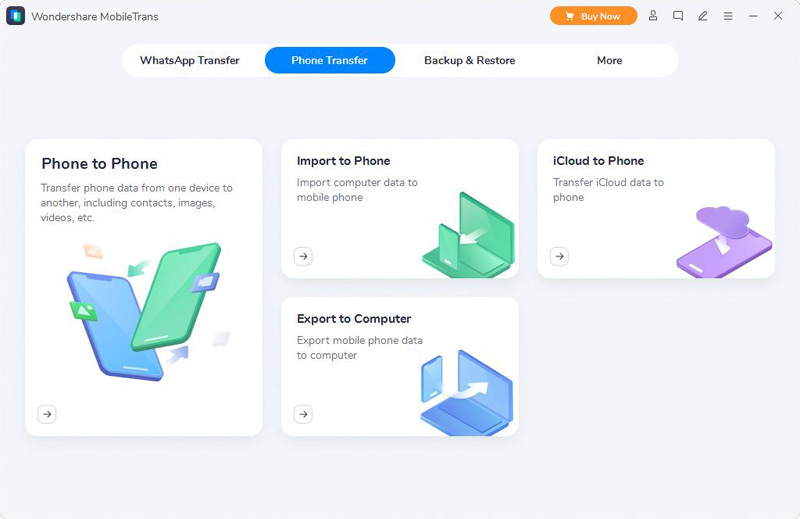
Note: The premise of selecting "MobileTrans" is that you have backed up your Samsung Galaxy J1/J2/J3/J4/J5/J6/J7/J8 with this Mobile Transfer software. Of course, the program also supports other backup files, such as Kies backup, iCloud backup, iTunes backup, etc. If you have any other type of backup file, you can also select it.
Step 2: Please select a backup file according to your needs, and then use USB cable to connect your Samsung Galaxy J1/J2/J3/J4/J5/J6/J7/J8 with the computer.
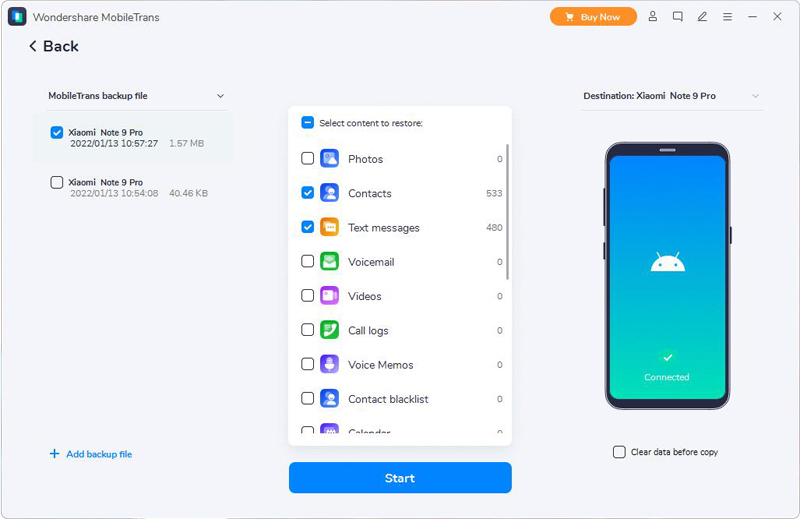
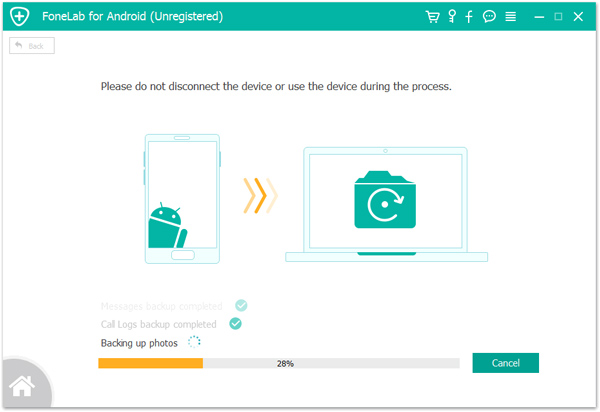
Step 3: After the computer detects your device, select the file type as needed, and then click "Start Transfer" to sync to your Samsung Galaxy J1/J2/J3/J4/J5/J6/J7/J8. At this point, you can see the transfer progress bar on the interface, please be patient.

Method 4. Restore Backup to Samsung Galaxy J1/J2/J3/J4/J5/J6/J7/J8 using Samsung Kies
Samsung Kies is a mobile phone management tool specially created for Samsung mobile phone users. By connecting a PC with Samsung mobile phones, you can synchronize data and find new software more conveniently. So, if you have ever used Samsung Kies to back up your data of Samsung Galaxy J1/J2/J3/J4/J5/J6/J7/J8, restoring these data is just a piece of cake.
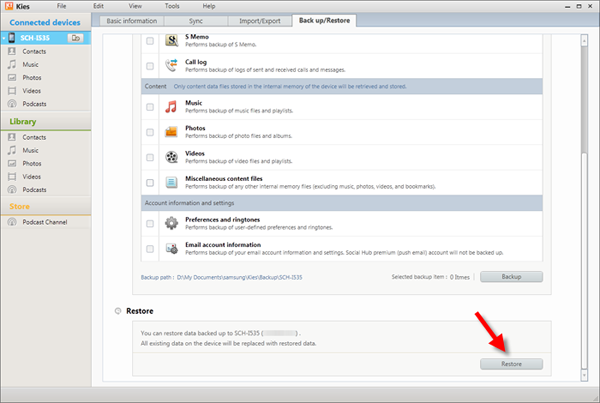
Step 1. Run Samsung Kies on your computer and connect your Samsung Galaxy J1/J2/J3/J4/J5/J6/J7/J8 to computer using USB cable.
Step 2. Tap on "Back up/Restore" in the top menu bar, then scroll to the bottom of the page and click "Restore".
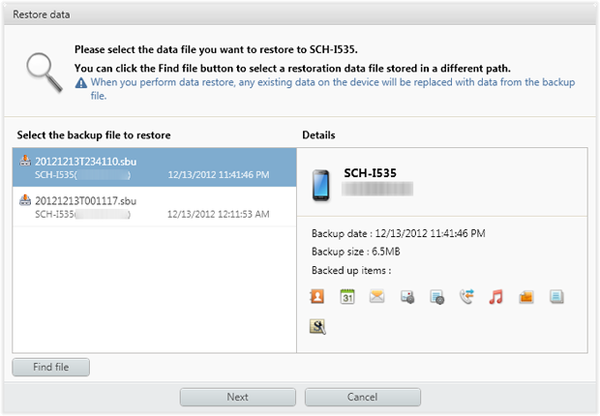
Step 3. Choose a backup file from the list according to your need, then click on "Next".
Step 4. Select the data type(s) displayed on the interface and click on "Next". Before performing this step, we have to remind you, please make sure that this is the data you want to recover. Once you operate, this process is irreversible.

Step 5. As you can see, you can witness the entire data recovery process. The time required for recovery depends on the amount of data you selected. Please be patient and wait for the recovery to complete.
Method 5. Restore Backup to Samsung Galaxy J1/J2/J3/J4/J5/J6/J7/J8 using Samsung Cloud
When you back up and restore content using the storage options on your Galaxy device, you will be able to download the files again. You can use cloud services to back up pictures, videos, music, documents, etc. After backing up everything to Samsung Cloud, restoring the data is easy. You can use the "Restore" function to transfer it to a new device or another device.
Note: The available settings may vary by carrier and software version. Samsung Cloud is not available on Verizon phones or tablets, and Samsung Cloud may not be supported in some countries/regions. Besides, before performing recovery, please make sure that your phone’s battery and internal storage space are sufficient, and your phone has been connected to a stable WiFi network.
Step 1: Unlock your Samsung Galaxy J1/J2/J3/J4/J5/J6/J7/J8, then go to > Settings > Accounts and Backup > Backup and Restore > Restore data.
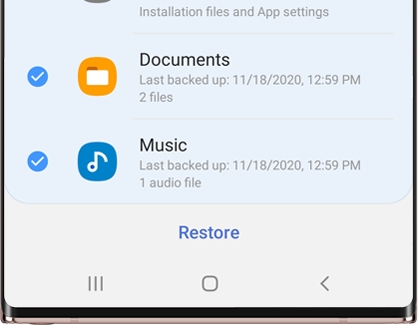
Step 2: Now, please choose a backup file as you like, then select the content to be restored and click on "Restore" to download the backup data and restore the select contents to your device.
Method 6. Restore Backup to Samsung Galaxy J1/J2/J3/J4/J5/J6/J7/J8 using Google Cloud
If you use Google Cloud to back up your data, then you can use this method to restore data more quickly. The use steps are as follows:
Step 1: Now, open "Settings > Accounts", click "Add Account" and log in to the account.
Step 2: Follow the instructions on the screen, and then select the backup device you need on the display backup device.
Step 3: If you want to restore everything from Google Cloud Backup, please click "Restore" and then click "Restore All". Otherwise, please press the "arrow" icon next to "Restore All" and perform the restoration selectively.
Way 1. Backup Data from Samsung Galaxy J1/J2/J3/J4/J5/J6/J7/J8 to Computer
Android Data Recovery can not only restore data without backup, but also back up your phone data and restore it to any supported devices. The specific usage method is as follows:
Step 1: Run the software, then select "Android Data Backup & Restore" in the main interface.
Step 2: Connect your Samsung Galaxy J1/J2/J3/J4/J5/J6/J7/J8 to the computer via USB cable.
Step 3: After successfully connection, you can select the "Device Data Backup" or "One-click Backup" option to back up your files.
After completing all the steps, please click the "Start" button to start exporting data from Samsung Galaxy J1/J2/J3/J4/J5/J6/J7/J8 to the computer.
Way 2. Backup Data from Samsung Galaxy J1/J2/J3/J4/J5/J6/J7/J8 to Samsung Cloud
Samsung Cloud has manual backup and automatic backup functions. Next, I will introduce you two kinds of backup operations.
Manual back up:
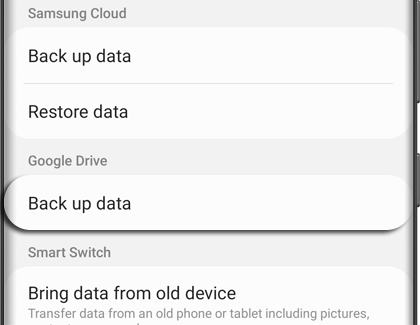
Step 1: In "Settings", click your "Name", and then click "Back up data".
Note: When backing up data for the first time, you may need to click "No backups".
Step 2: Click "Back up data" again.
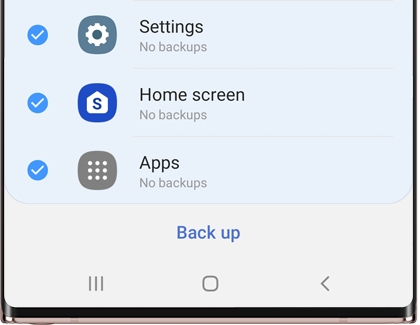
Step 3: Select the data you want to back up, and then click "Back up".
Step 4: After completing synchronization, click "Done".
Automatic backup:
Your data will be automatically backed up every 24 hours. But your phone needs to be charged, connected to a Wi-Fi network, and the screen needs to be turned off for at least an hour. You can also customize which files are automatically backed up.
Step 1: In "Settings", click your "Name", and then click "Back up data".
Step 2: Then click more options (the three vertical dots), and then click settings.
Step 3: Click "Sync and auto backup settings", and then click "Auto back up".
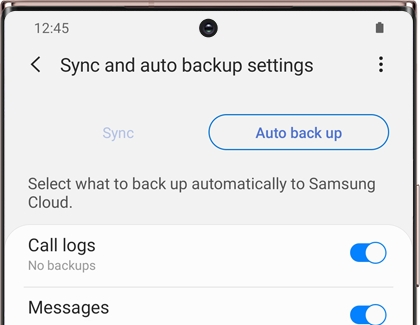
Step 4: Here, you can adjust which options for automatic backup. Click the switch next to the desired application.
Note: Enabling automatic backup also ensures that your cloud storage account will not be accidentally deleted. Any accounts or categories that have not been used in 12 months, such as contacts, calendars, photos, videos, keyboard data, etc., may be deleted. If the cloud storage is full, the content will not be backed up automatically.
Way 3. Backup Data from Samsung Galaxy J1/J2/J3/J4/J5/J6/J7/J8 to Samsung Kies
Since Samsung Kies can restore backup files, naturally it must be able to back up your phone data. Next we look at how to operate.
Step 1: Run Samsung Kies and connect your Samsung Galaxy J1/J2/J3/J4/J5/J6/J7/J8 to computer via a USB data cable.
Step 2: Once your device is recognized, tap on "Back up/Restore" in the top menu bar.
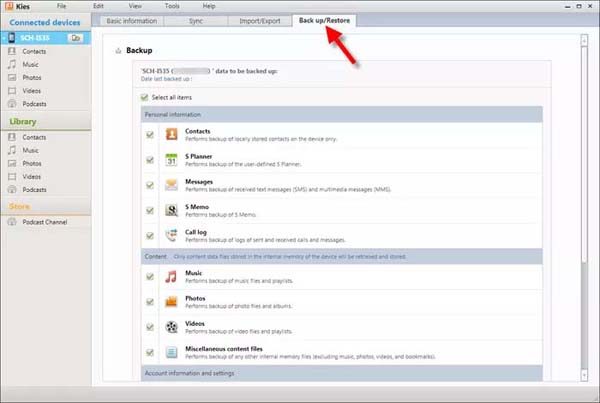
Step 3: Check the box(es) near the item(s) you wish to back up, then scroll to the bottom of the window and click the "Backup" button.
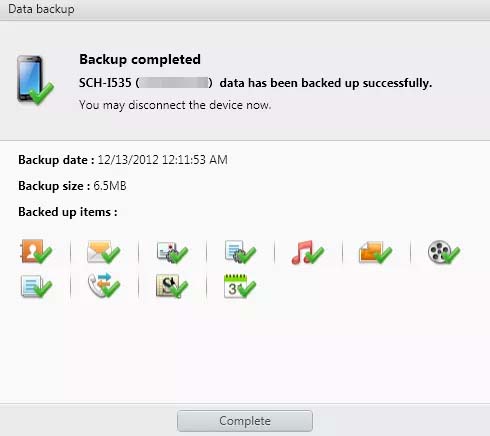
Step 4: Wait for the backup is complete, then tap on "Complete" button. The amount of data you want to back up determines the time required for the backup. Please do not disconnect your phone unless you are told that the backup is complete.


