One click to transfer all data from Samsung/iPhone/vivo/Huawei/OPPO/Android phone to vivo S12/S12 Pro, and to recover deleted and lost files on vivo S12/S12 Pro, as well as backing up data from vivo S12/S12 Pro to computer.
This is a very practical article, which will introduce you to how to transfer the data of any smartphone to vivo S12/S12 Pro in batches, and how to effectively recover the deleted and lost data from vivo S12/S12 Pro.
Recently, vivo launched a new series of vivo S12 products, which can make the body lighter and feel better while ensuring the endurance and performance experience. First, let's take a look at the basic features of these two phones:
- In terms of core configuration, vivo S12 is equipped with MediaTek Dimensity 1100 processor manufactured by 6nm process, and the maximum storage combination can reach 12+256GB. Vivo S12 is designed with an ultra-thin curved screen with 57 radian. As for shooting performance, vivo S12 uses a combination of 44 megapixel AF main camera and 8 megapixel wide-angle lens in front, 108 megapixel main camera and f/1.88 aperture in rear, and is equipped with an 8 megapixel 120 wide-angle lens and a 2 megapixel macro lens. In terms of battery life, it uses 4200mAh battery and supports 44W fast charging technology.
- vivo S12 Pro is significantly upgraded in performance compared with any previous vivo S series mobile phones. Vivo S12 Pro uses a 6.56-inch AMOLED full screen with a refresh rate of 90Hz. It is equipped with MediaTek Dimensity 1200 processor, uses 4300mAh battery and supports 44W fast charging. In terms of camera performance, vivo S12 Pro is equipped with 50 megapixel Samsung JNV ultra-clear sensor+8 million ultra-wide-angle lens in front, and a three-camera combination of 100 million ultra-clear pixel camera+8 million ultra-wide-angle lens and 2 million macro lens in rear.
Obviously, no matter in design, performance or experience, vivo S12 series is unmatched by any previous vivo S series. Therefore, you certainly don't want any problems about data transfer or data recovery to bother you in the process of using your vivo S12 or vivo S12 Pro. Below, we will give you six parts to answer questions about how to transfer data to your vivo V12(Pro) and how to recover the lost data in vivo V12(Pro).
- Part 1. Transfer Data from Android/iPhone to vivo S12/S12 Pro
- Part 2. Sync Data from Backup Files to vivo S12/S12 Pro
- Part 3. Recover Deleted & Lost Data on vivo S12/S12 Pro without Backup
- Part 4. Restore Data from Bakcup Files to vivo S12/S12 Pro
- Part 5. Retrieve Data to vivo S12/S12 Pro with Best Data Recovery
- Part 6. Back Up Data from vivo S12/S12 Pro to Computer
Part 1. Transfer Data from Android/iPhone to vivo S12/S12 Pro
If you want to transfer data between different smartphones without any obstacles, you only need a professional data management software, just like the Mobile Transfer.
Mobile Transfer allows you to transfer all data including contacts, messages, music, photos, videos, call logs, notes, reminders, calendar, Apps, App data and more from any popular smartphone like vivo, OPPO, Samsung, Huawei, Xiaomi, Redmi, Honor, Realme, Google, iPhone, ZTE, LG, HTC, Sony, Nokia, OnePlus, ASUS, Lenovo and so on to vivo S12/S12 Pro, and vice versa.


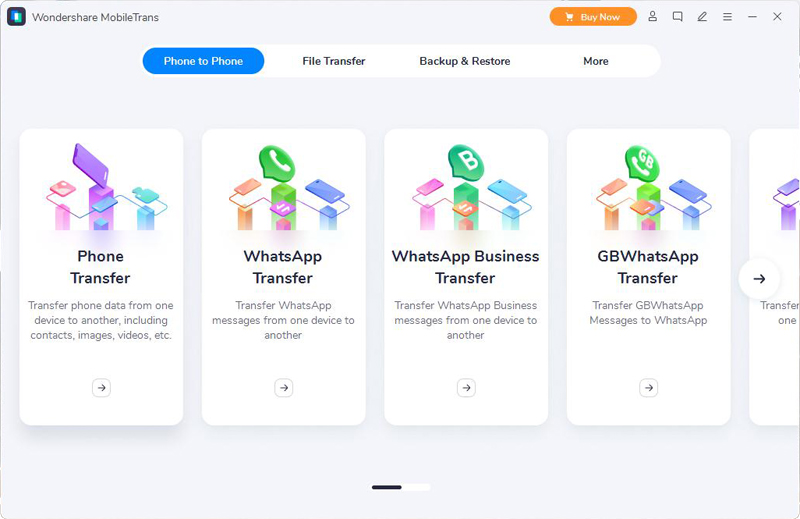
Step 1. Download, install and run the Mobile Transfer software on your computer, then click on "Phone to Phone" and press "Phone Transfer" button.
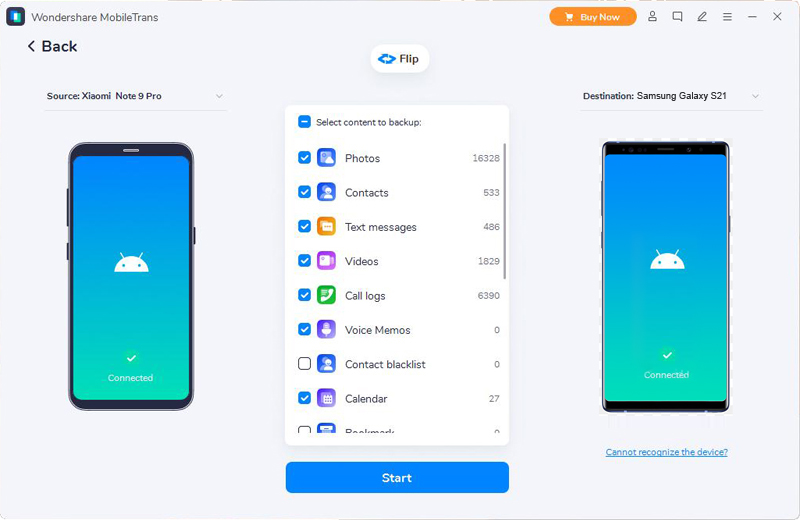
Step 2. Connect your old Android/iPhone device and the new vivo S12/S12 Pro to the same computer using their USB cables. Please make sure that your old phone is displayed in the sourse panel, and the vivo S12/12 Pro is displayed in the destination panel. You can use the "Flip" button to exchange the position of your phones.
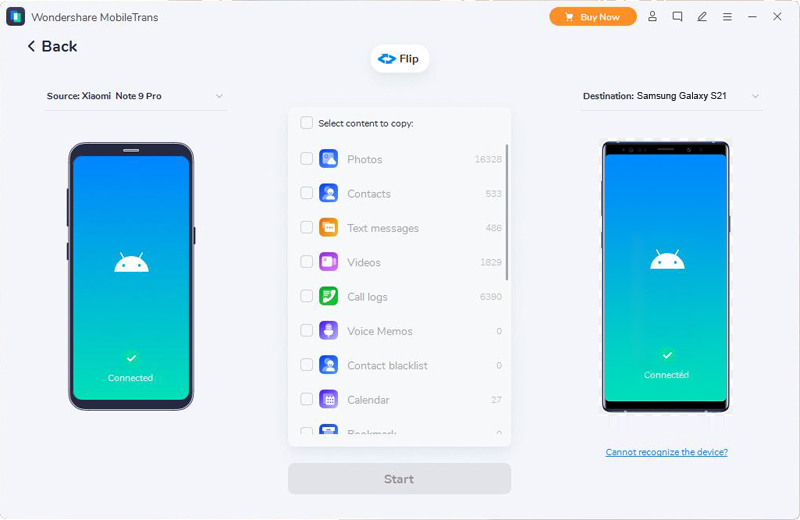
Step 3. After choosing the files as you need, then click on "Start" to sync them from your old phone to the new one.
Part 2. Sync Data from Backup Files to vivo S12/S12 Pro
If your old mobile phone is not with you, or just because you have a suitable backup file, you can extract the required data from the backup file and transfer it to the new vivo S12/12 Pro through Mobile Transfer.
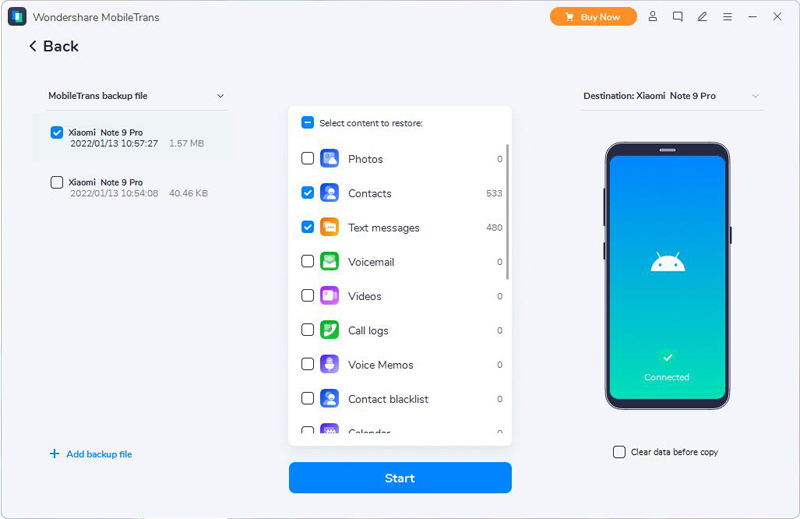
Step 1. Run the Mobile Transfer and click on "Backup & Restore" in its homepage.
Step 2. Choose a backup file from the list and press "Restore", then connect your vivo S12 or vivo S12 Pro to the computer via its USB cable.

Step 3. Now, the program will automatically extract all the transferable files inside of the selected backup. Once your phone is detected, select the file types that you wanting to transferred, then click on "Start" to sync them to your vivo S12 or vivo S12 Pro.
Part 3. Recover Deleted & Lost Data on vivo S12/S12 Pro without Backup
Compared with data migration, I believe more users will pay more attention to the effective methods of data recovery. To recover deleted and lost file on your vivo S12 and vivo S12 Pro without backup, you just need the vivo Data Recovery.
vivo Data Recovery allows you directly recover deleted and lost files including WhatsApp messages, photos, videos, contacts, text messages, audio, call logs, documents and more from any Android smartphone/tablet/SD card, of course including your vivo S12 and vivo S12 Pro.
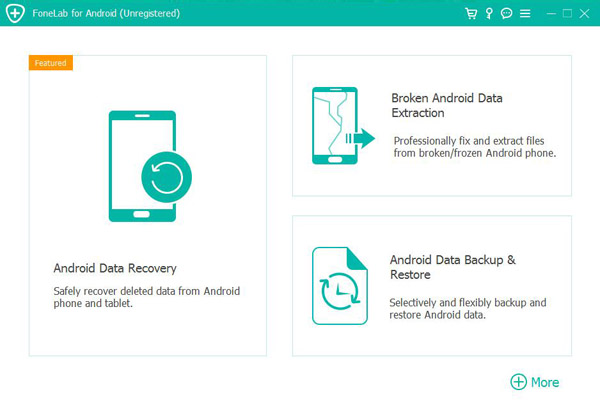
Step 1. Download, install and run the vivo Data Recovery software on your computer, then click on "Android Data Recovery" on the homepage.
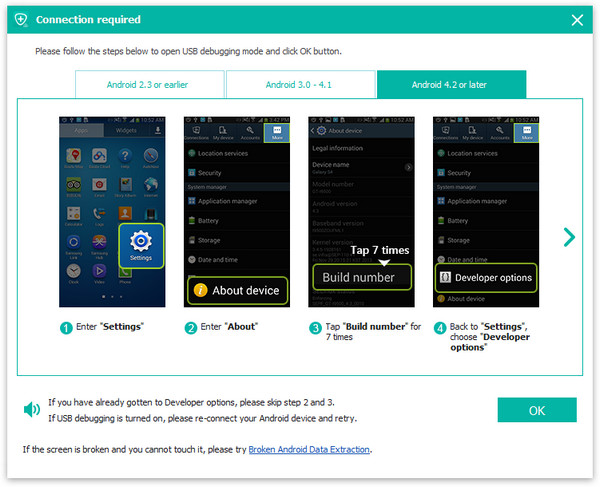
Step 2. Connect your vivo S12 or vivo S12 Pro to computer via a USB cable, please enable the USB debugging mode and follow the prompt on your phone's screen to make your phone recognized by the program.
Step 3. Then choose the file types that you want to scan on the interface, and click on "Next" to begin analyzing and scanning your phone.
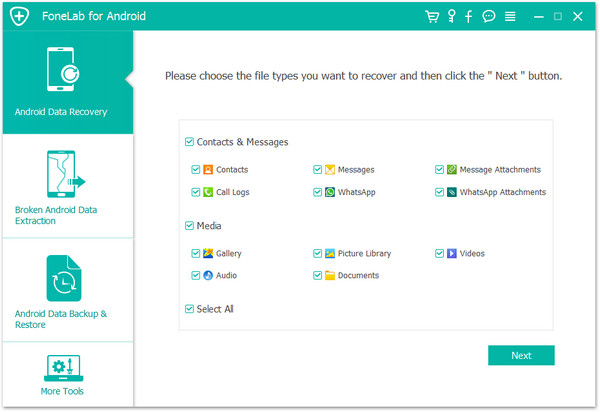
Tip: By default, in order to save scanning time, the program will automatically execute the standard scanning mode. If you want to get more data, you can click Deep Scan to scan your mobile phone using deep scanning mode, but it will take more time. Please be patient.
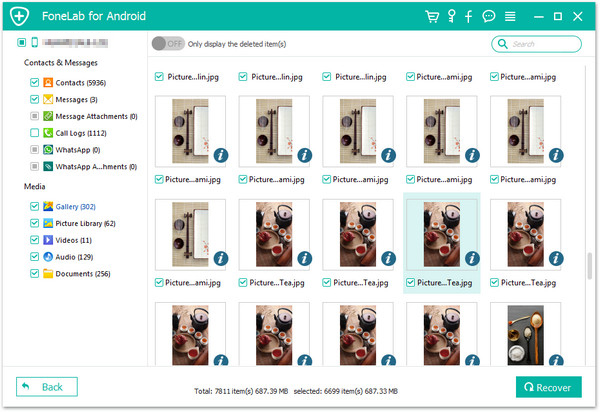
Step 4. After all the scan result is displayed, you can click to preview all of them. Select the files those what you needed, then click on "Recover" to save them back to your vivo S12 or vivo S12 Pro.
Part 4. Restore Data from Bakcup Files to vivo S12/S12 Pro
In fact, vivo Data Recovery is a comprehensive data management tool that integrates data recovery, system repair, data backup and other functions. Therefore, you can easily back up your mobile phone data, and extract the backup files at any time to restore the data to any supported device.
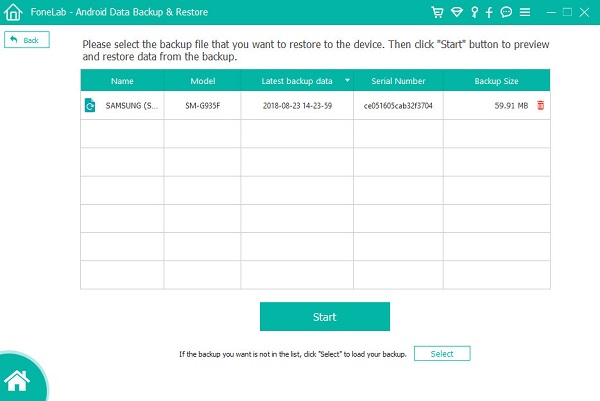
Step 1. Launch the vivo Data Recovery software, then click on "Restore from Backups" and connect your vivo S12 or vivo S12 Pro to computer via its USB cable.
Step 2. When your phone is detected, click on "Device Data Restore" on the interface.
Step 3. Choose a backup file from the list and click on "Start" to begin to extract the data that can be restored from the selected backup file.
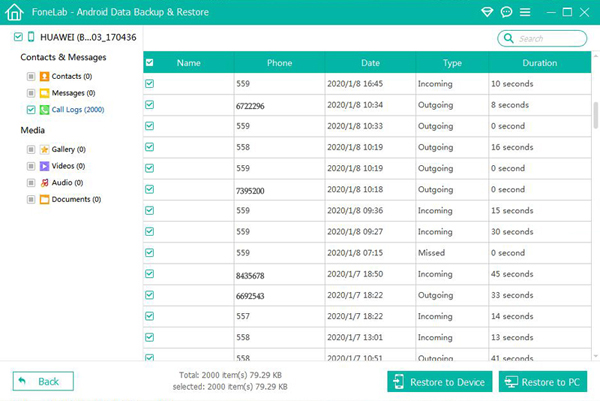
Step 4. Wait for all the files have been extracted, select the files that you want to recover, click on "Restore to Device" or "Restore to PC" to save them all back.
Part 5. Retrieve Data to vivo S12/S12 Pro with Best Data Recovery
Best Data Recovery is a data recovery software with a long history, which can easily help you recover deleted and lost data including photos, videos, audio, emails, documents and more from your vivo S12 and vivo S12 Pro in a click.
Step 1. Download, install and run the Best Data Recovery on your computer, then connect your vivo S12 or vivo S12 Pro to computer via a USB cable.
Step 2. Skip to the next screen, please choose the file types that you want to scan, then select the disk name of your phone and click on "Scan" to begin scanning your phone for the lost files.
Step 3. When the scan is completed, select the files that you want to recover, click on "Recover" to save them back to your computer.
Part 6. Back Up Data from vivo S12/S12 Pro to Computer
Whether you want to transfer your mobile phone data or restore lost data, as long as you have a backup file available, this can help you achieve it. Therefore, it is very necessary to back up your mobile phone data regularly. In fact, the two softwares mentioned above, including Mobile Transfer and vivo Data Recovery, can be used to back up your mobile phone data. Next, please let us introduce them for you one by one.
Back Up vivo S12/S12 Pro Data with Mobile Transfer
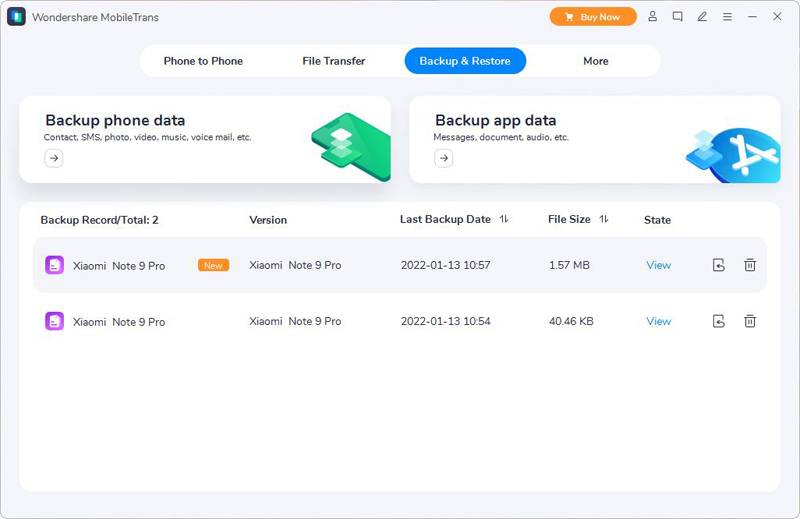
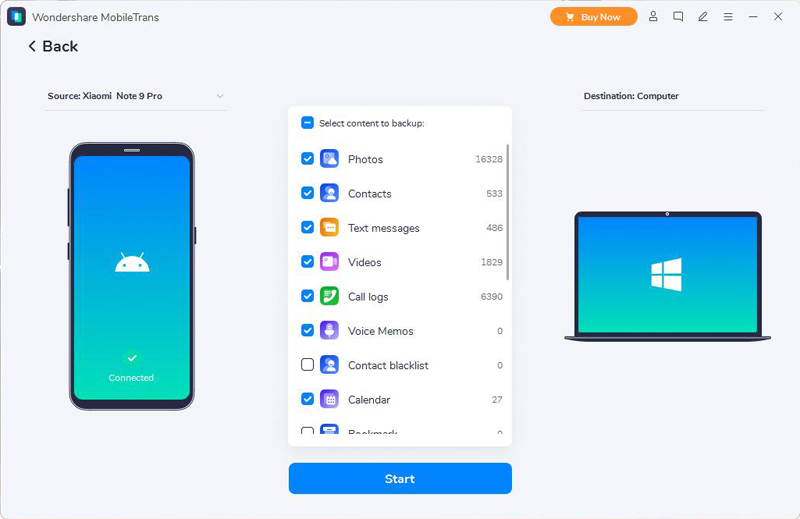
Step 1. Run Mobile Transfer, then click on "Backup & Restore" in the main interface and connect your vivo S12/S12 Pro to computer.
Step 2. When skip to the next screen, click on "Backup phone data".
Step 3. Wait for your phone to be recognized, chooes the file types that you want to backup, then click on "Start" to begin backing up your phone data to computer.
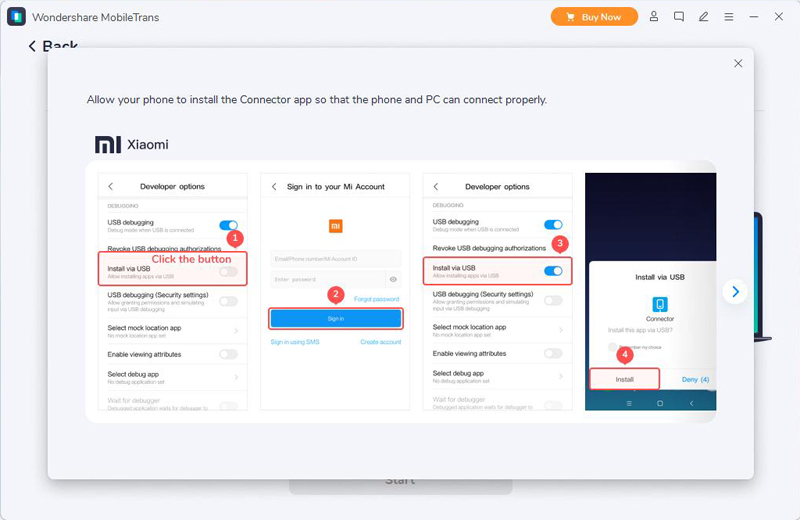
Tip: If your device can not be detected, please don't worry and follow the prompts that display on the software's interface to get your phone connected and being recognized.
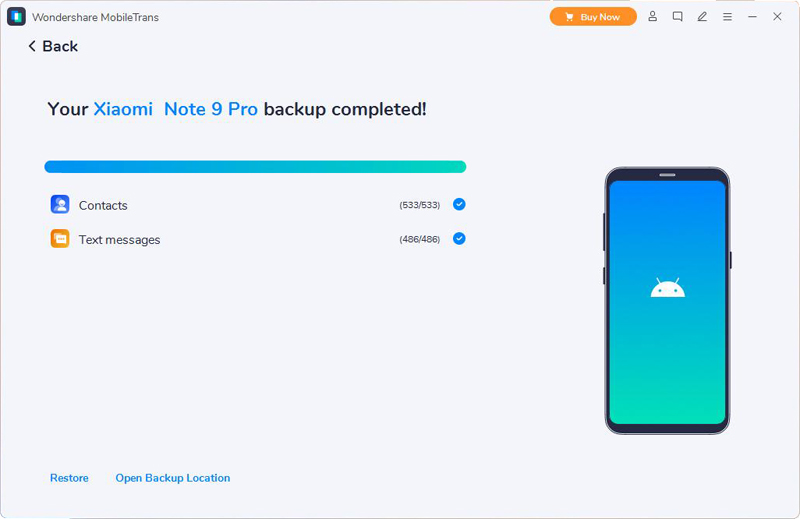
Once it's done, the content and quantity of all backups will be listed, and you will be told the path to save the backups, so that you can organize and use these backup files at any time.
Back Up vivo S12/S12 Pro Data with vivo Data Recovery
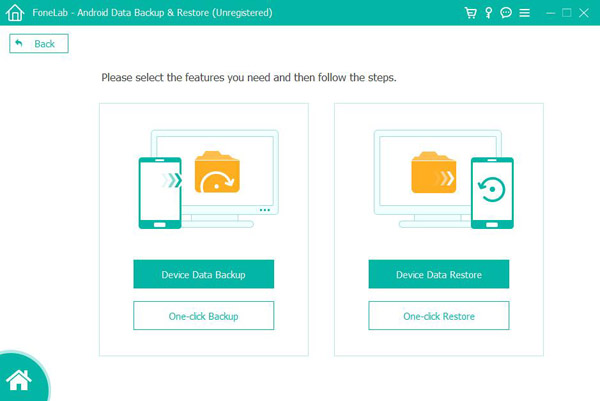
Step 1. Run the vivo Data Recovery software, then click on "Android Data Backup & Restore".
Step 2. Then connect your vivo S12/S12 Pro to computer and click on "One-click Backup" or "Device Data Backup" to go on.
Step 3. Choose the files that you wanting to backup, then click on "Start" to begin backing up your phone data.
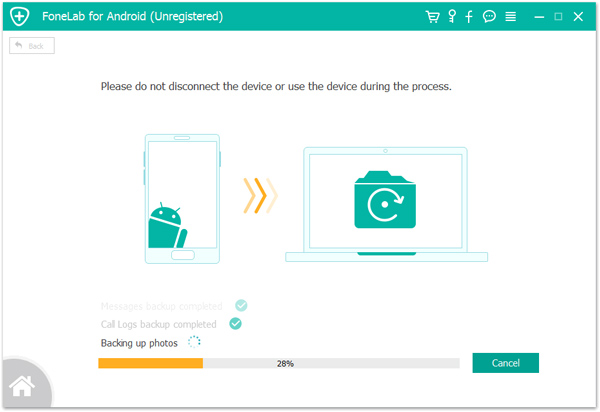
Note: During the whole data backup process, please don't disconnect your mobile phone until all the data is completely backed up to your computer.


