10 simple ways to transfer all data from Android/iPhone to vivo X Note, and to recover the deleted and lost data on vivo X Note, as well as backing up your vivo X Note data.
This is a worthy article showing you the easiest and convenient ways to transfer all data from any Android phone or iPhone/iPad device to vivo X Note, as well as restoring your deleted and lost data from vivo X Note, whether you have backup files or not.
Vivo X series is an important part of vivo mobile phone product line. With the increasing recognition of vivo X series by users, vivo recently launched its flagship product vivo X Note for the high-end market.
The biggest highlight of vivo X Note is its large enough screen. It uses 7-inch AMOLED screen made of LTPO E5, with a resolution of 1440×3080 and a refresh rate of 120Hz. In terms of core performance, vivo X Note is equipped with the latest Qualcomm Snapdragon 8 Gen1 eight nuclear processor, and has three storage versions of 8/12GB+256GB and 12GB+512GB. In terms of camera capability, vivo X Note is equipped with five cameras, including four rear cameras, namely, a 50-megapixel main lens+a 48-megapixel super wide-angle lens+a 12-megapixel portrait lens+an 8-megapixel 5x optical zoom periscope lens, and a 16-megapixel front-mounted self-timer camera. In terms of endurance, vivo X Note is equipped with a large 5000mAh battery, which supports 80 watts of wired fast charging, 50 watts of wireless fast charging and 10 watts of reverse charging. In other details, vivo X Note also uses stereo dual speakers, and supports NFC, Wi-Fi6, linear motor and IP68 dustproof and waterproof, etc..
Vivo X Note with 7-inch 2K high refresh rate display and 3D ultrasonic wide-area fingerprint is not only very friendly to users who like big-screen flagship, but also a very good choice for mobile phone users who pursue high-end performance. Of course, you have chosen vivo X Note as your mobile phone companion, haven't you? Therefore, we guess that you are also looking for ways to transfer mobile phone data efficiently and quickly, and are interested in ways to recover lost mobile phone data. Next, we will share some safe, professional and simple data transfer and recovery methods for vivo X Note. Please don't miss it.
Directly Sync Data from Android/iPhone to vivo X Note
- Transfer Data from Android/iPhone to vivo X Note
- Transfer WhatsApp/Wechat/Kik/Line/Viber Messages to vivo X Note
Restore Data from Backup to vivo X Note
- Restore Data from MobileTrans Backup to vivo X Note
- Restore Data from iTunes Backup to vivo X Note
- Restore Data from vivoCloud to vivo X Note
- Restore Data to vivo X Note with Android Data Recovery
Directly Recover vivo X Note Lost Data without Backup
Back Up Data from vivo X Note to Computer
- Back Up vivo X Note Data Using Mobile Transfer
- Back Up vivo X Note Data Using Android Data Recovery
- Back Up Any Data on Your vivo X Note
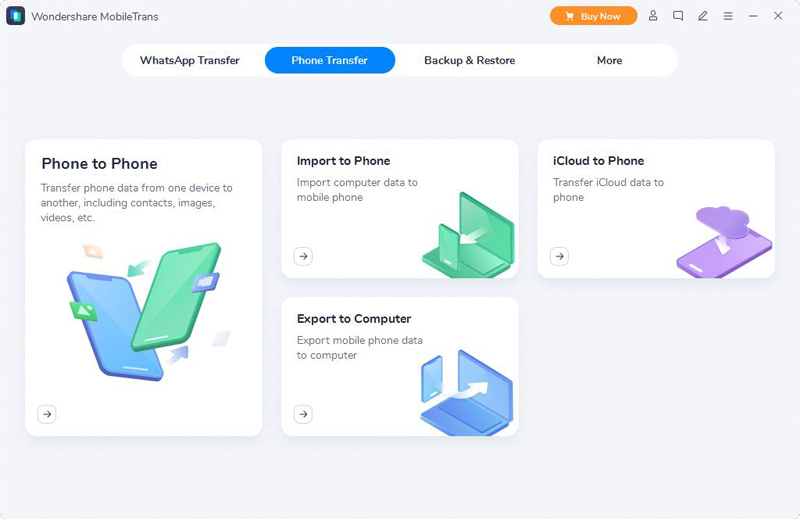
Part 1 Directly Sync Data from Android/iPhone to vivo X Note
Very few users will abandon the data in their old mobile phones and choose a blank new one, not to mention that there is plenty of storage space on your vivo X Note. Therefore, if you don't want to transfer your mobile phone data, there may just be no effective way. In fact, Mobile Transfer is your ideal choice.
Mobile Transfer is a popular data transfer and management software that allows you transfer all data including ontacts, contact blacklist, voicemail, text messages, apps, WhatsApp/Wechat/Kik/Line/Viber messages, voice memos, music, photos, videos, call logs, Safari history, wallpaper, calemdar, reminders, notes, bookmarks, documents and more any Android/iPhone device to vivo X Note in a click. Now, please click the below button to download this software, then install it to your computer and follow the following guide to try transmitting your data from phone to phone.


Transfer Data from Android/iPhone to vivo X Note
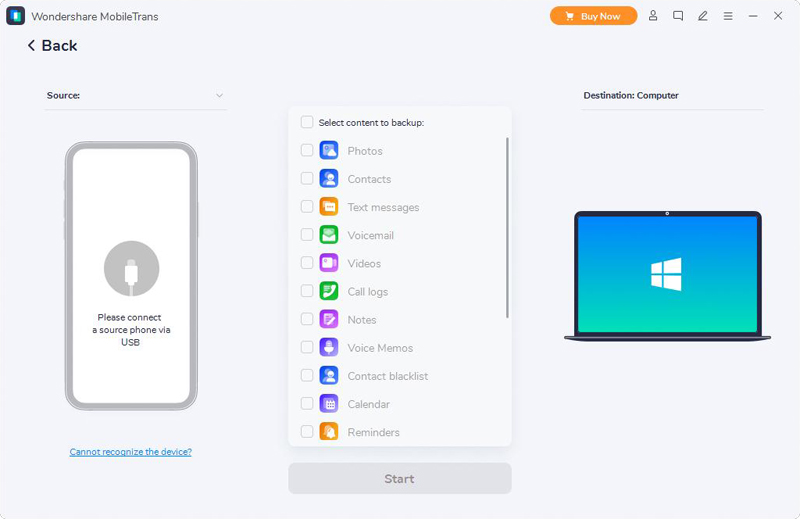
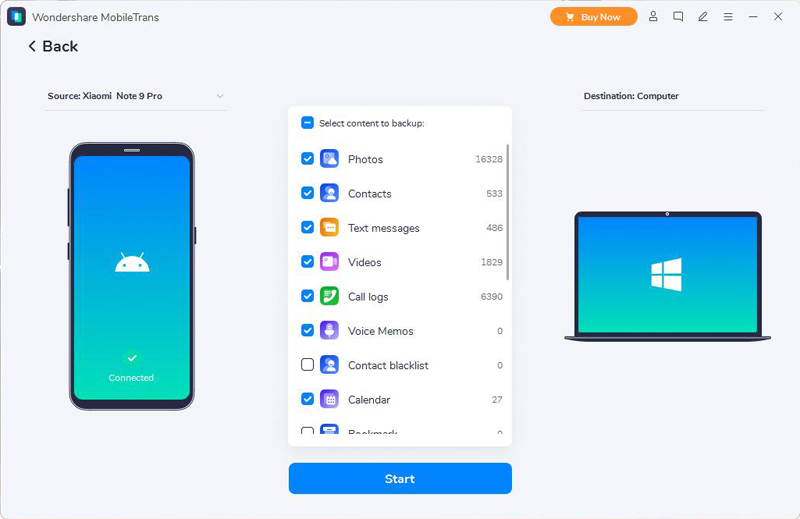
Step 1. Run Mobile Transfer > Tap "Phone Transfer" > Tap "Phone to Phone".
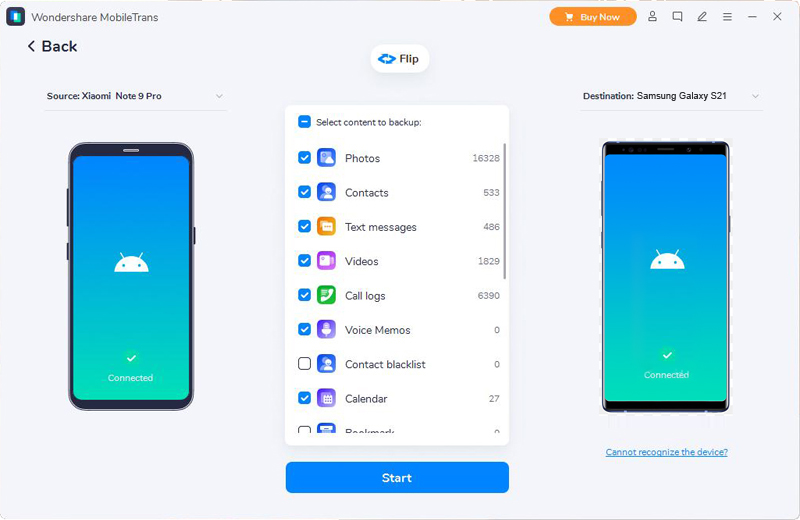
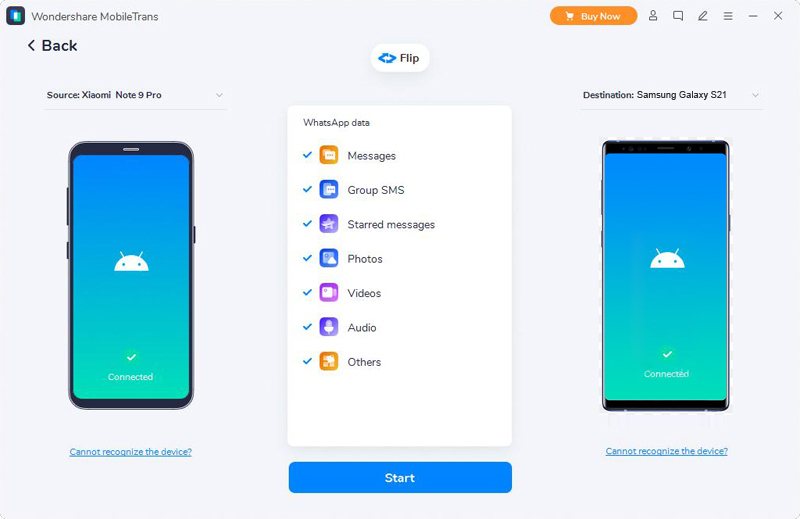
Step 2. Use the USB cables to connect your old phone and vivo X Note to computer, and follow the on-screen prompts to make your phones recognized.
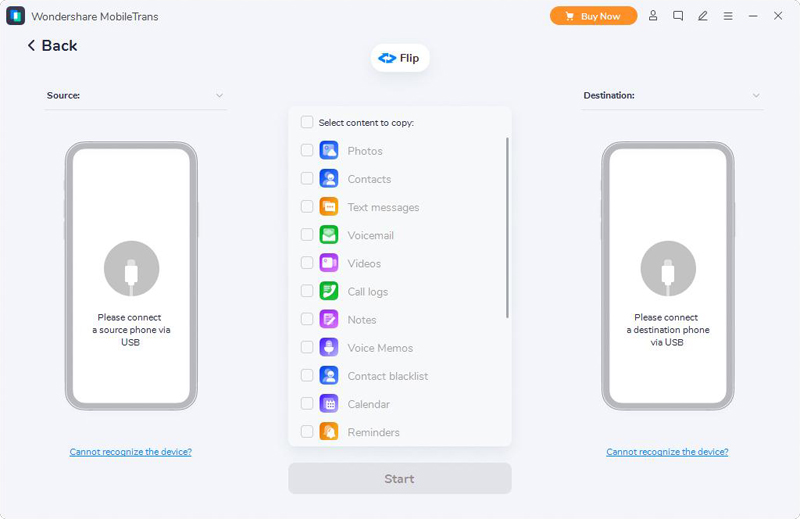
Tip: Once your phones are detected, they will be displayed on the both sides of the interface. Please click the "Flip" button to let the old phone displaying on the left panel, and the vivo X Note displaying on the right.
Step 3. After choosing the file types that you wish to transfer, and then click on "Start" to sync them from the old phone to vivo X Note.
Transfer WhatsApp/Wechat/Kik/Line/Viber Messages to vivo X Note
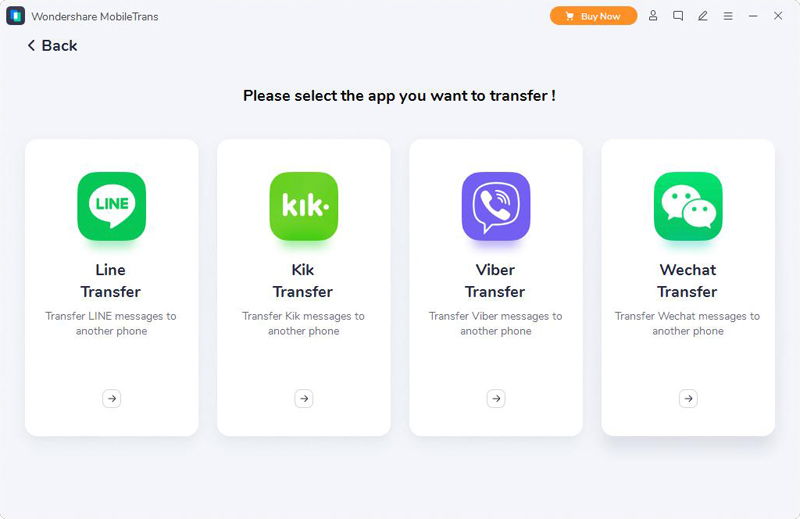
Step 1. Run Mobile Transfer > Tap "WhatsApp Transfer" > Choose the one you want from all the options.
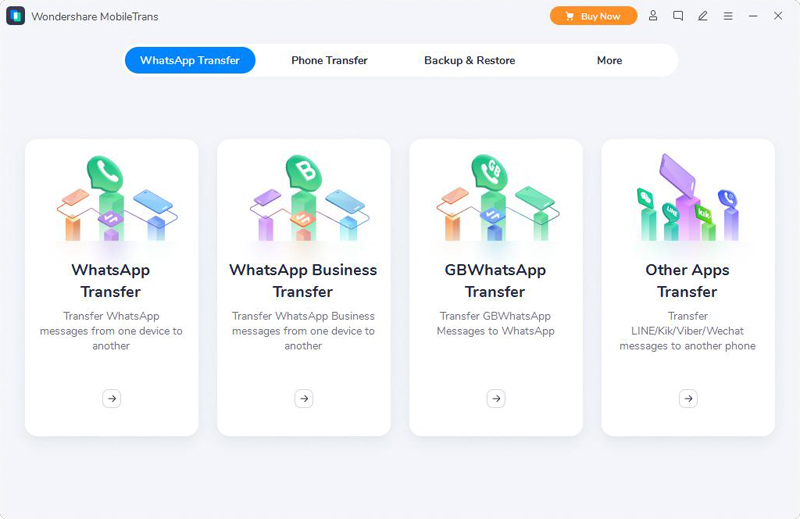
- To transfer your WhatsApp messages, you can choose "WhatsApp Transfer", "WhatsApp Business Transfer" or "GBWhatsApp Transfer" according to the WhatsApp version you are using.
- To transfer your Wechat/Kik/Line/Viber messages, you need to tap on "Other Apps Transfer", then you can see four options, namely, "Line Transfer", "Kik Transfer", "Viber Transfer" and "Wechat Transfer", just choose the one as needs.
Step 2. Connect both of your phones to computer via its USB cable, and adjust their position after recognition.

Step 3. Now, all the transferable file types will be listed, check those what you want, then click on "Start" to sync them to your vivo X Note.
Part 2 Restore Data from Backup to vivo X Note
The greatness of Mobile Transfer lies in its excellent comprehensive performance. You can use it to back up your mobile phone data with one click, or you can extract any required data from the backup anytime and anywhere and transfer it to any supported device, such as your vivo X Note.
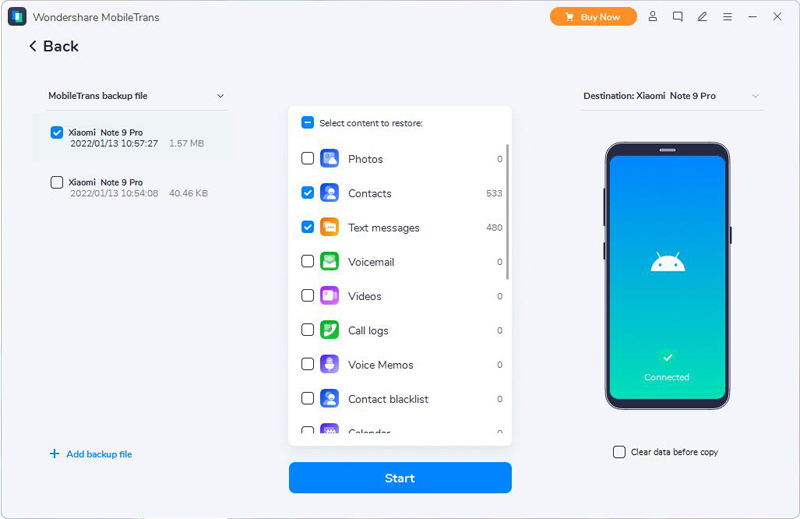
Restore Data from MobileTrans Backup to vivo X Note
If you have ever backed up your phone data using Mobile Transfer, then you can follow the steps below to restore them to your vivo X Note.
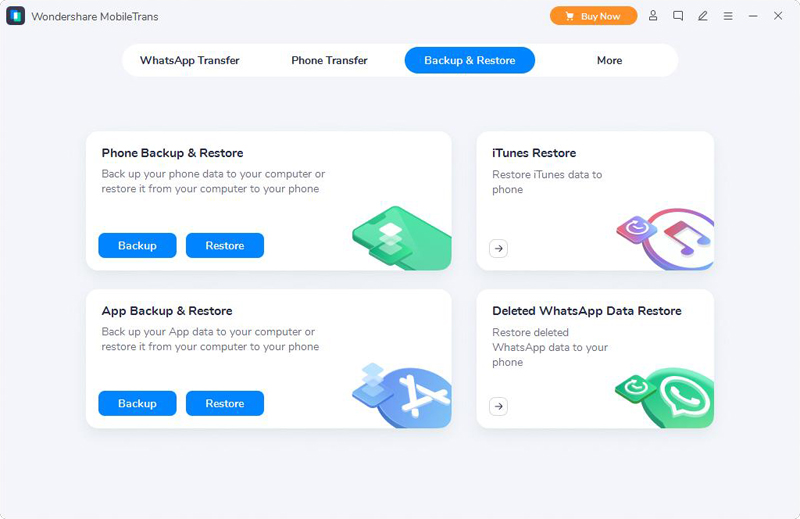
Step 1. Run Mobile Transfer > Tap "Backup & Restore" > Tap "Restore" button inside of the "Phone Backup & Restore" option.
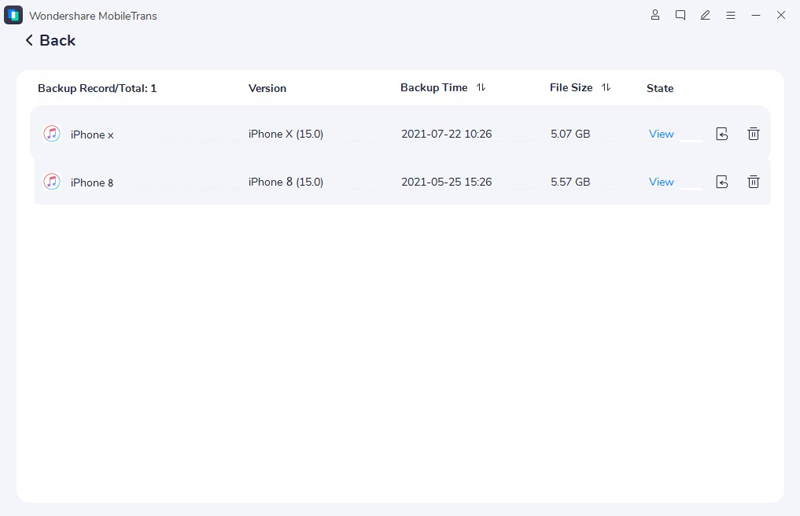
Step 2. The program will scan and load all the found backup file(s) from the established storage path, please choose the one as needs, then tap on the "Restore" button behind the selected backup.
Step 3. Connect your vivo X Note to computer, then check the required file types and tap on "Start" to moving them to your vivo X Note.
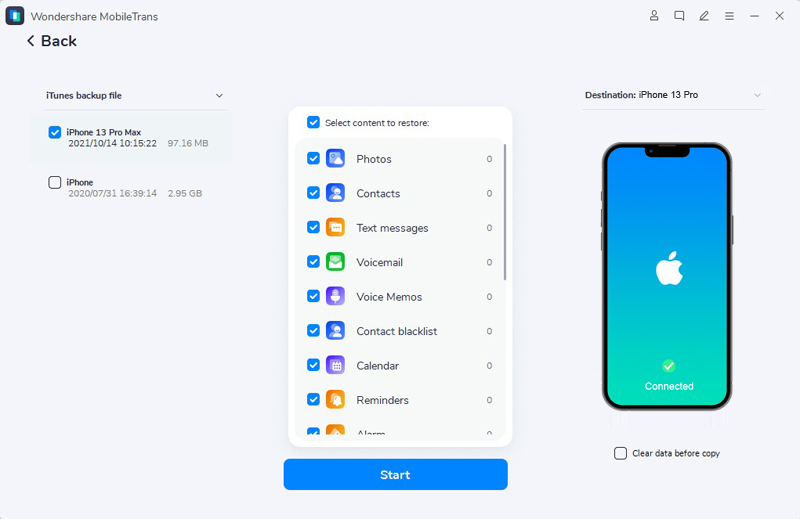
Restore Data from iTunes Backup to vivo X Note
If you are an old iPhone/iPad user, and you have ever synced your iPhone/iPad with iTunes, then you can follow the steps below to restore data from iTunes backup to your vivo X Note.
Step 1. Run Mobile Transfer > Tap "Backup & Restore" > Tap "iTunes Restore".
Step 2. Choose an iTunes backup from the list and press the corresponding "Restore" button.
Step 3. Connect your vivo X Note to computer, then check the file types as your needs and tap on "Start" to moving them to your vivo X Note.
Restore Data from vivoCloud to vivo X Note
vivoCloud is a cloud storage server developed by vivo for its mobile phone users. If you are originally a vivo user and have synchronized your mobile phone data to vivoCloud, you can refer to the following steps to download the data from vivoCloud to vivo X Note.

Step 1. Connect your vivo X Note to a stable WIFI network, then launch the vivoCloud app on your phone.
Step 2. Tap on the "Log in" button and enter the vivo ID and passcode to login your vivo account.
Step 3. Select the type of data you wish to restore, then tap on the "Restore" button to restore the selected data to your vivo X Note.
Restore Data to vivo X Note with Android Data Recovery
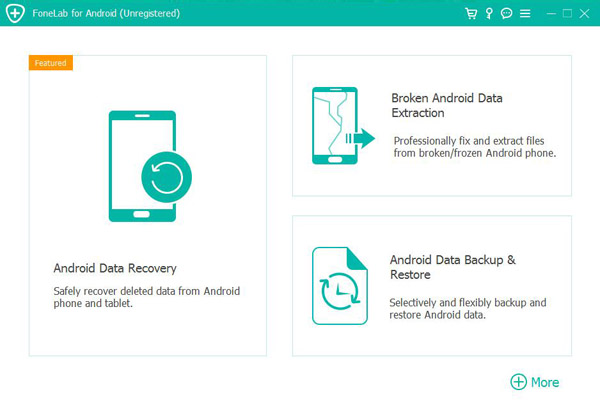
Android Data Recovery is a very reliable data management software, and data backup and backup recovery is one of its most commonly used functions. If you have ever used it to back up your mobile phone data, please follow the following steps to restore them to your vivo X Note.
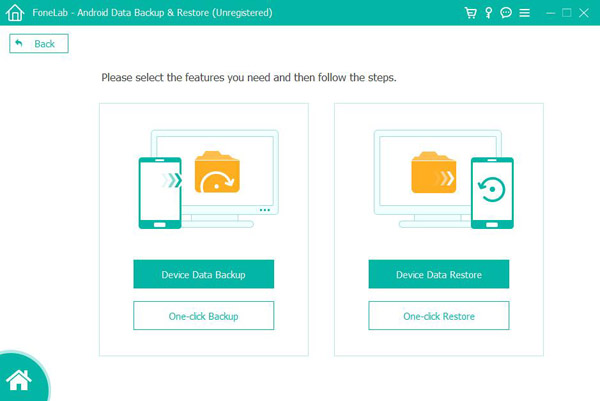
Step 1. Download, install and run the software on your computer, then tap on the "Android Data Backup & Restore" option.
Step 2. Connect your vivo X Note to your computer using USB. When the software detects your device, please select "Device Data Restore" among all the items.
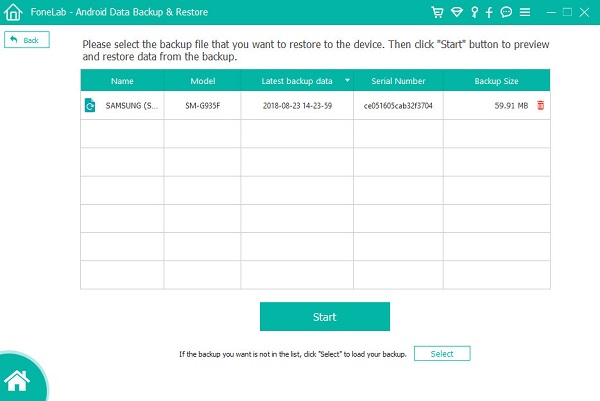
Step 3. Select the required backup file from the list, then click the "Start" button to begin extracting all the restoreable data from the selected backup.
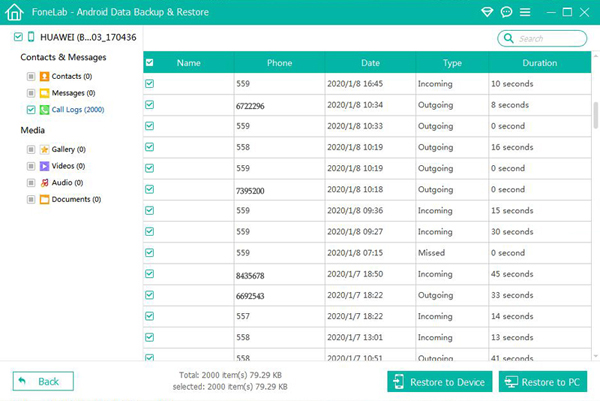
Step 4. When all the data have been extracted, you can preview all the details. After choosing whose what you needs, then click on "Restore to Device" to complete the recovery process.
Part 3 Directly Recover vivo X Note Lost Data without Backup
Android Data Recovery is well known and widely used, mainly because of its unparalleled data recovery capability and superior compatibility. With the help of this software, you can directly all data including text messsages, WhatsApp/Wechat messages, contacts, call logs, auido, music, photos, videos, documents and more from any Android smarphone & tablet, not just vivo, but also Samsung, Xiaomi, Redmi, Realme, Google, OPPO, Huawei, Honor, Motorola, ZTE, Infinix, ASUS, OnePlus, Lenovo, LG, HTC, Sony, etc..
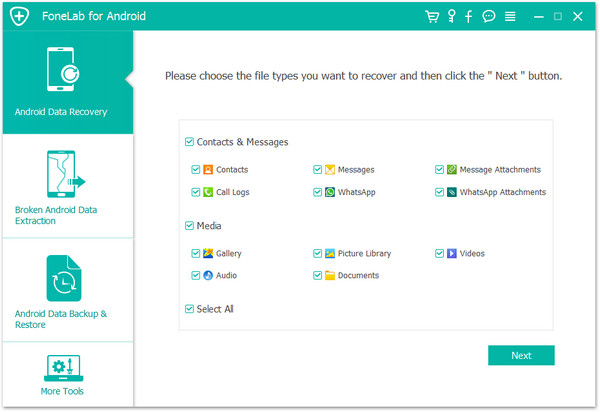
Step 1. Run the software on your computer, and then tap on "Android Data Recovery".
Step 2. Connect your vivo X Note to computer via USB cable, then enable the USB debugging mode on your phone's screen and press "OK".
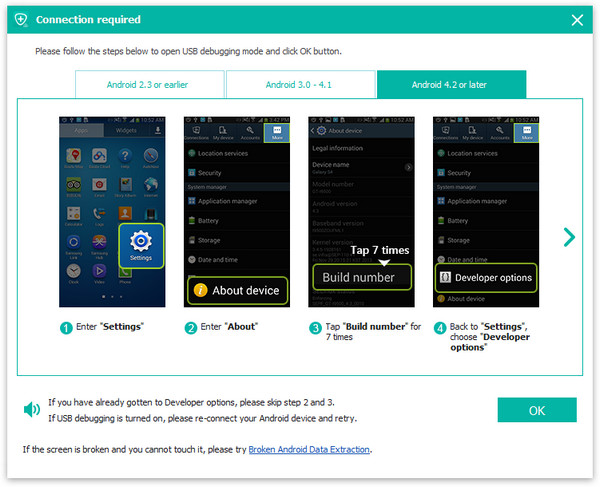
Tip: If your phone is connected but not detected successfully, please click “Device connected, but can’t be recognized? Get more help.” to get more methods for establishing a successful connection.
Step 3. After connection, all scanable file types on your device will be showed in the interface, choose those whatever you wanted and press "Next".
Note: Before the scan starts, the program will prompt you to install a plug-in to root your mobile phone and send you an authorization request to read the relevant data. Please agree to it. None of these operations will damage your mobile phone and data. Please rest assured.
Step 4. Wait for the scan process to finish, all the found data will be listed. Click to preview all of them in details, then select the files as needs and click on "Recover" to save them back to your vivo X Note.
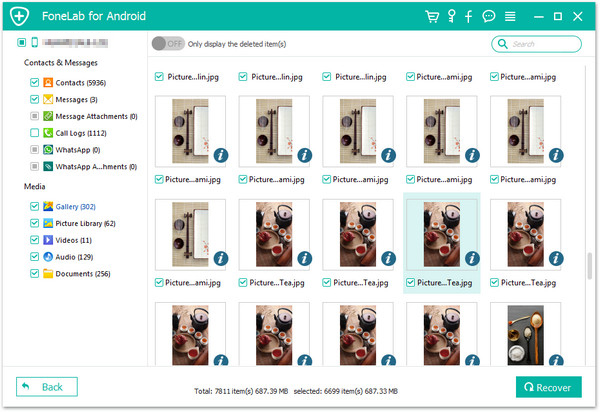
Tip: If you can't find the data you want, click "Deep Scan" button on the right bottom corner to get more lost data.
Part 4 Back Up Data from vivo X Note to Computer
Most mobile phone users don't have the habit of backing up their mobile phone data. On the one hand, they don't think it's necessary; on the other hand, they think it takes too much time to back up. In fact, whether it is data transfer or data recovery, when you have a backup file, it is definitely a happy thing. Therefore, if you know some simple and efficient data backup methods, I believe you are very happy to back up your mobile phone data regularly, aren't you? Next, let's tell you how to back up your vivo X Note data in a click.
Back Up vivo X Note Data Using Mobile Transfer
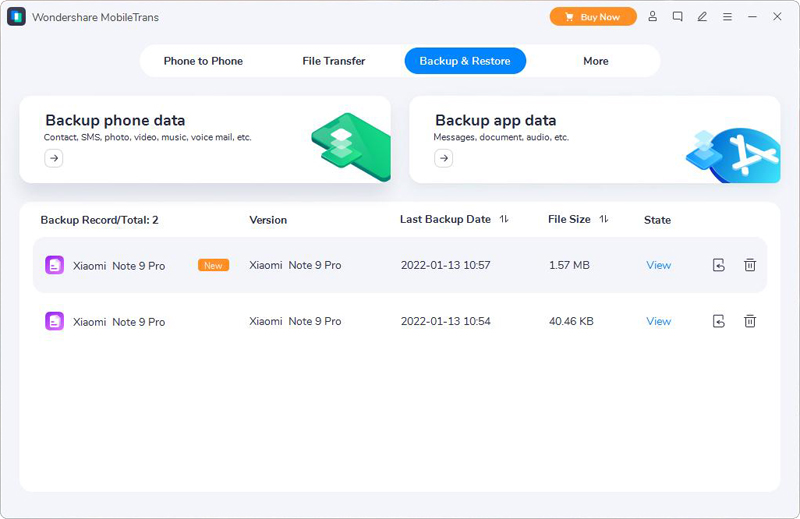
Step 1. Run Mobile Transfer > Tap on "Backup & Restore" > Choose "Phone Backup & Restore" > Tab on "Backup".
Step 2. Connect your vivo X Note to computer using a USB cable, the program will detects it soon.
Step 3. Choose the file types that you wish to backup, then click on "Start" to begin to back up the selected data from vivo X Note to your computer.
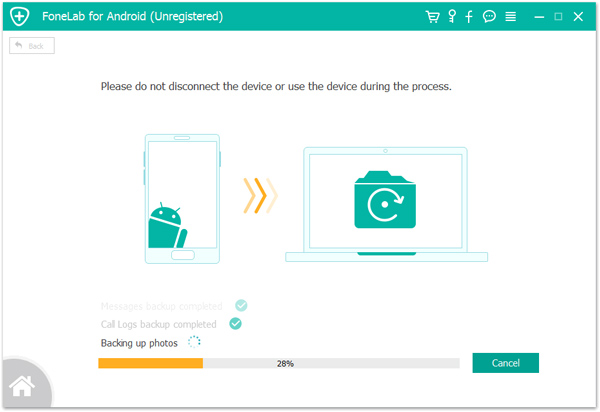
Back Up vivo X Note Data Using Android Data Recovery
Step 1. Run vivo Data Recovery and tap on "Android Data Backup & Restore".
Step 2. Connect your vivo X Note to computer using a USB cable, and then tap on the "Device Data Backup" or "1-Click Backup" option.
Step 3. Select the required files you are going to backup, then click on "Start" to complete the backup process.
Back Up Any Data on Your vivo X Note
Note: Before backing up your phone data, please remember to connect your vivo X Note to a stable WIFI network, and make sure that your phone has sufficient power.
Step 1. Run vivoCloud app on your vivo X Note, then login to your vivo account and you can back up Contacts, Messages and other files according to your need.
Step 2. Go to Settings > Accounts & Sync, access the sync interface of your personal Google account, then select options you want to back up.
Step 3. To backup your photos on vivo X Note, please go to Photos (Google Photos) app, then tap on Menu > Settings > switch the "Back up & sync" option to "On", then the photos on your phone will be backed up automatically.
Step 4. Go to Settings > More settings > Backup & Reset > Backup data > Google server, switch the "Back up my data" option to "On".
Step 5. Run Drive app or other drive apps on your vivo X Note, you can upload and back up other files according to your needs.


