Whether you're recording a live broadcast or creating a work video training, you often need to record both your computer screen and audio. But how can we record computer screen with audio easily and quickly? This article will be an eye-opener for you.

The most convenient solution I can offer allows you to easily create high-quality screen and audio recordings.
Learn how to expertly capture your computer screen and audio through this comprehensive tutorial. Acquire proficiency in a range of recording techniques, ensuring that you never overlook critical on-screen instances. Enhance the quality of your presentations, tutorials, and gaming sessions using this comprehensive guide. Utilize the wealth of methods outlined in the informative reference article, enabling you to record your computer screen and audio with accuracy and finesse.
Embark on your screen and audio recording journey on both Windows and Mac operating systems with the help of the comprehensive reference article below. Discover a variety of methods for capturing your screen and audio content on your Windows and Mac computers.
Discover valuable insights to enhance the quality of your screen and audio recordings.
Uncover practical tips and expert tricks outlined in the reference article, enabling you to refine your recording proficiency. Elevate your video content and engage your viewers with impeccable recordings.
Learn about the three major features, and please continue your recording journey.
Personalize Recording Configurations
Explore the process of fine-tuning your recording parameters, encompassing aspects like frame rate, resolution, and output format. This flexibility empowers you to adapt your videos to specific needs, whether it's for a presentation, tutorial, or showcasing your gameplay skills.
Prioritize Exceptional Audio Quality
Recognize the significance of superior audio quality in elevating your video content. Uncover techniques for configuring your microphone settings, minimizing background disturbances, and maintaining optimal audio levels to ensure your videos maintain a professional audio standard.
Master Saving and Editing Techniques
Grasp the importance of proficiently saving and editing your recordings. Delve into the array of editing capabilities provided by different tools, enabling you to refine your videos and achieve the desired professional touch.
Guide Listing
- Method 1: Use the tools that come with Windows and Mac OS
- Method 2: Make full use of Screen Recorder tool On Mac
- Method 3: Capturing Screen and Audio on Windows
- Method 4: Capture Screen with Audio Using PowerPoint on Windows
- Method 5: Record your Screen with audio by Audacity
- Method 6: Record Screen with audio use Adobe Audition
Method 1: Use the tools that come with Windows and Mac OS
Players with Windows operating systems can use the Xbox Game Bar to record game videos, but this is not a built-in function of recording screen and audio in Windows systems. Apple users can use QuickTime Player to record the screen and play audio at the same time. So, here are some steps on how to access and configure these built-in tools.
To enable screen and audio recording using QuickTime Player, adhere to these steps:
- Launch the QuickTime Player application.
- Access the "File" menu and opt for "Save Recording Setup."
- In the ensuing window, designate the desired file name for the recording and click "Save."
- Choose the file format for saving the recording and indicate the preferred storage location before clicking "Save" again.
- Navigate to the window you wish to record for screen and audio content, and ensure that QuickTime Player's "Screen" and "Audio" tabs have the correct source selected.
- Initiate the recording process by clicking the "Start" button and await its completion.
- Upon concluding the recording, open the saved file and import the video and audio components for editing and customization as needed.
Method 2: Make full use of Screen Recorder tool On Mac
SyncRestore Screen Recorder is a powerful screen recording software that can create professional screen recordings for Windows and Mac computers and add audio effects. Here are some detailed guidelines to help you get the most out of the software and achieve great results. First, you need to download and install Screen Recorder. After downloading on the official website, you will see the installation wizard and follow the prompts to complete the installation process. Once the installation is complete, you will see the Screen Recorder icon, which can be found on the taskbar.


Here are the steps to get started:
Step 1: Begin by opening your computer's web browser. Visit the official website of FoneLab Screen Recorder and proceed to download and install the program. Once the installation is complete, the program will automatically launch.
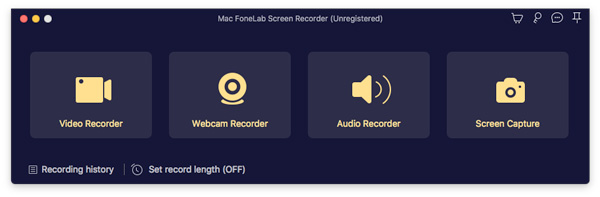
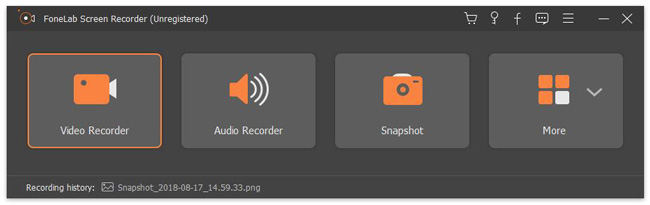
Step 2: Within the program interface, you'll notice several options, including Video Recorder, Webcam Recorder, Audio Recorder, and Screen Capture. For this task, select "Video Recorder."
Step 3: When you're prepared, simply click the "REC" button to commence the recording. If necessary, you can also make adjustments to recording settings, mouse settings, hotkeys, output preferences, or other relevant options.
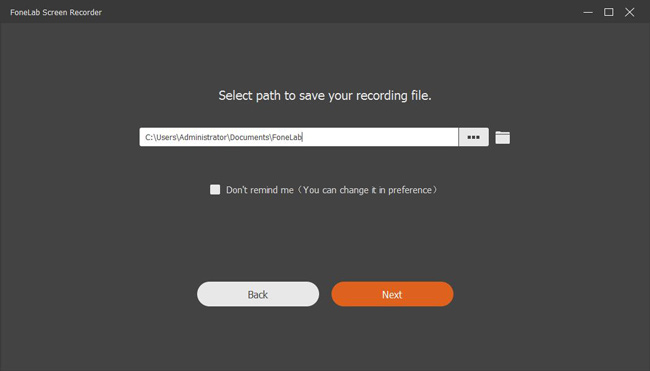
Step 4: Once you've completed your recording, click the "Stop" button, and save the recorded files to a folder on your computer.
Method 3: Capturing Screen and Audio on Windows
Multiple approaches are available for screen recording on Windows 10, which include employing PowerPoint (PPT), web-based recorders, or alternative software solutions. However, the introduction of Windows 10/11 has brought forth a comprehensive functionality known as the Gamebar, enabling direct screen capture on your PC. It's essential to be aware of certain constraints associated with the Gamebar, such as its inability to capture the entire screen.
Steps to Record Screen with SyncRestore Screen Recorder:
Step 1: Launch SyncRestore Screen Recorder on your computer, and from the main interface, select Video Recorder.
Step 2: You can start recording by clicking the REC button without any additional settings. However, if you prefer, you have the option to customize the recording area, select a different destination folder, and more. Additionally, you can enhance your videos by adding annotations during the recording.
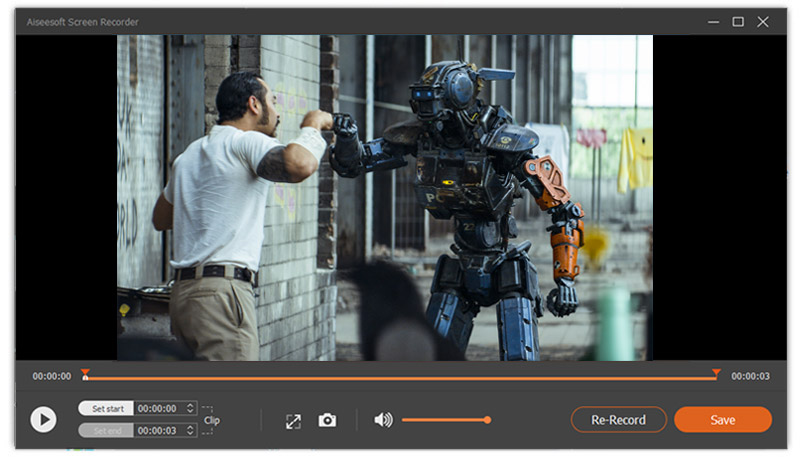
Step 3: When you're done, simply click the stop button and save the video to your computer.
Method 4: Capture Screen with Audio Using PowerPoint on Windows
In this section, we will also explore another feature available to PowerPoint users, which is screen recording. This feature is quite useful, especially when users want to convert their content-rich presentation into a video format. Screen recording technology enables users to effortlessly capture the content displayed on their screens and save it as a video file. This method is particularly beneficial for preserving valuable presentation content in video format, making it convenient for future reference or sharing when required.
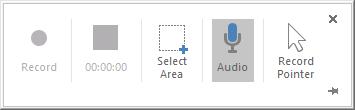
Step 1: Initiate the PowerPoint recorder by selecting "Insert" and then choosing "Screen Recording."

Step 2: In the pop-up control bar, activate the audio option and click "Select Area" to define the recording area.
Method 5: Record your Screen with audio by Audacity
Audacity is a well-known and user-friendly audio recording and editing software designed for Windows 10 operating systems. Its wide range of features simplifies the tasks of recording, editing, and manipulating audio files, catering to both beginners and experienced users effectively.
Step 1: Download and install Audacity from its official website if you haven't already. After installation, launch the application.
Step 2: Confirm that your microphone or audio source is correctly connected to your Windows 10 computer and is recognized by the system.
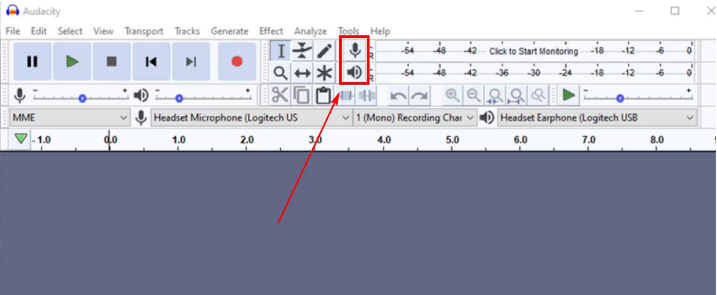
Step 3: You'll notice a dropdown menu located beside the microphone icon in the top toolbar. Click on it to choose your preferred recording source, either your microphone or another audio input. To avoid audio distortion, click on the microphone icon and adjust the recording level. Adjust it to a level that doesn't peak into the red zone while speaking or playing audio.
Step 4: Expand the dropdown menu located next to the audio track title and pick the format in which you wish to record your audio, typically either WAV or MP3.
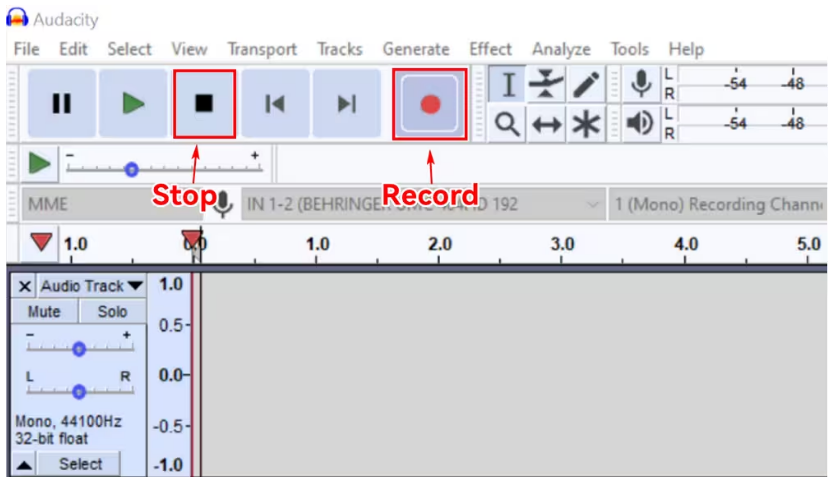
Step 5: Initiate the recording process by clicking on the red "Record" button found in the toolbar. Start speaking or playing the audio you intend to capture. Conclude your recording by clicking the square "Stop" button in the toolbar.
Step 6: Navigate to "File" and choose "Export" to preserve your recording. Decide on a location and provide a name for the file. Next, select your preferred format and finalize the process by clicking "Save."
Method 6: Record Screen with audio use Adobe Audition
Adobe Audition is a robust software for audio recording and editing, extensively employed on the Windows 10 OS for capturing and improving audio content. It's renowned for its user-friendly interface and an array of advanced features that streamline the audio recording, editing, and mixing process. This makes it an excellent option for both experienced professionals and beginners. Whether you're recording podcasts, music, or any other audio content, Adobe Audition equips you with the necessary tools to attain top-notch results, solidifying its position as the go-to software for audio production and editing on Windows 10.
Here are the steps for you to record screen with audio:
Step 1: To start using Adobe Audition, you need to launch it and access the File menu on your Windows 10 computer. Next, click New > Audio File to create a new audio project. In this step, the user needs to specify a file name and storage location for the audio file. After successfully creating an audio project, users can start Audition and start recording and editing audio material.
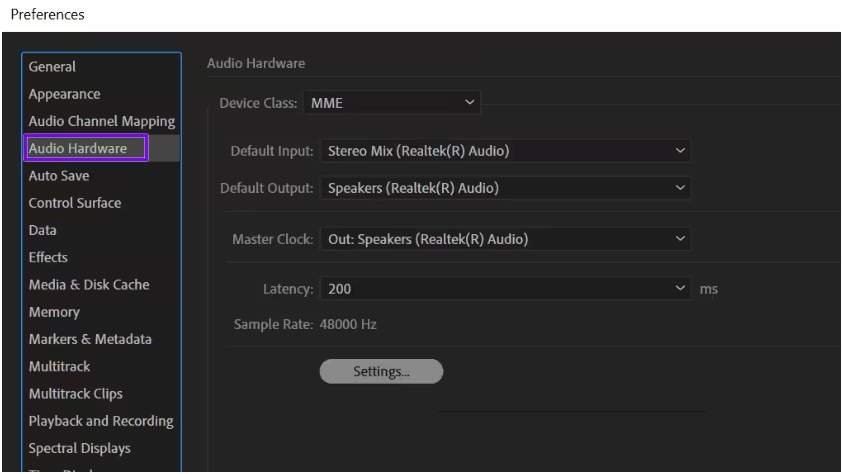
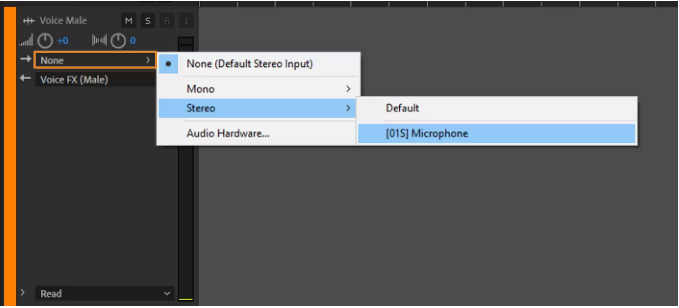
Step 2: When doing speech recognition, make sure your microphone or audio input device is connected and recognized by Windows. Visit Edit > Preferences > Audio Hardware and select your audio input and output devices. Adjust settings as needed. Also, if you encounter any issues, you can try restarting your computer to resolve the issue.
Step 3: Within the Multitrack Editor, pick the specific track where you intend to capture audio. Activate the "Arm for Record" button, represented by a red circle, positioned on the track. Subsequently, produce a sound or speak into the microphone to confirm that the input level meter displays the correct level. It's important to steer clear of any clipping, which is when the meter enters the red zone, as this can lead to undesirable distortion.
Step 4: Before recording, make sure you have your audio device plugged into your computer's audio interface. Next, follow these steps: 1. Click the Record button (a red circle) in the transport control area at the top of the screen. This will start Adobe Audition recording. 2. During the recording process, you can click the "Stop" button (a square icon) in the transmission control area at any time.
Step 5: Once you have finished recording, go to the "File" menu and select the "Save File" option to save your audio file to your computer. You can choose a suitable location and audio file format (usually WAV or MP3 format) based on your needs and equipment. After selecting the file, click the "Save" button and your audio file will be safely saved in the specified location. In this way, you can enjoy your precious audio recordings anytime and anywhere.
Step 6: Adobe Audition is a powerful audio editing software that can help you easily trim, clean and enhance recorded audio. If necessary, the audio can be trimmed, redundant content removed, and pre-processed to make it clearer and more accurate. After editing, the audio can be imported into the "File > Export" menu and then selected the desired audio format to save. In this way, you can output the edited audio files to different platforms or devices, such as common MP3, WAV, AAC and other formats. Audio can also be exported as smart objects for further processing in applications such as Adobe After Effects and Premiere Pro.
Conclusion
You can check the relevant documentation to learn that Screen Recorder is a powerful screen recording software that can help you record camera, video and audio easily. You can start using the software with simple operations to record your screen for educational and other presentation purposes. With Screen Recorder you can easily capture screen content and save it as a video or audio file. The software has multiple recording modes, and you can choose different modes according to your needs. In addition, the software also provides a real-time preview function, you can view the screen content in the preview window to better adjust the recording settings. Screen Recorder also supports recording screens on multiple computers simultaneously, which is useful when content needs to be presented to multiple audiences at the same time. In addition, the software provides a convenient user interface that can help you quickly find and set the desired recording settings. In summary, Screen Recorder is a powerful screen recording software that can help you easily capture screen content and save it as a video or audio file. You can always try this software to record your screen for educational and other presentation purposes.


