Nothing is more depressing than a slow computer/Windows. Especially when you are in a hurry. After all, it was completely ok not long ago, and it hasn't changed much during this period. But here, wait a few minutes to open Microsoft Word ...
Of course, you can bite the bullet and put up with it. But before spending money on a computer technician or buying a brand new computer, you want to see if you can repair it. Right?
If it sounds like you, then we have some good news: you may be right. Windows will slow down as time goes by, so if your computer used to run normally, but now it is slowing down, this may be a Windows problem, and you should be able to fix it yourself.
In this article, we will show you how to install and update drivers on Windows 10/8.1/7. Your Windows PC needs drivers to communicate with hardware such as graphics card, audio interface, printer, mouse and keyboard. Some peripheral drivers can be installed only by connecting them to your computer (conforming to the class standard), but most third-party devices usually need to install additional drivers. We divide it into four parts:
Windows driver updates and many devices, such as network adapters, monitors, printers and video cards, are automatically downloaded and installed through Windows updates. You may already have the latest driver, but if you want to update or reinstall the driver automatically, the method is as follows:
Methods Outline:
- Method 1: Speed Up/Optimize/Update Computer/Windows Drivers
- Method 2: Update Driver through Device Manager
- Method 3: Update drivers through windows
- Method 4: Delete unnecessary files, applications, applications to Speed Up your Computer
- Method 5: Remove applications and desktop programs to Optimize your PC
- Method 6: Clean the vent to Speed Up your computer
Method 1: Speed Up/Optimize/Update Computer/Windows Drivers
Many computer problems are caused by outdated device drivers.
Therefore, when you encounter computer problems, the first thing you should do is to check whether your driver is up to date. If not, please update them.
So, you can update your drivers in windows 10/8.1/7 with Windows Drivers Tool just one click:
Therefore, if your computer slows down, you will need to update the driver. If it crashes or crashes, update the driver. If you can't connect to the Internet, update the driver. If your mouse, keyboard, monitor, or speakers are working, update the driver. If you update the driver for whatever the problem is actually, it is highly likely that the problem will be resolved with Windows Drivers Tool automatically just 5 steps.
With Windows Drivers Tool you can update all drivers with a single click. Get the latest version of all drivers certified as safe and reliable directly from the manufacturer. You don't need to know anything about your computer. Windows Drivers Tool automatically recognizes your system and all devices and installs the latest and correct drivers directly from the manufacturer. You don't need to know exactly what system your computer is running on, you don't risk downloading and installing the wrong drivers, and you don't have to worry about making mistakes when you install. You can receive all driver updates, including updates that Microsoft considers "optional" and do not provide. The device manufacturer does not rely on Windows Update to provide updated drivers on time (because they pre-supply the latest drivers).

One-Click to Speed Up/Optimize/Update Computer/Windows Drivers automatically:
Step 1: Run the downloaded executable and follow the on-screen instructions.
Step 2: Run Windows Drivers Tool and click UPGRADE.

Step 3: When you purchase Windows Drivers Tool, paste or enter the software key you received by email.

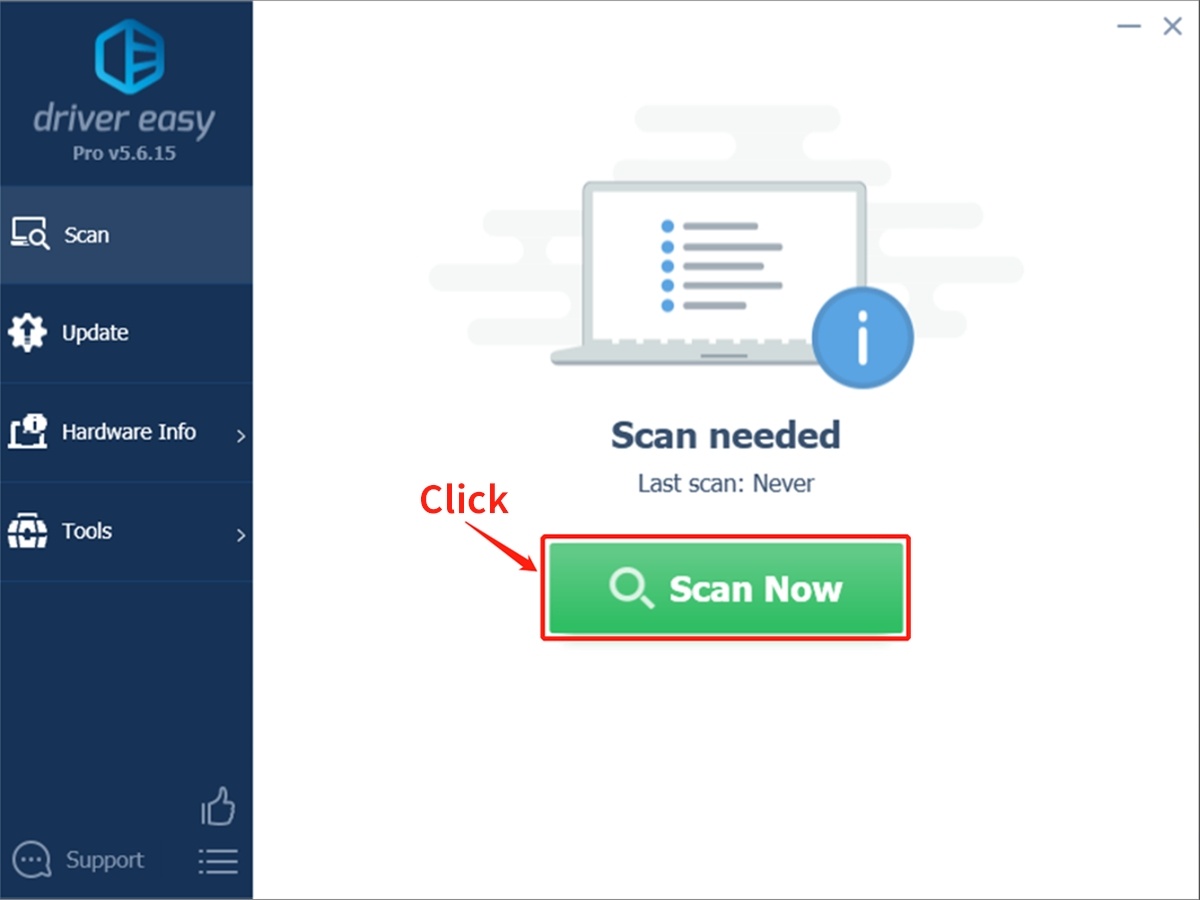
Step 4: Click Scan Now. Windows Drivers Tool scans your computer and detects devices that don't have drivers or are outdated.
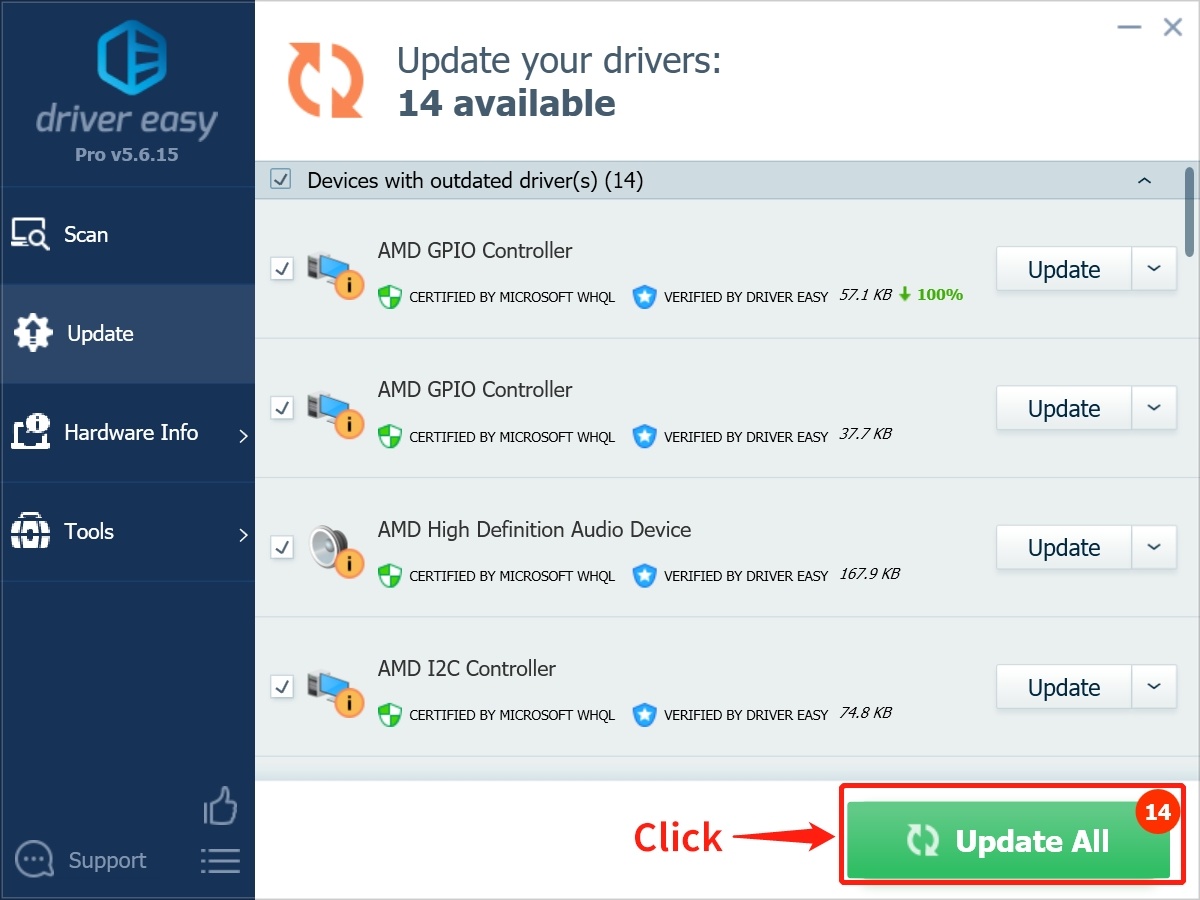
Step 5: Click Update All. Windows Drivers Tool then downloads and updates all old and missing device drivers to provide the latest version directly from the device manufacturer.
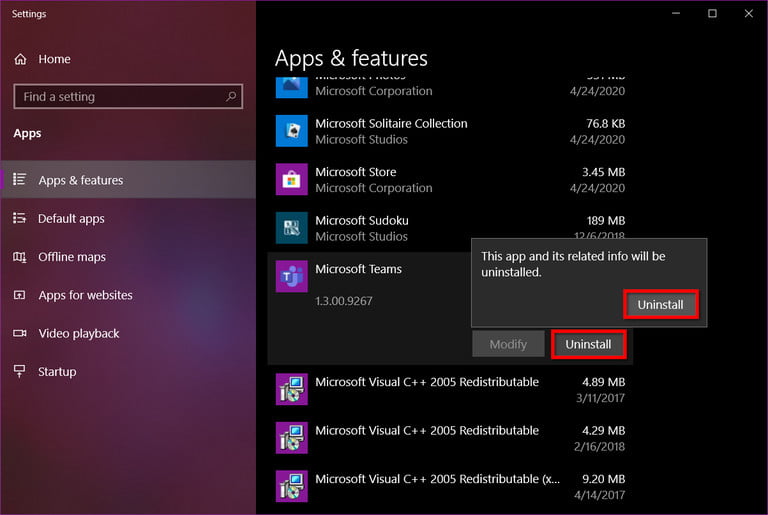
Method 2: Update Driver through Device Manager
Along with many devices such as network adapters, monitors, printers, and video cards, driver updates for windows will be automatically downloaded and installed through windows update. You may already have the latest driver, but if you want to update or reinstall the driver manually.
To manually update windows drivers, you need to use device manager. To begin, follow these steps:
Step 1: Open the Control Panel and select Device manager.
Step 2: Find the scope of the device, right-click and select Update Driver.
Step 3: In the window that appears, select Search automatically for updated driver software.
Method 3: Update drivers through windows
Another way to manually update windows drivers is to use windows update. To begin, follow the next step.
Step 1: Open windows settings.
Step 2: Select Update and Security > windows update.
Step 3: Now click Select view optional update.
Step 4: Move to driver updates tab.
Step 5: Confirm the driver to be updated and click download and install.
Method 4: Delete unnecessary files, applications, applications to Speed Up your Computer
Storage plays an important role in the overall state of PC. It not only saves the operating system, all programs and applications, files and temporary data, but also plays an important role in memory management. Windows 10 switches to the default drive when the system memory is overloaded and uses part of it as "virtual memory". This is not a problem on PCs with large memory above 16GB.
For example, windows 10 can allocate 5GB of free space in virtual memory. When the drive is full of files and programs and there is only 4GB of free space, performance problems may occur. Deleting unwanted files and programs can help.
Step 1: Click the folder icon in the taskbar. Then open the file explorer.
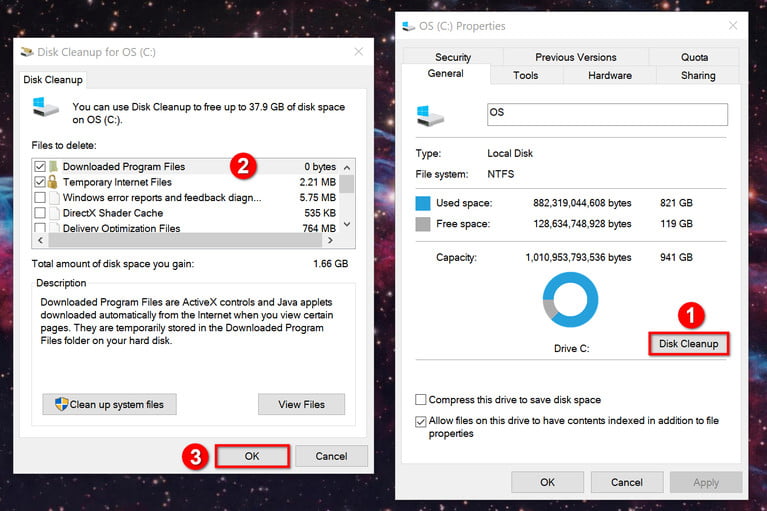
Step 2: The file browser must be opened with this PC category selected. Otherwise, select the PC shown on the left. Right click the default drive and select properties from the pop-up menu.
Step 3: click the disk cleanup button.
Step 4: the disk cleanup window appears on the screen. Select the file type to delete from the files to delete.
You can safely deleted these files:
Delivery optimization files
Downloaded program files
Recycle bin
Temporary internet files
Temporary files
Thumbnails
You can delete files from the download folder. Include this range when you include unwanted files. If you save a file to this folder, you will not choose to download it.
Step 5: Click OK to finish.
Click the system file sorting button to delete more files, but pay attention. The following is a list of that can be safely deleted.
Delivery optimization files
Device driver packages
Language resource files
Windows upgrade log files
If unsure, please read each instruction before deleting. Do not delete the list of files marked as windows ESD installation files. This file is used to reconfigure the PC.
Method 5: Remove applications and desktop programs to Optimize your PC
Delete unwanted applications and desktop applications to ensure enough space for users and windows 10, and more space on the computer.
Application: right click the tile or start menu list, just select Delete in the pop-up menu.
Desktop application: right click the start menu list and select Delete from the pop-up menu. When the program is provided with the deletion program, please use it instead.
According to the next step, you can delete applications and desktop applications through an interface.
Step 1: Right click the start button and select applications and functions in the power menu.
Step 2: Select an application or desktop application, click the delete button, and then click the second delete prompt.
Method 6: Clean the vent to Speed Up your computer
Almost all computers need air flow to maintain their internal components. Through one set of vents, the fan sucks in cool air, and the second set of vents discharges warm air. In some cases, because the chassis itself transfers heat in the components, you can see the ultra book without vents. But most desktops and laptops rely on a certain amount of air flow.
In order to cool the PC that needs air flow, keep the suction port clean. As the internal fan draws air, this vent will accumulate dust and other foreign matters. Over time, this unpleasant collection will reduce air intake, resulting in hot internal components such as processors and memory. The hotter the PC, the slower the performance. You will eventually see program conflicts, notorious death, blue screens, and random reboots.
The aspirator on the table is mainly on the front. You can follow the side or top. The power supply device including the PC exhausts warm air through the ventilation hole on the back.
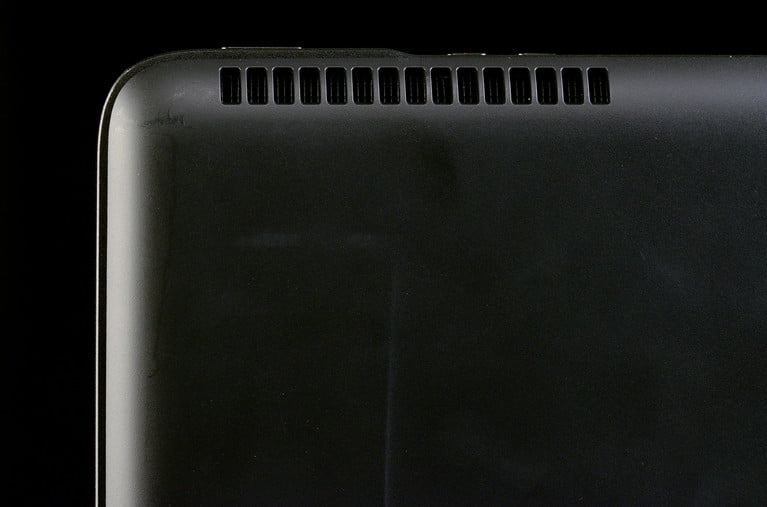
The aspirator on the laptop is usually on the floor. The exhaust port is generally installed on the back or side according to different models. Suction fans are generally the dirtiest.
The best way to clean these vents is to use compressed air. Cans can be purchased at Walmart or similar stores. In some cases, you may need to open the side of the desktop, simply blow everything out, or clean the dust filter by hand. For the saw, in order to use compressed air in the fan and surrounding components, the panel that can be deleted is located at the bottom.
However, if you are not familiar with the process, please do not break down anything. Clean the respirator or ask an experienced person for help.


