9 top ways to transfer all data from Android/iPhone to OPPO Find X5/X5 Pro, and to recover deleted and lost files on OPPO Find X5/X5 Pro, as well as backing up your OPPO Find X5/X5 Pro data.
This practical article will show 9 different methods to users of OPPO Find X5 and OPPO Find X5 Pro from three aspects: data transfer, data recovery and data backup. If you have the same need, please don't miss this excellent article.
OPPO will launch a brand-new OPPO Find X5 series flagship mobile phone at its spring new product launch conference. The OPPO Find X5 series will include three versions of OPPO Find X5 and OPPO Find X5 Pro, that is, in addition to two versions of Snapdragon 888 and Snapdragon 8 processor, there will be a version using MediaTek Dimensity 9000 processor.
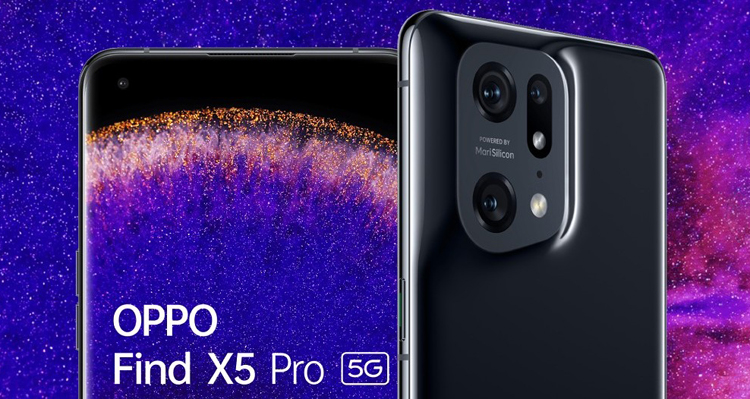
The new OPPO Find X5 series will adopt the new professional camera suspension anti-shake technology, and the anti-shake effect will be improved by 3 times. The front will use a micro-curved OLED flexible screen with a refresh rate of 120Hz and support the second generation LTPO technology. OPPO Find X5 series rear camera module is a triple lens module composed of two main camera levels with high probability.
Whether you finally choose OPPO Find X5 or OPPO Find X5 Pro, you will get a flagship mobile phone with greatly improved comprehensive performance. There is no doubt that it will make you fondle admiringly. Therefore, you don't want to be trapped in data processing problems such as data transfer, data backup and data recovery, which will reduce your user experience, do you? This is a rare opportunity to solve a series of problems you encounter in using OPPO Find X5( Pro) by following our summarized experience.
Part 1 Transfer Data to OPPO Find X5/X5 Pro
- Directly Sync Android/iPhone to OPPO Find X5/X5 Pro (Recommended)
- Transfer WhatsApp Messages to OPPO Find X5/X5 Pro (Recommended)
- Transfer Wechat/Line/Kik/Viber Messages to OPPO Find X5/X5 Pro (Recommended)
- Sync Data from Backup to OPPO Find X5/X5 Pro
- Sync Data to OPPO Find X5/X5 Pro with Clone Phone
Part 2 Recover Data from OPPO Find X5/X5 Pro
- Directly Recover Deleted & Lost Data on OPPO Find X5/X5 Pro (Recommended)
- Restore Data from Backup to OPPO Find X5/X5 Pro
Part 3 Back Up OPPO Find X5/X5 Pro Data
- Backup OPPO Find X5/X5 Pro with Mobile Transfer
- Backup OPPO Find X5/X5 Pro with Android Data Backup & Restore
Part 1 Transfer Data to OPPO Find X5/X5 Pro
In fact, the data migration on OPPO Find X5/X5 Pro is not only in the initial stage of use, but also may run through this life cycle, so you should master at least one effective data transfer method. However, next, we recommend you the five most commonly used solutions.
Directly Sync Android/iPhone to OPPO Find X5/X5 Pro
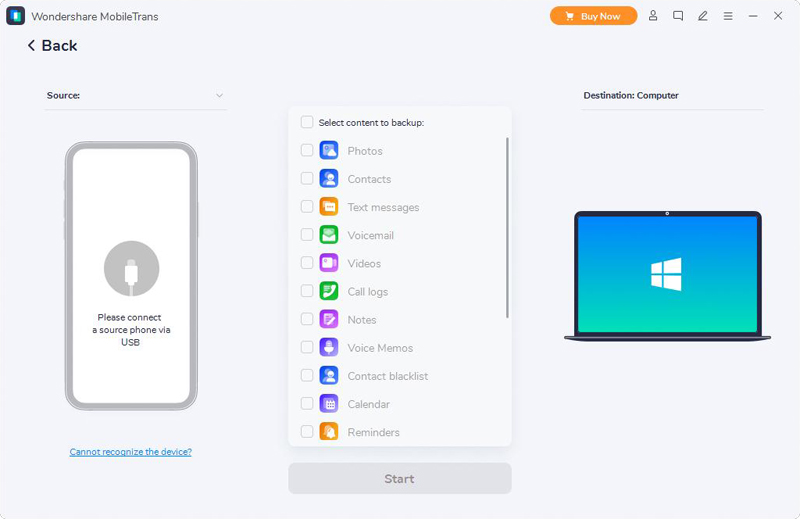
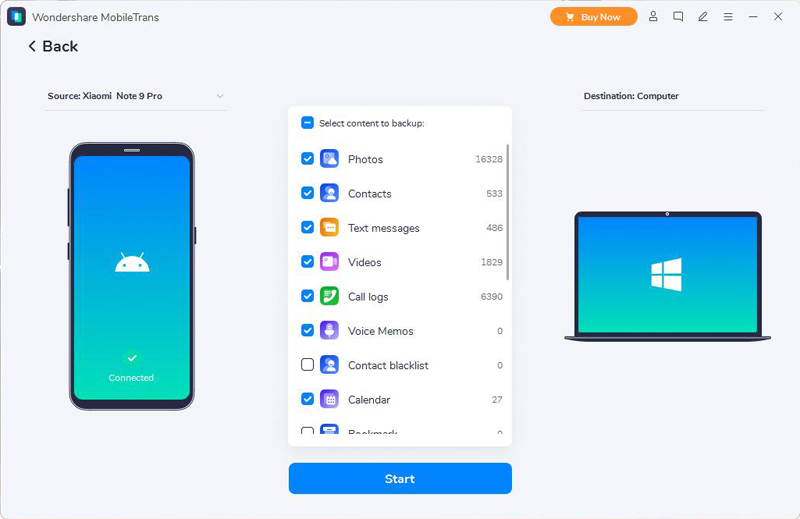
Mobile Transfer is the first choice to solve the problem of data transfer between different mobile phones. It has the characteristics of multifunction, simple operation, strong compatibility and high favorable rate of users. More importantly, it can easily and directly transfer all data including photos, contacts, contact blacklist, call logs, text messages, videos, voice memos, calendar, notes, reminders, music, Apps and more from any Android/iPhone to OPPO Find X5/X5 Pro. Now, please click to download and install the corresponding version of Mobile Transfer to your computer, and follow the below steps to try moving your phone data.


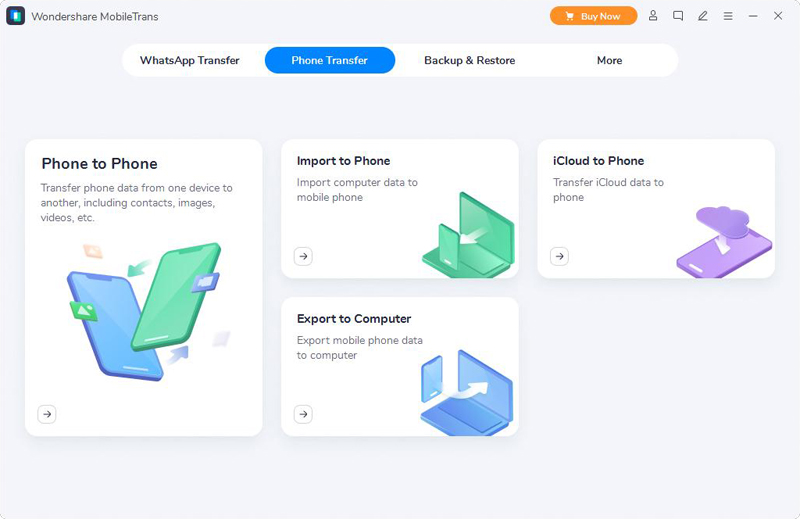
Step 1. After running the software, as you can see, the page displayed will have various options. In this case, please select "Phone Transfer" in the menu bar at the top of the page, and then select "Phone to Phone" among all displayed options.
Step 2. Connect both of your old and new phones through cables into the USB ports on your PC, the program will detects your phones automatically. Once they're deleted, the old Android/iPhone will displayed on the left and the OPPO Find X5/X5 Pro will displayed on the right. A "Flip" option is available at the top center to swap the phone sources.
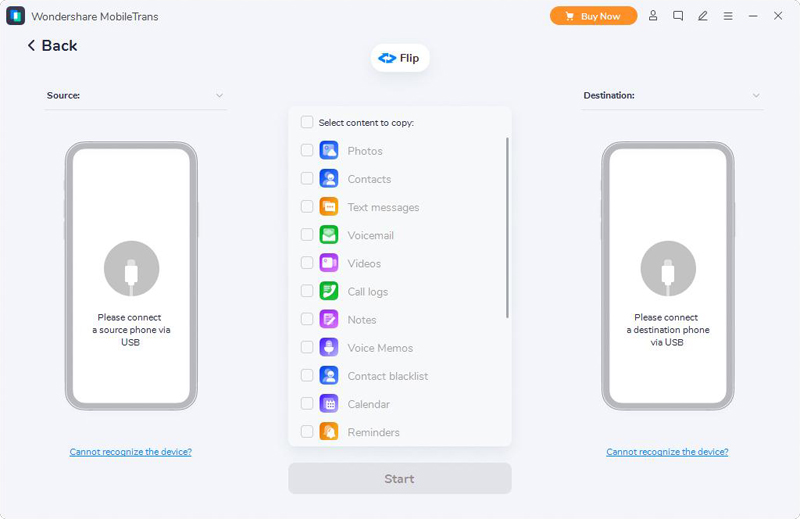
Step 3. Last step, select one or some or all items that you wish to transfer to the OPPO Find X5/X5 Pro, the press "Start" to complete the transfer process.
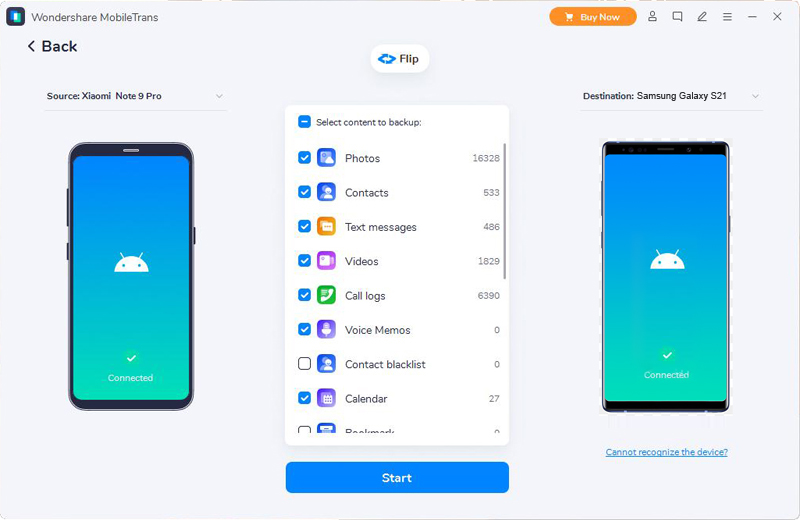
Tip: You can check the option of "Clear data before copy" to wipe all data on your OPPO Find X5/X5 Pro before transferring data.
Transfer WhatsApp Messages to OPPO Find X5/X5 Pro
As a well-considered software, of course, it will take into account WhatsApp users' need to transfer chat records and attachments, so Mobile Transfer also allows you to directly transfer your WhatsApp data between different mobile phones.
Step 1. Return to the homepage of Mobile Transfer, then click on "WhatsApp Transfer" > "WhatsApp Transfer".
Tip: According to the different versions of WhatsApp installed on your mobile phone, you can also choose "WhatsApp Business Transfer" and "GBWhatsApp Transfer" here.
Step 2. Please connect your source (the old phone) and destination phone (OPPO Find X5/X5 Pro) to the same computer via their USB cables.

Step 3. Wait for your phones are recognized, select the file types that you wanting to transfer, then clcik on "Start".

Transfer Wechat/Line/Kik/Viber Messages to OPPO Find X5/X5 Pro
Coincidentally, as the mainstream social software, Wechat/Line/Kik/Viber has a huge user base. Mobile Transfer also allows you to directly transfer Wechat/Line/Kik/Viber messages from any Android/iPhone devices to OPPO Find X5/X5 Pro.
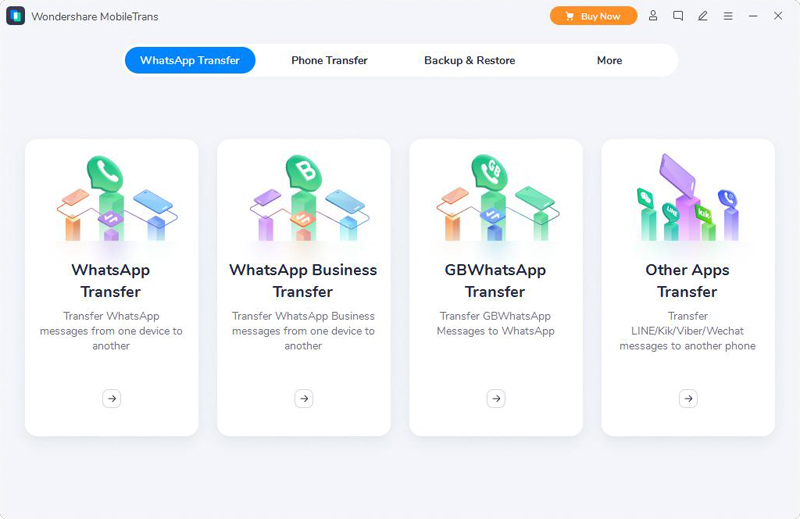
Step 1. Return to the homepage of Mobile Transfer, then click on "WhatsApp Transfer" > "Other Apps Transfer".
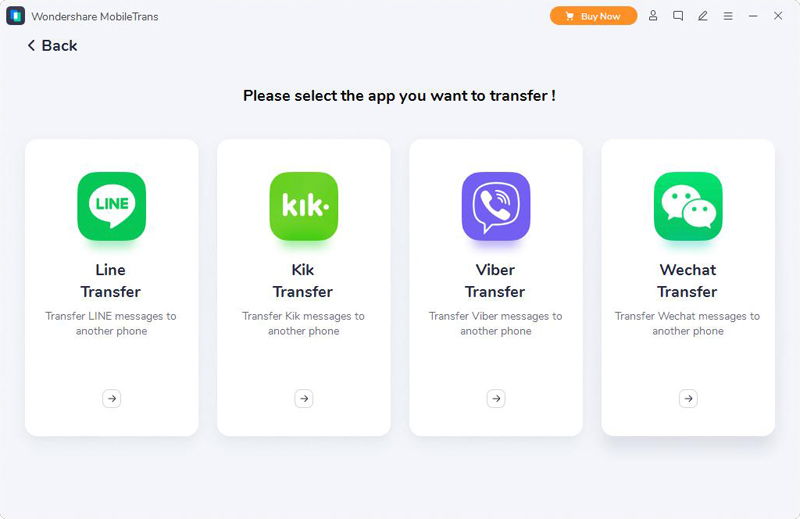
Step 2. Please select the app you want to transfer on the next screen, either "Line Transfer" or "Kik Transfer" or "Wechat Transfer".
Note: If you want to transfer the Viber messages to other phone, you need to backup the Viber messages on your old phone first, and restore it to your OPPO Find X5/X5 Pro from backup.
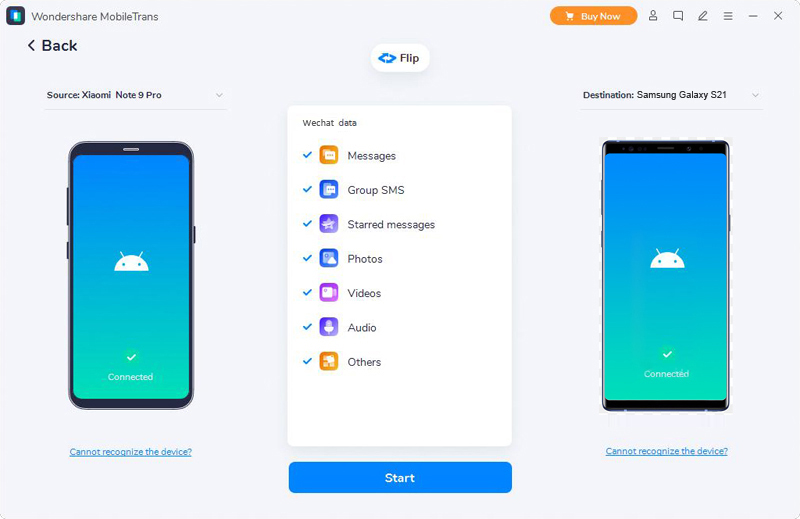
Step 3. Connect both of your phones to computer via USB cables, once identified, please adjust the position of your mobile phone by clicking the "Flip" button.

Step 4. After ticking the contents you wish to transfer and tap on "Start".
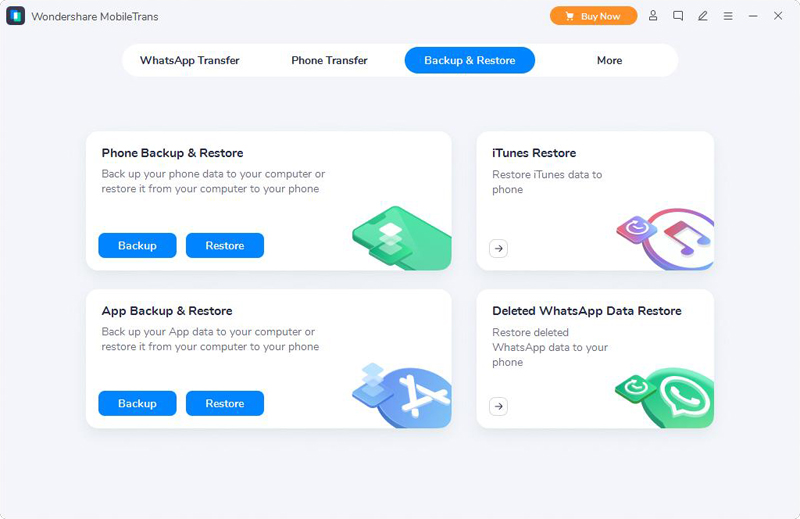
Sync Data from Backup to OPPO Find X5/X5 Pro
Different from users who dislike the backward performance of old phones, some users change their phones because their old phones are lost or damaged. For this part of users who can't directly transfer data between mobile phones, Mobile Transfer allows them to extract data from backup file and restore to any supported devices, as long as you have used this software to back up your phone data before.
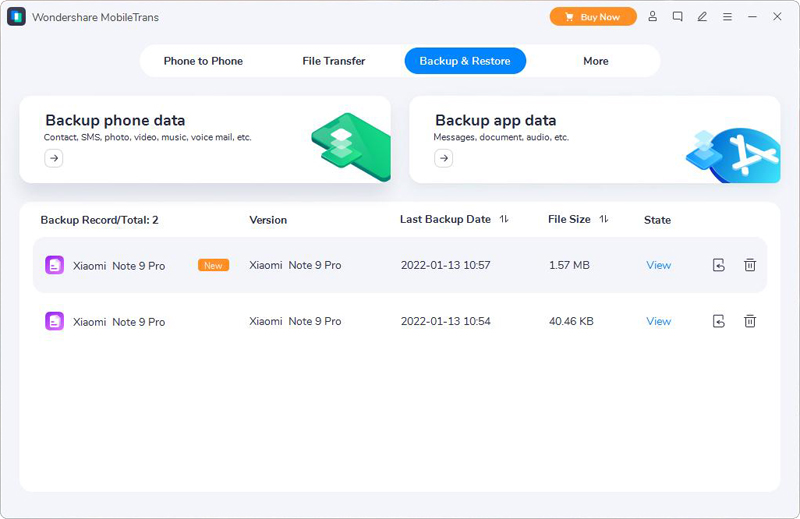
Step 1. Run Mobile Transfer and click "Backup & Restore" option in the menu bar at the top of the page, then click the "Restore" button in the "Phone Backup & Restore" function block.
Step 2. Now, all the previous backup files will be listed, just choose the latest one and click the "Restore" button following it.
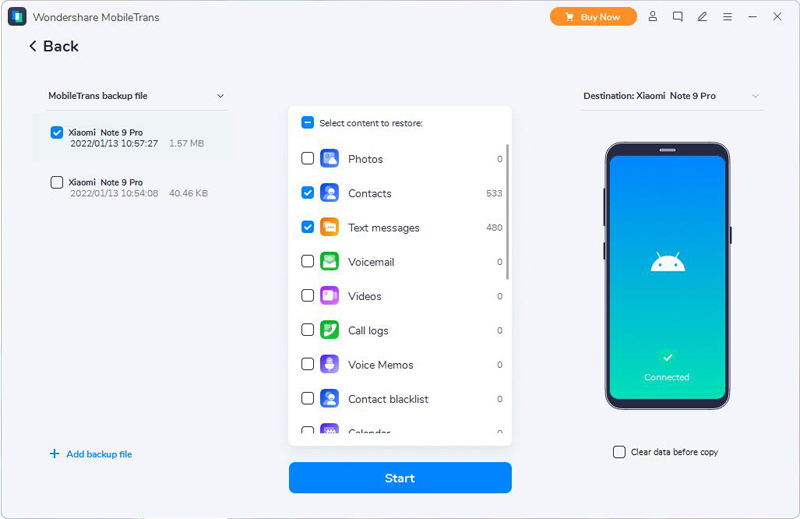
Step 3. Connect your OPPO Find X5/X5 Pro to computer with its USB cable, then select the items that you wish to restore, then click on "Start" to begin restoring the selected files to your OPPO Find X5/X5 Pro.
Sync Data to OPPO Find X5/X5 Pro with Clone Phone
In addition to Mobile Transfer, Clone Phone is a good choice for you to transfer other mobile phone data to OPPO mobile phone. Clone Phone is a data migration tool specially developed by OPPO for its users. Although it has certain limitations, its biggest advantage is that it is free of charge.
Note: Before using this method, please make sure that your mobile phones are fully charged, so as to avoid failure caused by insufficient power in the process of data transfer.
Step 1. Install and launch Clone Phone app on your old phone, then tap on "This is the old phone".
Step 2. Install and launch Clone Phone app on your OPPO Find X5/X5 Pro, then you will be asked to choose the type of your old phone, either Android or iPhone.
Step 3. You will be presented with a QR code that display on the screen of your OPPO Find X5/X5 Pro, now use your old phone to scan the QR code to establish the connection between your phones.
Step 4. After that, click on "Start Cloning" to transfer all the data from the old phone to your OPPO Find X5/X5 Pro, or you can customize and choose data to wish to transfer.
Part 2 Recover Data from OPPO Find X5/X5 Pro
There would be lots of unexpected events which will cause data loss on your OPPO Find X5/X5 Pro, such as losing data after OS update or rooting, improper handling, device stuck or not responding, device locked, SD card issue, forgotten password, ROM flashing and so on. After losing or deleting them, you must want to get the regret to restore them back. Whether you have backed up your phone data before or not, next we will introduce two safe and simple methods to you.
Directly Recover Deleted & Lost Data on OPPO Find X5/X5 Pro
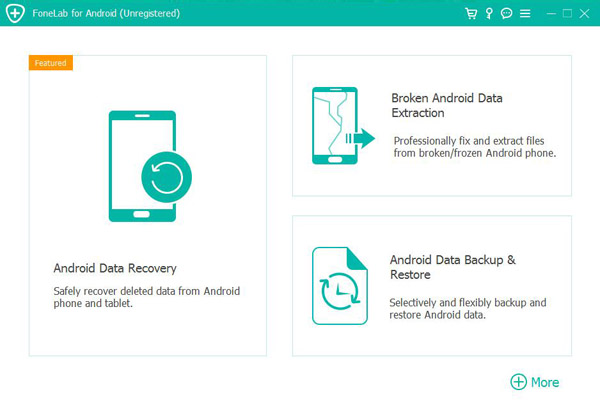
Before using this method, let's introduce OPPO Data Recovery to you first. OPPO Data Recovery supports recovering data including text messages, contacts, call logs, music, videos, photos, WhatsApp messages, documents and more from almost all OPPO smartphones, of course included your OPPO Find X5 and OPPO Find X5 Pro.
Step 1. Install OPPO Data Recovery on your PC and launch the application, then click on "Android Data Recovery".
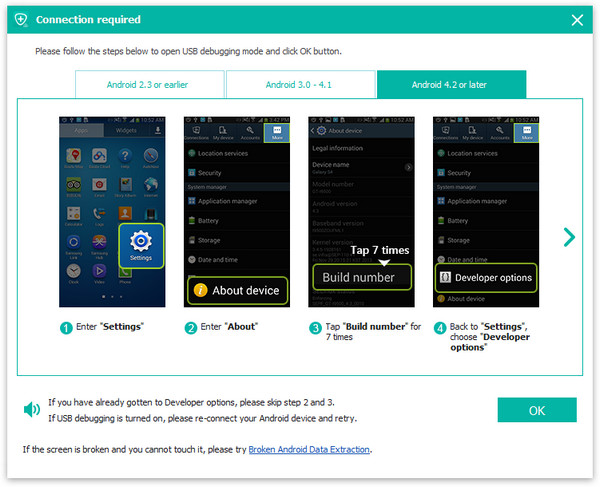
Step 2. Connect your OPPO Find X5 or OPPO Find X5 Pro to computer using its USB cable, and follow the prompts to enable the USB debugging on your phone's screen.
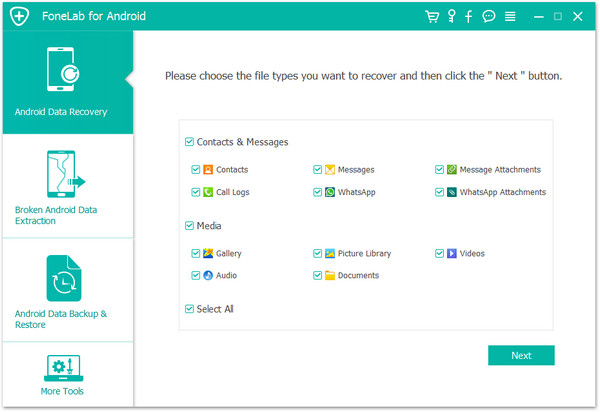
Step 3. Wait for the software to detect your phone automatically, then choose the file types that you wish to scan, and press "Next" to analyze and scan your device under the standard scan mode.
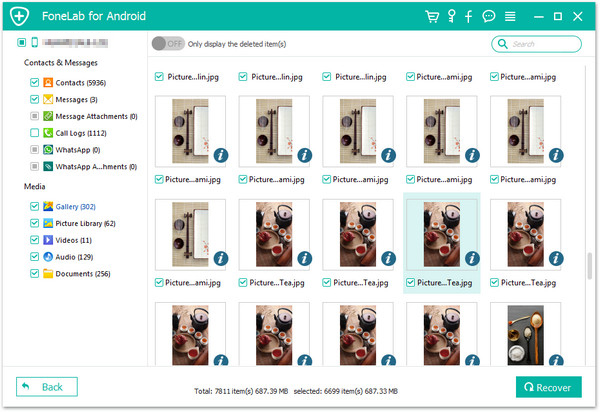
Step 4. After all the scan result are displayed, preview and select whose what you needed, then click on "Recover" to save them back to your OPPO Find X5/X5 Pro.
Note: If you can not find the data you need, click "Deep Scan" button on the right bottom corner to get more lost contents.
Restore Data from Backup to OPPO Find X5/X5 Pro
If your phone is lost or damaged, or your data is completely overwritten by the new data, as long as you have a backup file available, you can use this OPPO Data Recovery software to extract the required data from the backup file and restore it to any supported device.
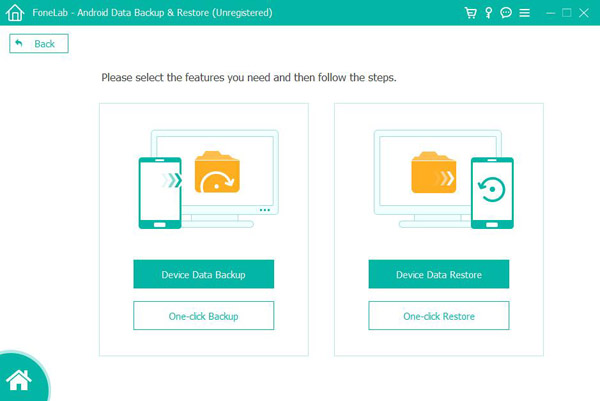
Step 1. Run the software and click on "Android Data Backup & Restore".
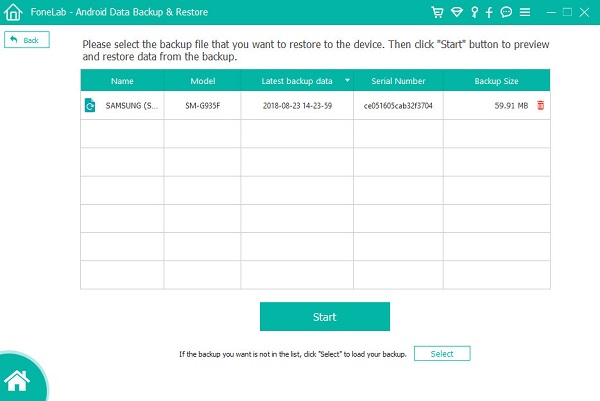
Step 2. Use a USB cable to connect your OPPO Find X5 or OPPO Find X5 Pro to computer and click "Device Data Restore".
Step 3. Once your device is recognized, select the latest backup from the list and press "Start" to extract all the restoreable contents from the selected backup.
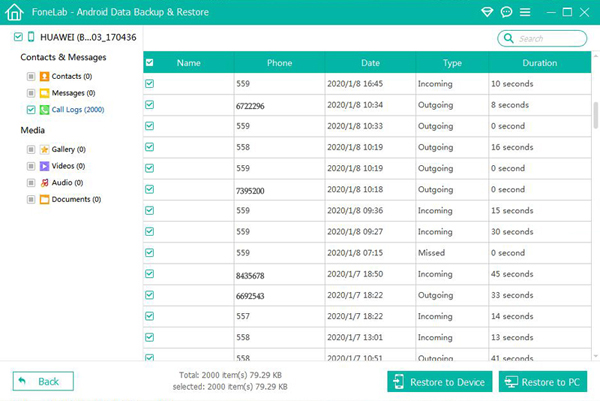
Step 4. Wait for the extraction to complete, select the files that you wish to recover, then click "Restore to Device" or "Restore to PC" to complete the recovery process.
Part 3 Back Up OPPO Find X5/X5 Pro Data
Through the above tutorial, you can clearly know that if you have a backup file, it will be of great help whether in data transfer or data recovery. Therefore, it is very necessary for you to back up your phone data regularly. Next, we will show how to back up your OPPO Find X5/X5 Pro by using the above-mentioned two softwares respectively.
Backup OPPO Find X5/X5 Pro with Mobile Transfer
Mobile phone data backup is one of the most commonly used functions of this Mobile Transfer software.
Step 1. Run Mobile Transfer, then tap on "Backup & Restore" and click "Backup" inside of the "Phone Backup & Restore" option.
Step 2. Use a USB cable to connect your OPPO Find X5/X5 Pro to computer and follow the on-screen prompts to make your phone recognized.
Step 3. After that, select the file types that you want to backup, then click on "Start" to complete the transfer process.
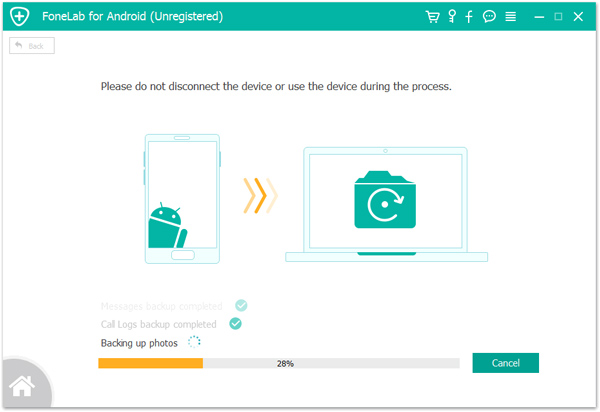
Backup OPPO Find X5/X5 Pro with Android Data Backup & Restore
Similarly, the Android Data Backup & Restore function is one of the core functions of the OPPO Data Recovery software, and has won high praise from users.
Step 1. Launch the software and then choose the "Android Data Backup & Restore" option in its primary interface.
Step 2. Connect your OPPO Find X5/X5 Pro to computer with its USB cable and tap on "Device Data Backup".
Step 3. Select the files that you wanting to backup, then click on "Start" to complete the backup process.