8 best ways to transfer iPhone/Android phone data to OPPO Reno7/Reno7 Pro/Reno7 SE (5G), to recover deleted and lost files on your OPPO Reno7/Reno7 Pro/Reno7 SE (5G), and to back up your OPPO Reno7/Reno7 Pro/Reno7 SE (5G) data.
This guide prepares for you the best ways to complete data transfer & data recovery & data backup in OPPO Reno7/Reno7 Pro/Reno7 SE (5G). In other words, we will show you the most simple and effective ways to sync all data from any Android/iPhone smartphones to OPPO Reno7/Reno7 Pro/Reno7 SE (5G), and to recover the deleted and lost data from OPPO Reno7/Reno7 Pro/Reno7 SE (5G), as well as backing up your OPPO Reno7/Reno7 Pro/Reno7 SE (5G) data.
OPPO Reno7 series has three models, namely Reno7, Reno7 Pro and Reno7 SE. Now I will briefly introduce you their configuration. In terms of screens, Reno7 Pro uses a 6.55-inch AMOLED screen, Reno7 and Reno7 SE use a 6.43-inch AMOLED screen. Their resolution is 2400 × 1080, and the refresh rate supports up to 90Hz. In terms of processors, OPPO Reno7 is equipped with Qualcomm Snapdragon 778G processor, Reno7 Pro is equipped with Dimensity 1200-MAX processor, and Reno7 SE is equipped with Dimensity 900 processor. In terms of camera configuration, the OPPO Reno7 and Reno7 Pro have a front Sony IMX709 super-sensitive cat-eye lens with 32 million pixels; the Reno7 SE has a Sony IMX 471 sensor with 16 million pixels. The Reno7 series all have three rear cameras. Reno7 uses a 64MP main camera + 8MP wide-angle + 2MP macro, Reno7 Pro is equipped with a 50MP Sony IMX766 sensor + 8MP wide-angle + 2MP macro, and Reno7 SE uses a 48MP Sony IMX 581 sensor + 2MP macro + 2MP portrait Blur. Reno7 series all support multiple functions such as photo, video, night scene, professional, panoramic, portrait, time-lapse photography, slow motion, super text, multi-scene video, AI ID photo, etc. In terms of batteries, the Reno7 series all have a built-in 4500mAh large battery. Reno7 Pro supports 65W super flash charging, Reno7 supports 60W super flash charging, and Reno7 SE supports 33W super flash charging. In other respects, Reno7 and Reno7 Pro also support full-featured NFC and so on.
- "When I accidentally lose important data in OPPO Reno7 Pro, how can I safely retrieve these data and restore them to my OPPO Reno7 Pro?" - Mark.
- "After getting the new OPPO Reno7 SE, how should I efficiently transfer the data from the old phone to the OPPO Reno7 SE?" - Mary.
- "My previous methods of backing up data were very cumbersome. Is there any simple backup method to help me back up OPPO Reno7 data to my computer?" - Anna.
I wonder that you may encounter data problems when using OPPO Reno7/Reno7 Pro/Reno7 SE? If you don't know how to efficiently complete data transfer, data recovery or data backup of OPPO Reno7 series, you can refer to this guide. This guide is divided into three parts to give you a detailed introduction on how to quickly complete the data transfer of OPPO Reno7/Reno7 Pro/Reno7 SE, how to recover lost or deleted data in the Reno7 series, and how to back up data on OPPO Reno7/Reno7 Pro/Reno7 SE to the computer. You can choose a suitable method to solve the data-related problems of the OPPO Reno7 series according to your needs.
Part 1 Transfer Data to OPPO Reno7/Reno7 Pro/Reno7 SE (5G)
This part prepares for you is how to complete the data transmission of OPPO Reno7/Reno7 Pro/Reno7 SE. When you getting a new phone, the first thing you should do is to transfer the data from the old phone to the new phone. There are many ways to help transfer data to a new phone on the Internet. However, those methods may have certain shortcomings, such as slow transmission speed, cumbersome operation, and insufficient security. If you need an efficient and safe data transfer method, you can refer to several solutions I have prepared for you.
- Sync Data from Android/iPhone to OPPO Reno7/Reno7 Pro/Reno7 SE (5G)
- Restore Data from Backup to OPPO Reno7/Reno7 Pro/Reno7 SE (5G)
- Sync Data to OPPO Reno7/Reno7 Pro/Reno7 SE (5G) with OPPO Clone Phone
Sync Data from Android/iPhone to OPPO Reno7/Reno7 Pro/Reno7 SE (5G)
This method can help you transfer data from Android/iPhone to OPPO Reno7/Reno7 Pro/Reno7 SE (5G) with one click. Choosing this method, Mobile Transfer is your best data transfer tool. Mobile Transfer is a very good data transfer software. It can perfectly solve various problems such as slow transmission speed, cumbersome operation, insufficient security and so on. First of all, under the same amount of data, it can transfer data from Android/iPhone to OPPO Reno7/Reno7 Pro/Reno7 SE at the fastest speed. Second, the operation of transferring data is very simple. You only need to connect the device to the computer, and then you can complete the data transfer of the OPPO Reno7 series with a few simple clicks. Third, in the process of data transmission, the software will not disclose any of your data information. What's more, the types of data that Mobile Transfer can transfer are very rich. You can transfer almost all the data in Android/iPhone to OPPO Reno7/Reno7 Pro/Reno7 SE.


Tip: If you don’t have Mobile Transfer on your computer, please click the link below to download it to your computer!
Step 1: Select the transmission mode
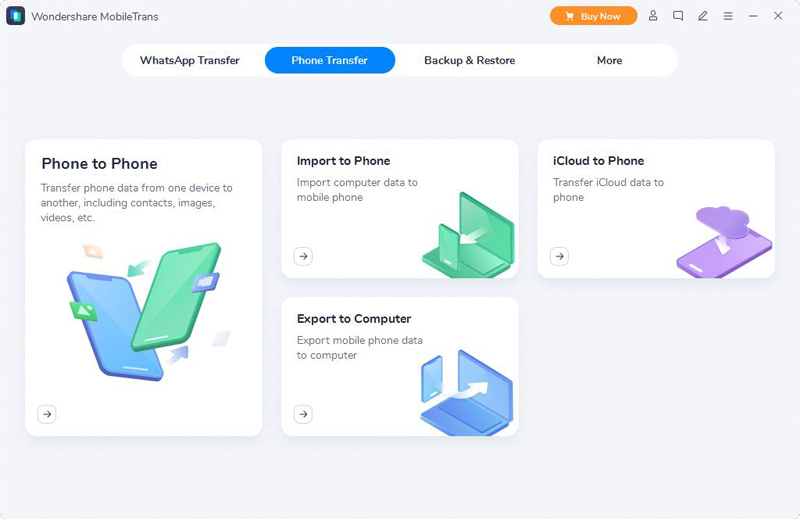
Run the installed Mobile Transfer on the computer, and then select the "Phone To Phone Transfer" mode on the homepage.
Step 2: Connect the device to the computer
Use a USB cable to connect the old phone-Android/iPhone and the new phone-OPPO Reno7/Reno7 Pro/Reno7 SE to the computer. In order to accurately complete the data transfer, check the Source (Android/iPhone) and Destination (OPPO Reno7/Reno7 Pro/Reno7 SE) displays when the software page displays your device.
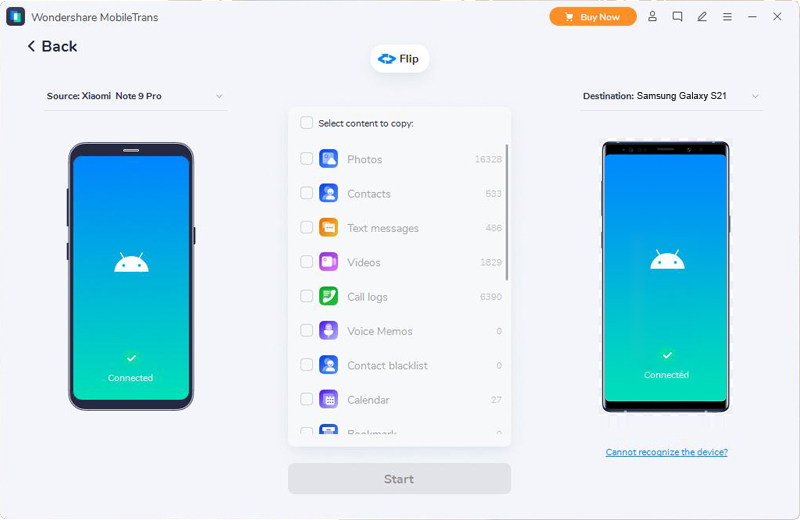
Note: If the display order of the device models behind Source and Destination is reversed, please click "Flip" to switch the positions of the two devices.
Step 3: Transfer data to OPPO Reno7/Reno7 Pro/Reno7 SE (5G)
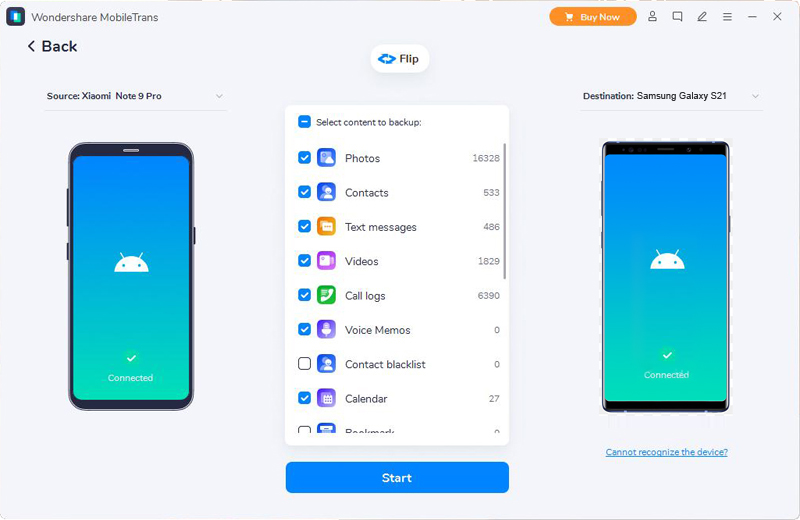
All data that can be transferred will be displayed on the page, such as contacts, text messages, call history, photos, music, videos, apps, etc. Select the data you need to transfer, and then click "Start Transfer" to start the data transfer process.
Restore Data from Backup to OPPO Reno7/Reno7 Pro/Reno7 SE (5G)
If your old phone is lost or damaged, and the data you need to transfer has been backed up in your computer, you can choose this method. This method can help you synchronize the data in the backup to OPPO Reno7/Reno7 Pro/Reno7 SE (5G). Similarly, Mobile Transfer is the best tool for you to use this method.
Step 1: After running Mobile Transfer on the computer, select the "Restore from Backups" mode on the page and select "MobileTrans".

Step 2: Use a USB cable to connect your device-OPPO Reno7/Reno7 Pro/Reno7 SE to the computer. After you connect your phone to your computer, Mobile Transfer will automatically detect your device and display the backups you have on your computer on the page.
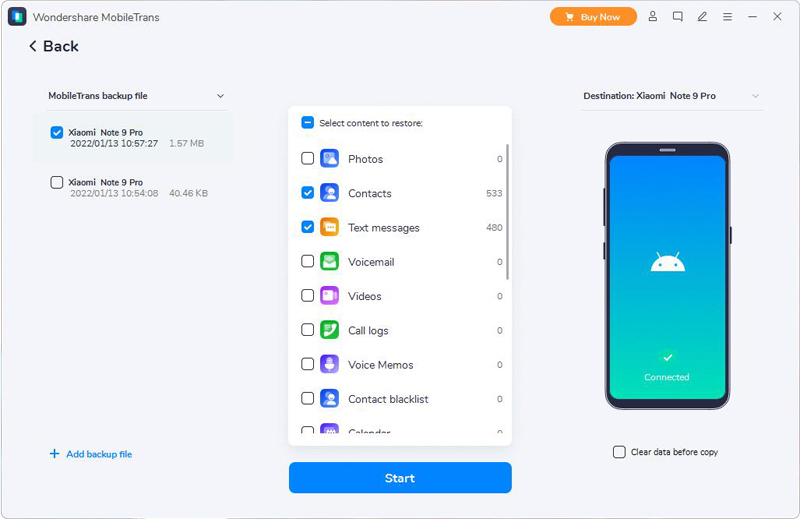
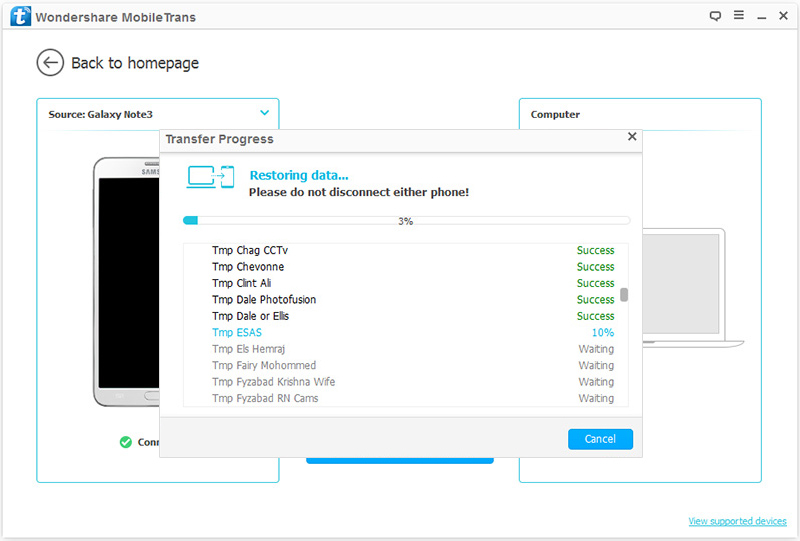
Step 3: Select the required backup file on the page, here, we just take choosing the MobileTrans backup option as an example, and select the type of data to be synchronized in the middle of the page. After selecting, click "Start Transfer" to synchronize the data from the backup file to OPPO Reno7/Reno7 Pro/Reno7 SE.

Sync Data to OPPO Reno7/Reno7 Pro/Reno7 SE (5G) with OPPO Clone Phone
In addition to choosing Mobile Transfer to complete the data transfer of OPPO Reno7/Reno7 Pro/Reno7 SE, you can also choose OPPO's self-developed data transfer software-OPPO Clone Phone. OPPO Clone Phone can quickly help you transfer data from your old phone to OPPO Reno7/Reno7 Pro/Reno7 SE without any traffic. Without the need for computers, cables and other equipment and networks, OPPO Clone Phone can directly transfer data and information to the new phone, eliminating cumbersome steps and the trouble of privacy leakage.
Step 1: Download OPPO Clone Phone on your new phone and old phone, and then open it.
Step 2: Choose a option according to your phone's brand.
- If your old phone is an iPhone, please select "New Phone" and "iPhone" in the new phone.
- If your old phone is an Android phone of another brand, please select "New Phone" and "Other Android Phone" on the new phone.
- If your old phone is an OPPO phone, please select "New Phone" and "OPPO" on the new phone.
Step 3: Select "This is the old phone" in the old phone and scan the QR Code generated by the new phone to start cloning.
Step 4: Select the data you need to synchronize to OPPO Reno7/Reno7 Pro/Reno7 SE from the old phone, and then press "Start Cloning" on the page to synchronize the data from the old phone to the new OPPO phone.
Part 2 Recover Data from OPPO Reno7/Reno7 Pro/Reno7 SE (5G)
This part introduces you in detail how to safely and efficiently recover lost or deleted data in OPPO Reno7/Reno7 Pro/Reno7 SE. According to the survey, we found that many users do not know how to restore the lost data to their mobile phones safely and efficiently after data loss. Therefore, I have prepared three methods for you in this part to retrieve the lost data in OPPO Reno7/Reno7 Pro/Reno7 SE and restore it to your device. It is worth mentioning that, no matter whether your lost data has a backup file or not, you can choose the following three methods to restore the data to your device.
- Restore Data from OPPO Reno7/Reno7 Pro/Reno7 SE (5G) without Backup
- Restore Data from Backup Files to OPPO Reno7/Reno7 Pro/Reno7 SE (5G)
- Restore Data to OPPO Reno7/Reno7 Pro/Reno7 SE (5G) with Best Data Recovery
Restore Data from OPPO Reno7/Reno7 Pro/Reno7 SE (5G) without Backup
If your lost data is not backed up, how do you retrieve it? Do not worry! OPPO Data Recovery provides you with a very safe and convenient way to help you recover lost or deleted data in OPPO Reno7/Reno7 Pro/Reno7 SE, even if it does not have a backup file.
OPPO Data Recovery is a powerful Android data recovery software. No matter if your device is lost due to a broken screen, virus attack, water or accidental deletion of your phone or other reasons, it can help you restore the lost data to your device. At the same time, its interface is simple and easy to operate. It is worth mentioning that it can help you recover all your lost or deleted data in OPPO Reno7/Reno7 Pro/Reno7 SE (5G), including contacts, text messages, pictures, videos, audios, emails, videos, documents Wait. At the same time, it is compatible with most Android phone models, including OPPO Reno7 series.
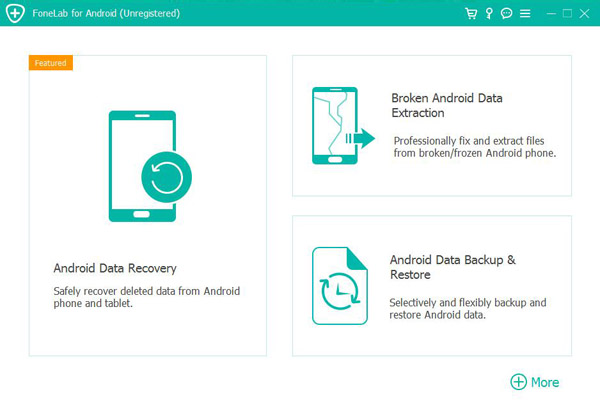
Step 1: Download OPPO Data Recovery, install it on your computer according to the prompts, and run it. Then select the "Android Data Recovery" mode on the homepage of the software.
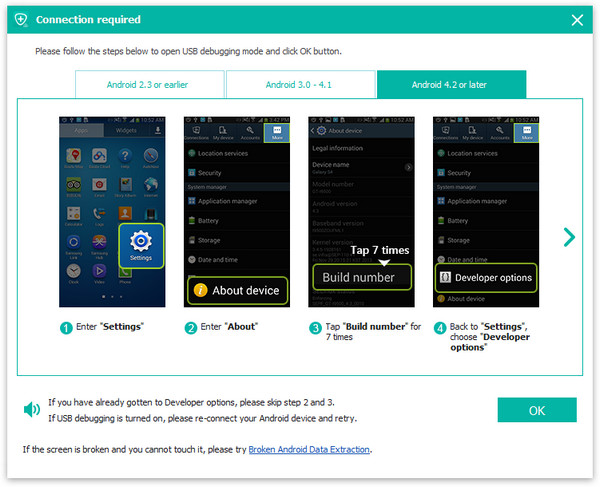
Step 2: Use USB to connect OPPO Reno7/Reno7 Pro/Reno7 SE to the computer. Then turn on USB debugging on your OPPO phone according to the following tips:
- Find Settings on the OPPO Reno7/Reno7 Pro/Reno7 SE.
- Find Build Number and tap it for 7 times continuously.
- Go back to Settings and click Developer Options.
- Check USB Debugging Mode.
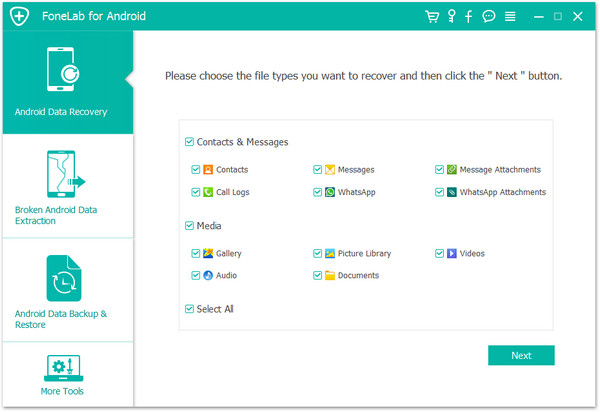
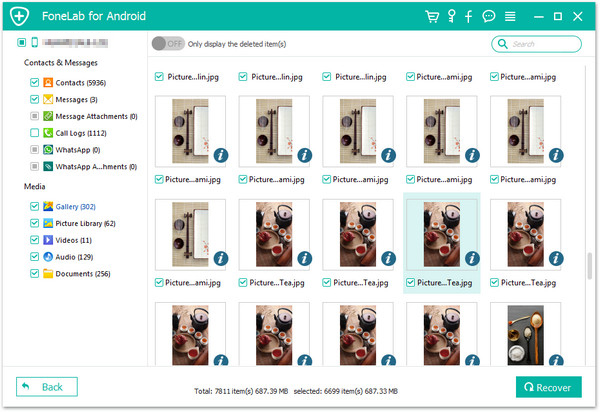
Step 3: Select the file type you need to recover on the software page. After selecting, click "Next" to scan.
Step 4: After scanning, all recoverable data will be listed on the software page. Preview and select the data you need to recover, and then click "Recover" to recover the selected data to your device.
Restore Data from Backup Files to OPPO Reno7/Reno7 Pro/Reno7 SE (5G)
If you need to restore the data in the backup to OPPO Reno7/Reno7 Pro/Reno7 SE, you can choose this method. With the help of OPPO Data Recovery, this method will give you a detailed introduction of how to restore the data in the backup to OPPO Reno7/Reno7 Pro/Reno7 SE.
Step 1: Run OPPO Data Recovery, and then select "Android Data Backup & Restore" mode on the homepage.
Step 2: Use USB to connect your OPPO Reno7/Reno7 Pro/Reno7 SE (5G) to the computer.
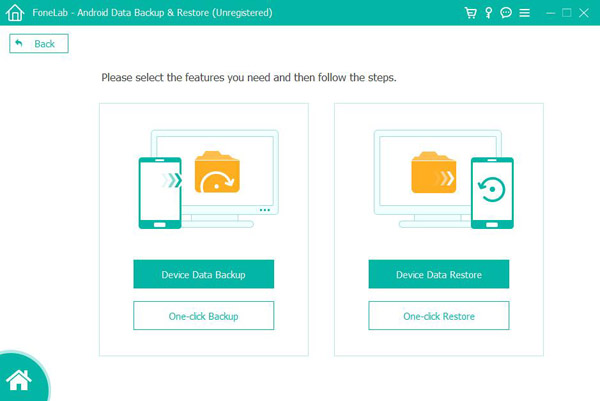
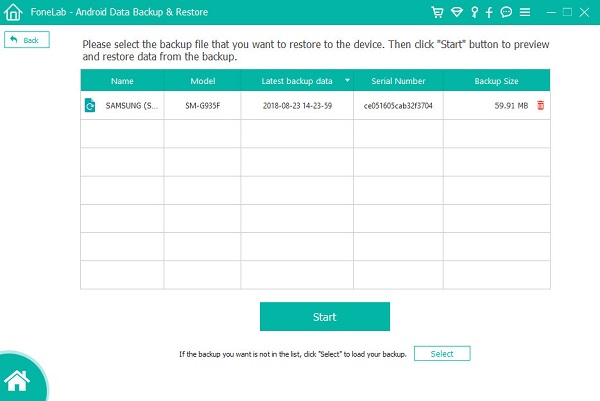
Step 3: Select "Device Data Restore" or "One-click Restore" mode on the page. The software will detect all your backup files and display them all on the page.
Step 4: Select the backup file you need from the backup list on the page, and then click "Start" to extract the recoverable data in the backup file.
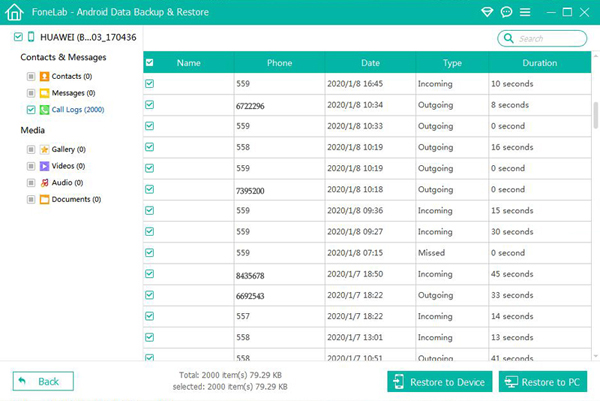
Step 5: After extracting the data, you can preview all the recoverable data on the page. Select the data you need to recover, and then click "Restore to Device" to start recovering the data in the backup to OPPO Reno7/Reno7 Pro/Reno7 SE (5G).
Restore Data to OPPO Reno7/Reno7 Pro/Reno7 SE (5G) with Best Data Recovery
Best Data Recovery is a very efficient data recovery software. It can help you retrieve all the lost or deleted data in OPPO Reno7/Reno7 Pro/Reno7 SE (5G) and restore the data you need to your device. The data it supports to recover includes contacts, photos, text messages, emails, etc. With the help of Best Data Recovery, I will show you how to recover the data in OPPO Reno7/Reno7 Pro/Reno7 SE (5G).
Step 1: Download and install Best Data Recovery on your computer, and then run it.
Step 2: Use a USB cable to connect OPPO Reno7/Reno7 Pro/Reno7 SE to the computer.
Step 3: On the software page, select the data that needs to be restored to the device, such as images, audio, video, document, etc. Then click "Scan" to scan the selected data.
Step 4: After the scan is completed, you can preview the scanned data on the page. Select the data on the page according to your needs, and then click "Recover" to restore the selected data to OPPO Reno7/Reno7 Pro/Reno7 SE.
Part 3 Back Up OPPO Reno7/Reno7 Pro/Reno7 SE (5G) Data
It is a good habit to back up data regularly. Because backup files can help us solve many data problems at critical times, such as data transmission and data recovery. But many users feel that backing up data is cumbersome, so they don't like to back up data. Now I have prepared two very simple backup methods for these users. You can choose the following methods to complete the data backup of OPPO Reno7/Reno7 Pro/Reno7 SE according to your needs.
- Back Up OPPO Reno7/Reno7 Pro/Reno7 SE (5G) Data with Mobile Transfer
- Back Up OPPO Reno7/Reno7 Pro/Reno7 SE (5G) Data with Android Data Backup & Restore
Back Up OPPO Reno7/Reno7 Pro/Reno7 SE (5G) Data with Mobile Transfer
Step 1: Run Mobile Transfer, and then select "Back Up Your Phone" on the main page.
Step 2: Use a USB cable to connect OPPO Reno7/Reno7 Pro/Reno7 SE (5G) to the computer.
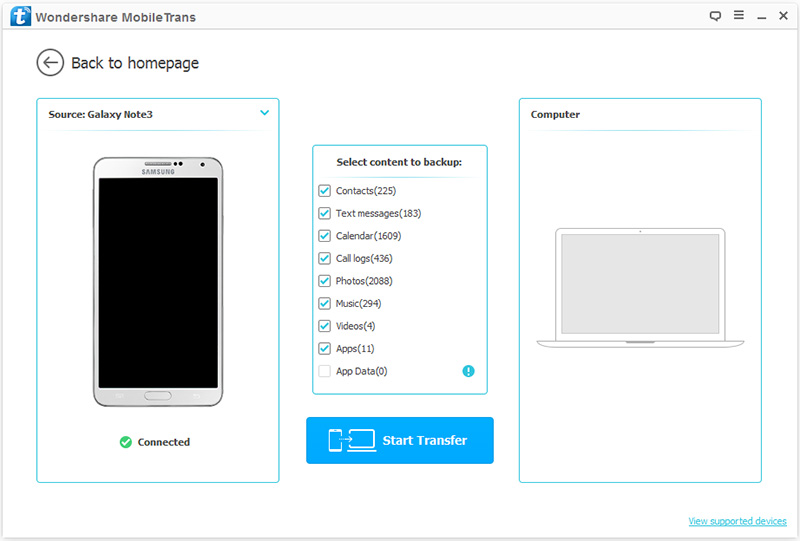
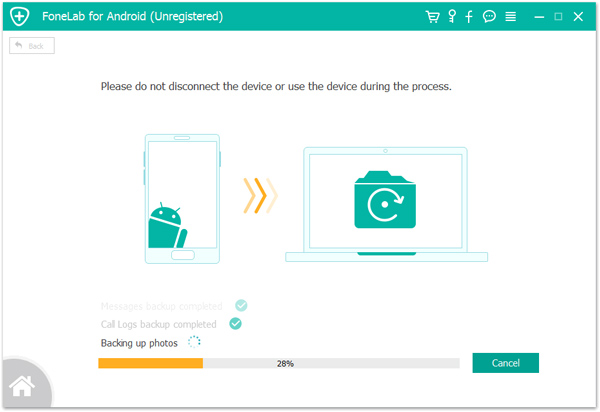
Step 3: In the middle of the page, select the type of data you need to back up to your computer. After selecting, click "Start Transfer" to start backing up your data.
Back Up OPPO Reno7/Reno7 Pro/Reno7 SE (5G) Data with Android Data Backup & Restore
Step 1: Start OPPO Data Recovery on the computer, and then select the "Android Data Backup & Restore" mode on the main page.
Step 2: Use a USB cable to connect Reno7/Reno7 Pro/Reno7 SE (5G) to the computer.
Step 3: Select "Device Data Backup" or "One-click Backup" option on the software page.
Step 4: From the page, you can view all the files that can be backed up. Select the file you need to back up, and change the storage path of the backup file according to your needs. After confirming the data to be backed up and the save path, click "Start" to back up your data from the OPPO phone to the computer.