5 simple ways to transfer all data from Android/Samsung/iPhone/vivo/OPPO/Xiaomi to ZTE Axon 40 Pro/40 Ultra, and to recover deleted and lost files on ZTE Axon 40 Pro/40 Ultra.
You don't want the problem of data transfer and data recovery to become a problem in the process of using ZTE Axon 40 Pro or ZTE Axon 40 Ultra, which will affect the user experience, right? Don't worry, you can learn more about effectively transferring data from old Android /iPhone to ZTE Axon 40 Pro/40 Ultra and how to safely recover important data lost in ZTE Axon 40 Pro/40 Ultra through this article.
If you want to buy a high-performance flagship phone to reinforce or replace your old Android phone /iPhone recently, then we strongly recommend you to consider two new flagship products launched by ZTE, namely ZTE Axon 40 Pro and ZTE Axon 40 Ultra. Next, let's take a look at their highlights:
- ZTE Axon 40 Pro uses a 6.67-inch AMOLED display with a resolution of 1080×2400 pixels and a maximum refresh rate of 144Hz. In terms of core configuration, ZTE Axon 40 Pro is equipped with Qualcomm Snapdragon 870 5G chip, and is equipped with three memory combinations: 256GB ROM+8GB RAM, 256GB ROM+12GB RAM, and 512GB ROM+12GB RAM. In terms of improving shooting performance, ZTE Axon 40 Pro adopts a rear-mounted 4-camera system, which is 100 MP main camera+8 MP super wide-angle lens+2 MP macro lens+2 MP independent depth-of-field lens. In addition, the front-mounted camera is a 16-megapixel self-timer camera. In terms of battery life, it has a built-in 5000 mAh large-capacity battery and supports 66W fast charging.
- ZTE Axon 40 Ultra is equipped with a new generation of Snapdragon 8 flagship chip, which creates the ultimate form of flagship mobile phone from the trinity of screen, image and performance. With the new 100% defect-free full screen, the 16-megapixel camera image upgrade and the advanced synchronization of the full screen, ZTE Axon 40 Ultra brings a more perfect immersive look and feel. More importantly, ZTE Axon 40 Ultra fully upgraded the rear camera configuration, creating the industry's strongest combination of three main cameras, including 64-megapixel ultra-humanistic main camera, 64-megapixel ultra-wide-angle main camera and 64-megapixel periscope telephoto main camera.
Compared with other flagship mobile phones of the same class, ZTE Axon 40 Pro/40 Ultra is superior in design and performance, but superior in price. If you also choose one of them as your new mobile phone companion, this is definitely a wise choice. For the performance and features of ZTE Axon 40 Pro/40 Ultra, we won't go into too much detail, but we will devote more space to introducing the issues of data migration and data recovery that users are very concerned about. Next, we will use two softwares to explain them in five parts. The softwares are very powerful and surprisingly simple to operate. Please don't miss them.
- Directly Sync Data from Android/iPhone to ZTE Axon 40 Pro/40 Ultra
- Sync WhatsApp/Wechat/Line/Kik/Viber Messages to ZTE Axon 40 Pro/40 Ultra
- Sync Data from Backup to ZTE Axon 40 Pro/40 Ultra
- Directly Recover Data on ZTE Axon 40 Pro/40 Ultra without Backup
- Restore Data from Backup to ZTE Axon 40 Pro/40 Ultra
Part 1 Directly Sync Data from Android/iPhone to ZTE Axon 40 Pro/40 Ultra
After years of evolution, smart phones have already formed a situation in which a hundred schools of thought contend. Therefore, your old mobile phone may be Android phones of various brands or iPhones of various ages. How to simply and effectively transfer the data from Android /iPhone devices to the new ZTE Axon 40 Pro/40 Ultra? Many users have thought of professional data migration software for the first time, bingo! Mobile Transfer is your ideal harbor.
Mobile Transfer is a well-known data management software in the industry. Its biggest function is to support the direct exchange of all kinds of data between any two smart phones. More importantly, it supports almost all smartphones on the market, including Android and iOS devices. Next, please follow our tutorial to learn how to use this powerful data transfer function.

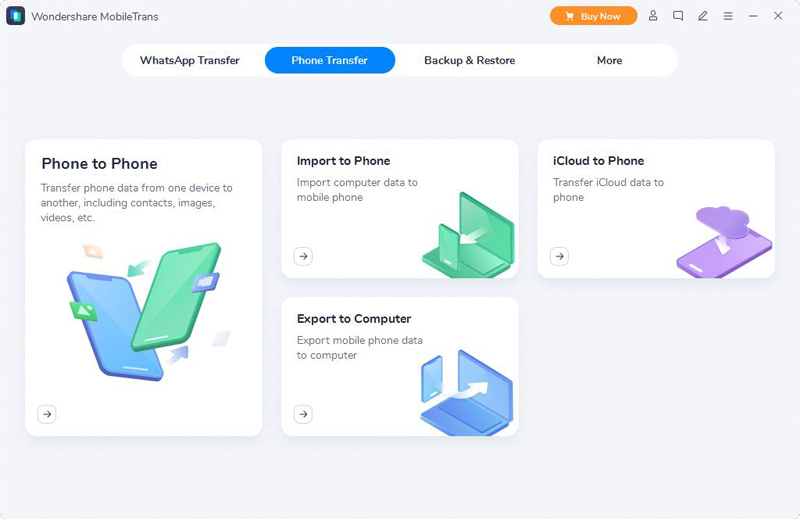
Step 1. After downloading and installing Mobile Transfer, launch it and then press "Phone Transfer" > "Phone to Phone".
Step 2. Then connect your old iPhone/Android phone and new ZTE Axon 40 Pro/40 Ultra to the same computer via their USB cables. Please follow the prompts on the screen to set up your mobile phone so that the program can detect them smoothly.
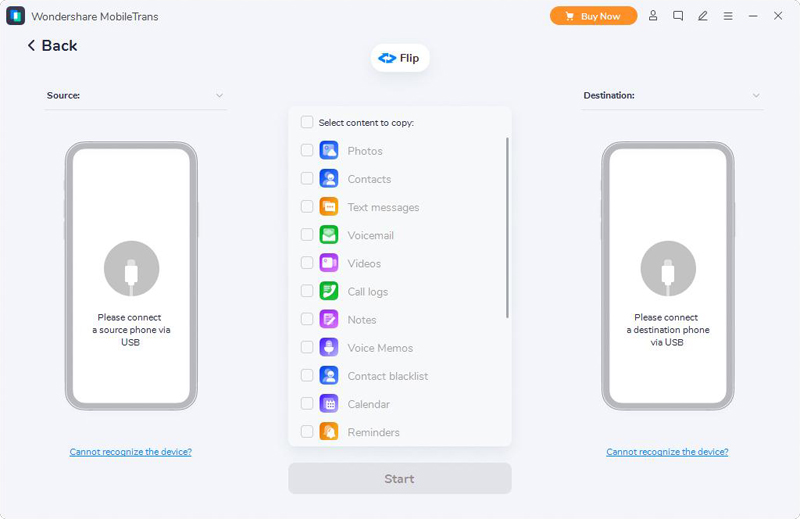
Once all your devices have been detected, please use the "Flip" button to make your old and new phones be displayed on the corresponding windows of the software interface.
Step 3. Finally, all the transferable files on your old phone will be displayed, please select the required file types, then click on "Start" to begin to sync them from the old phone to your ZTE Axon 40 Pro/40 Ultra in a click.
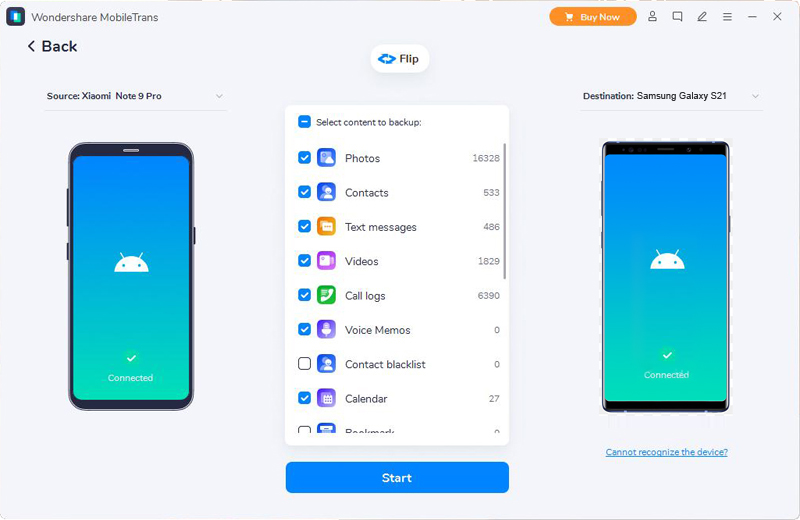
Tip: If you want to wipe all data on your ZTE Axon 40 Pro/40 Ultra before moving data, you can check the "Clear data before copy" option which is under the destination panel.
Part 2 Sync WhatsApp/Wechat/Line/Kik/Viber Messages to ZTE Axon 40 Pro/40 Ultra
The emergence of smart phones has directly changed the way people communicate with each other, thus forming a more diversified social culture. Therefore, when you change your mobile phone, you will never leave out the data on your social software, including chat records, pictures, videos and other attachments. Mobile Transfer is a big help again, because it can also directly transfer the data on your various social software between different mobile phones.
Step 1. Turn back to the primary screen of Mobile Transfer, and click on the "WhatsApp Transfer" option to list all the items, which are "WhatsApp Transfer", "WhatsApp Business Transfer", "GBWhatsApp Transfer" and "Other Apps Transfer".
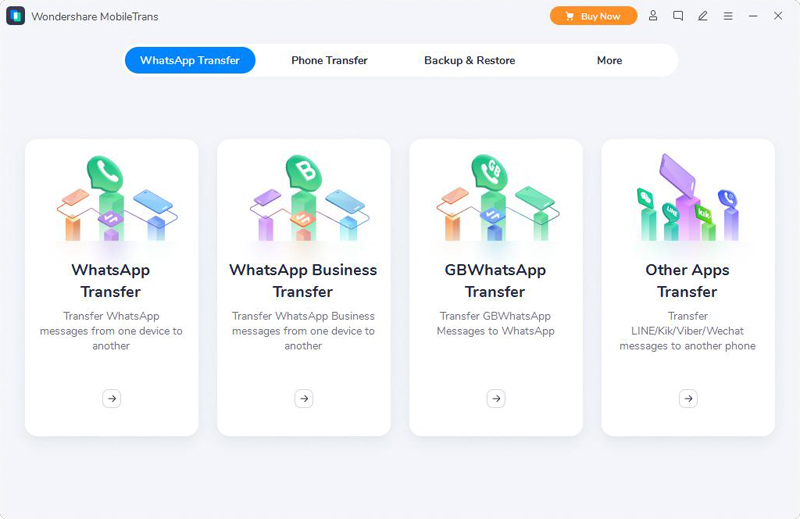
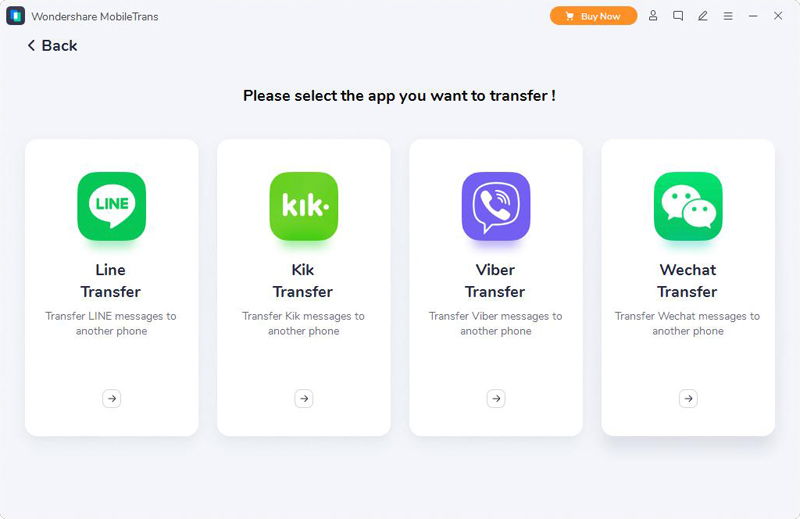
As you understand, the first three options are used to transfer your WhatsApp data. And the last one is used to transfer your Wechat/Line/Kik/Viber messages. Please choose the corresponding item as you need and go on.
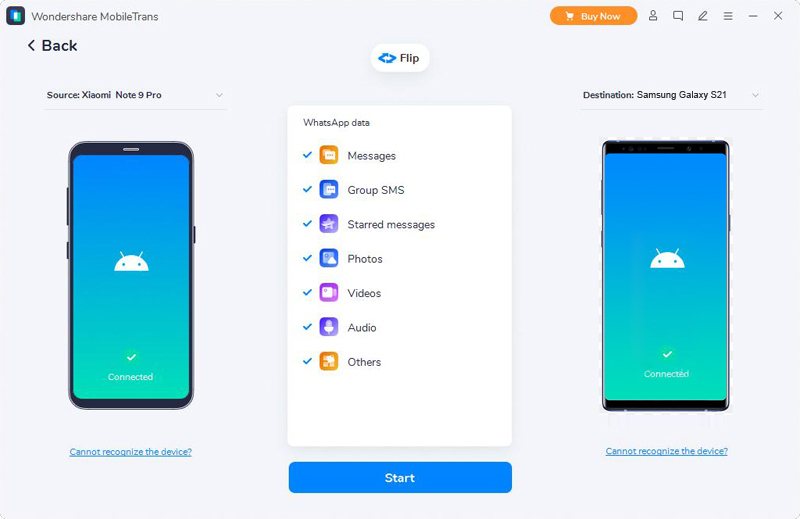
Step 2. Go to the next step, please connect your old phone and ZTE Axon 40 Pro/40 Ultra to the same computer via their USB cables.

Step 3. Wait for your phones are recognized, select the file types that you wanting to transfer, then clcik on "Start" to begin moving the selected files to your ZTE Axon 40 Pro/40 Ultra.
Part 3 Sync Data from Backup to ZTE Axon 40 Pro/40 Ultra
If you have previously used Mobile Transfer and used it to back up your old mobile phone data, then you can follow the following steps to extract the required data from the backup file and transfer it to ZTE Axon 40 Pro/40 Ultra.
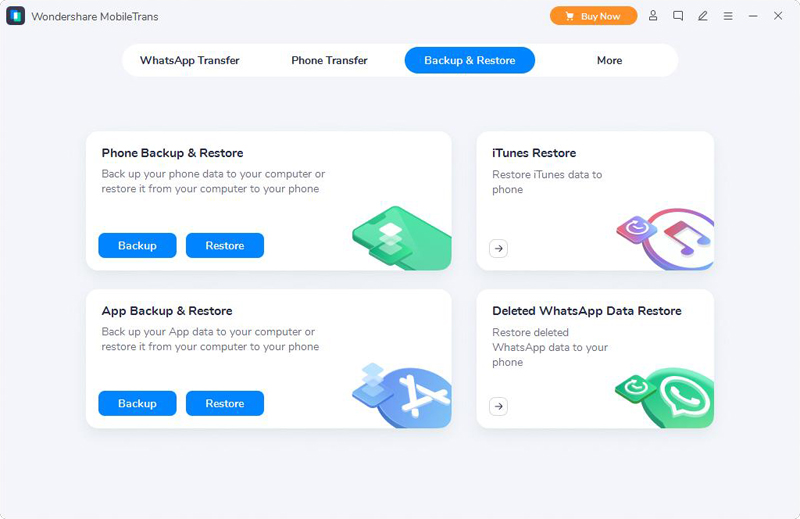
Step 1. Run Mobile Transfer and click "Backup & Restore" option in the menu bar at the top of the page, then tap the "Restore" button inside of the "Phone Backup & Restore" function block.
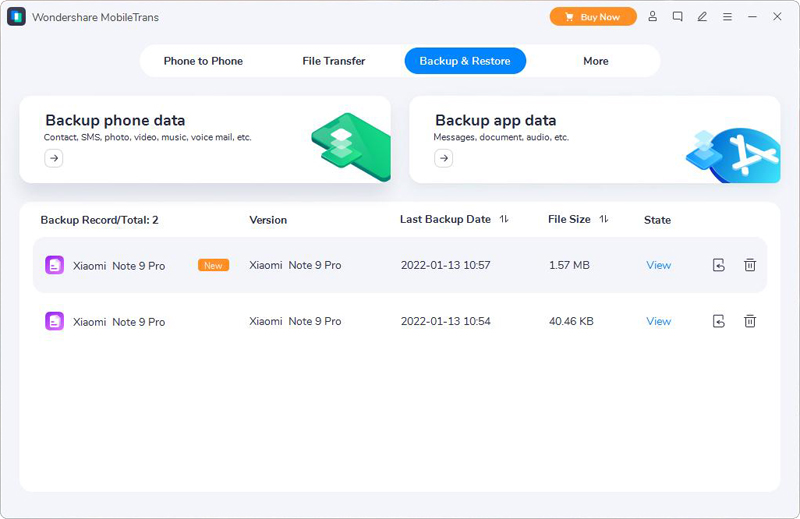
Step 2. Now, all the previous backup files will be loaded, please choose the one as needed and click the "Restore" button following it.
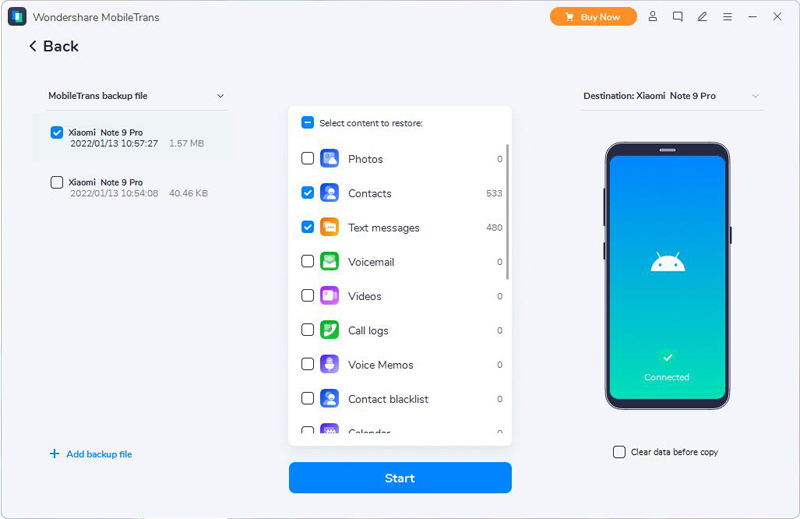
Step 3. Connect your ZTE Axon 40 Pro/40 Ultra to computer using a USB cable, then select the required files, and click on "Start" to begin moving them to your ZTE Axon 40 Pro/40 Ultra.
Part 4 Directly Recover Data on ZTE Axon 40 Pro/40 Ultra without Backup
If you have mastered the above data transfer methods, then I will continue to talk about data recovery. In the era when smart phones almost replace computers, more data are stored in our smart phones. However, these precious or extra data consume our mobile phone memory to some extent, which makes the mobile phone run slowly. In order to reduce the load of our mobile phones, the most common way for users is to use some data cleaning tools to clean the data cache or empty the recycle bin. Although this method is very time-saving and labor-saving, it will also easily lead to some important data being deleted by mistake. So can the mistakenly deleted data be recovered? Sure! If you want to recover the lost data on ZTE Axon 40 Pro/40 Ultra without backup files, Android Data Recovery software is your best choice.
As the name implies, Android Data Recovery software is applicable to almost any Android brand smartphones and tablets. Moreover, it can recover almost any lost data with the blessing of the strongest data compatibility in the industry. Before it is too late, please follow our tutorial and learn how to use it.
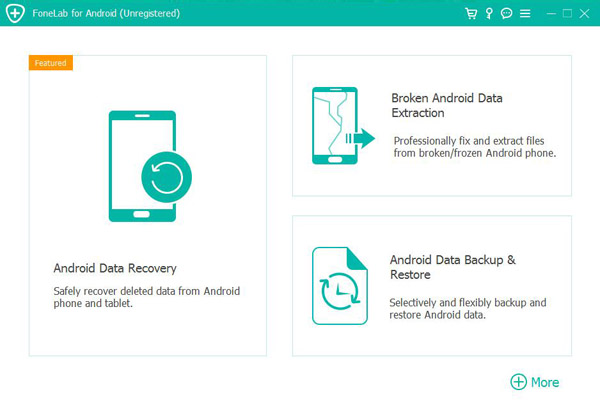
Step 1: Run the Android Data Recovery, and then tap on "Android Data Recovery" mode on its homepage.
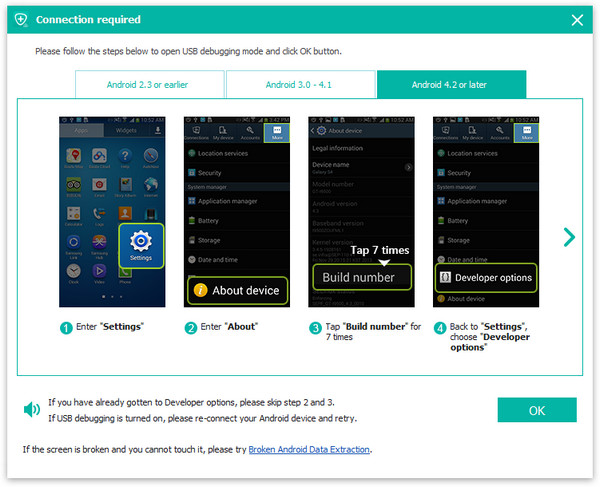
Step 2: Connect the ZTE Axon 40 Pro/40 Ultra to the computer using a USB cable. The software will automatically detect your device. If you failed to connect the device to your computer, please follow the on-screen prompts to get more helps.
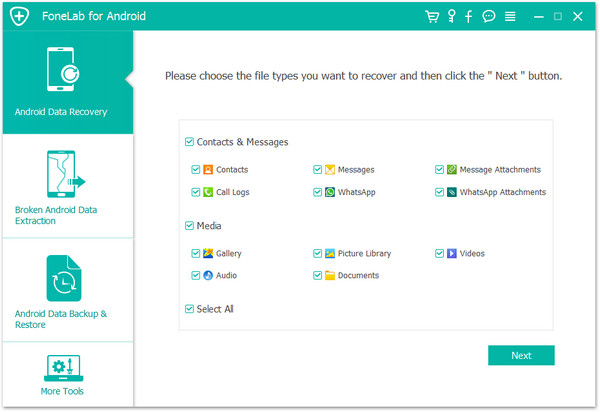
Step 3: Wait for your device to recognize, select the file types that you wish to scan, and then tap the "Next" button to scan your phone for the lost contents under the Standard Scan mode.
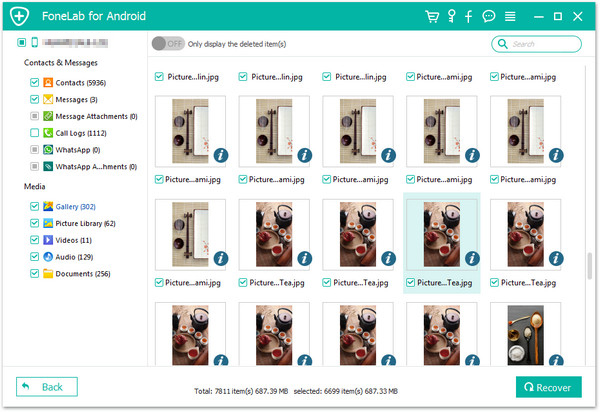
Step 4: Once the scan is finished, all the scanning result will be displayed. You can click to preview all the scanning result and select the data you need to restore, then click on "Recover" to begin restoring them back to your ZTE Axon 40 Pro/40 Ultra.
Tip: If you can not find the required files from the scan result, please don't worry, just click the "Deep Scan" button to rescan your phone, which will find more lost data. There is no doubt that this will take more time. Please be patient.
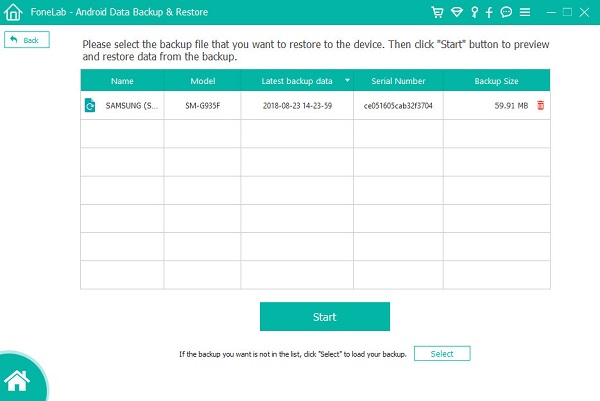
Part 5 Restore Data from Backup to ZTE Axon 40 Pro/40 Ultra
Today's data processing software is very user-friendly and comprehensive. If you have previously used Android Data Recovery software to back up your mobile phone data, you can easily extract and recover the required data from the backup files.
Step 1. Launch the Android Data Recovery software, then click on "Restore from Backups" and connect your ZTE Axon 40 Pro or ZTE Axon 40 Ultra to computer via its USB cable.
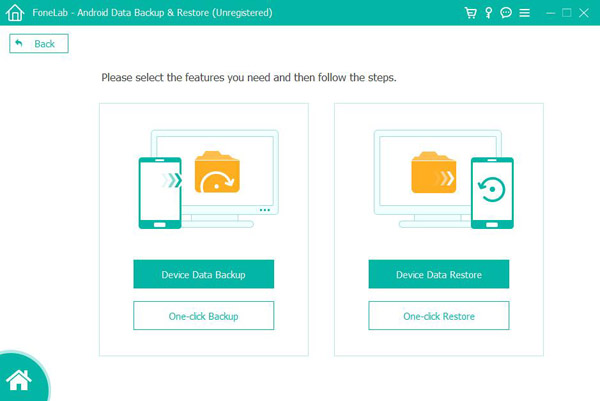
Step 2. When your phone is detected, choose the "Device Data Restore" option among all the items. If you want to restore the whole backup, you can also choose the "One-click Restore" option here.
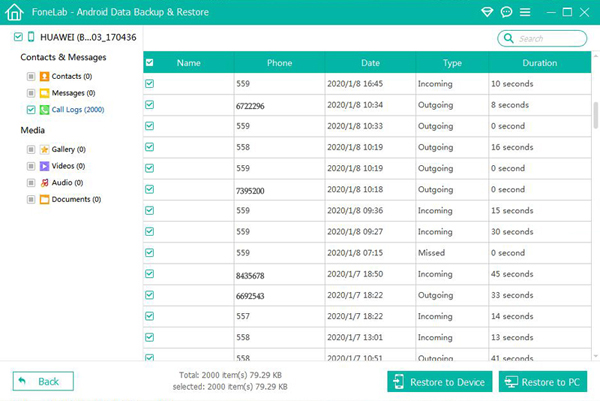
Step 3. Choose a backup file from the list and click on "Start" to begin to extract the data that can be restored from the selected backup file.
Step 4. Wait for all the files have been extracted, select the required files, then click on "Restore to Device" to save them back to your ZTE Axon 40 Pro/40 Ultra, or click on "Restore to PC" to save them back to your computer.